How to create a Face Detection Android App using Machine Learning KIT on Firebase (original) (raw)
Last Updated : 27 Sep, 2025
**Pre-requisites:
Firebase ML KIT aims to make machine learning more accessible, by providing a range of pre-trained models that can use in the iOS and Android apps. Let's use ML Kit’s Face Detection API which will identify faces in photos. By the end of this article, we’ll have an app that can identify faces in an image, and then display information about these faces, such as whether the person is smiling, or has their eyes closed with wonderful GUI.
Approach
**Step 1: Create a New Project
- Open a **new project in android studio with whatever name you want.
- We are gonna work with **empty activity for the particular project.
- The minimum **SDK required for this particular project is **23, so choose any API of 23 or above.
- The language used for this project would be **JAVA.
- Leave all the options other than those mentioned above, untouched.
- Click on **FINISH.
**Step 2: Connect with ML KIT on Firebase.
- Login or signup on **Firebase.
- In Firebase console, create a **new project or if you wanna work with an existing project then open that.
- **Name the project as per your choice.
- Go to **Docs.
- Click on Firebase ML, and in the left space, choose '**recognize text' under Vision.
- Go through the steps mentioned for better understanding.
- Come back to Android Studio.
- Go to **Tools -> Firebase -> Analytics -> Connect with Firebase -> Choose your project from the dialog box appeared -> Click Connect. (This step connects your android app to the Firebase)
**Step 3: Custom Assets and Gradle
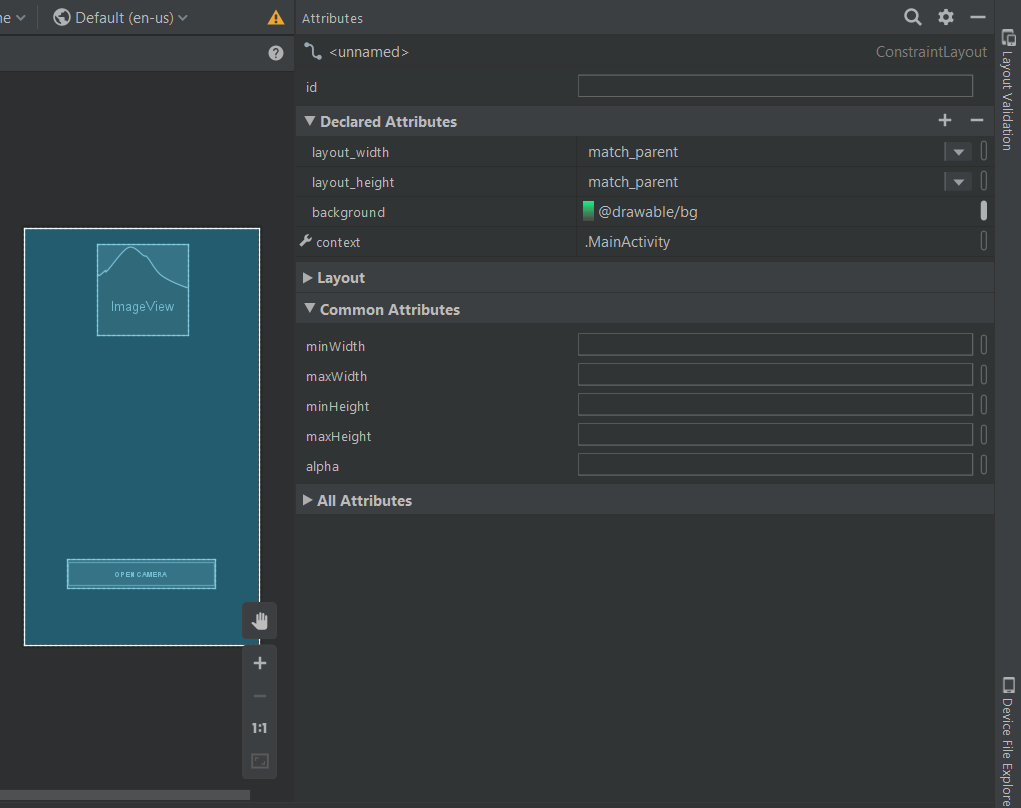
- For enhancing the GUI either choose an image of .png format and add it in the res folder and set it as the background of main .xml file, or set a background color by going to the design view of the layout and customizing background under **Declared Attributesas shown below:
- To, include the ML KIT dependencies, in the app, go to **Gradle Script -> build.gradle(Module:app) and add an implementation mentioned below:
implementation 'com.google.firebase:firebase-ml-vision:17.0.0'
- Now copy the below-mentioned text, and paste it at the very end of the app level Gradle, outside all the brackets as shown in the image below.
apply plugin: 'com.google.gms.google-services'

- Next, go to **build.gradle (project) and copy the below-mentioned text, and paste it in '**dependencies' classpath as shown in the image below.
classpath 'com.google.gms:google-services:4.2.0'

- Click on **sync now.
**Step 4: Designing the UI
- Below is the code for the basic XML file. Add a Button to open the camera option. XML `
<androidx.constraintlayout.widget.ConstraintLayout tools:context=".MainActivity" android:layout_height="match_parent" android:layout_width="match_parent" xmlns:tools="http://schemas.android.com/tools" xmlns:app="http://schemas.android.com/apk/res-auto" xmlns:android="" title="undefined" rel="noopener noreferrer">http://schemas.android.com/apk/res/android">
<Button
    android:background="#000000"
    android:layout_height="wrap_content"
    android:layout_width="wrap_content"
    app:layout_constraintStart_toStartOf="parent"
    app:layout_constraintEnd_toEndOf="parent"
    app:layout_constraintBottom_toBottomOf="parent"
    android:text=CAMERA
    android:layout_marginBottom="100dp"
    android:padding="16dp"
    android:id="@+id/camera_button"/>
</androidx.constraintlayout.widget.ConstraintLayout>
`
- Now the UI will look like this.

- Now go to **layout -> new -> layout resource file -> Name: fragment_resultdialog.xml. This file has been created to customize the output screen, which will display a dialog box called Result Dialog box with a text view called Result Text with all the attributes of the detected image. Below is the XML file for the XML file created.
Advantage of Firebase ML Kit
Simplified Development: Firebase ML Kit provides pre-trained models for face detection, eliminating the need for complex machine learning expertise. This significantly reduces development time and resources.
**Additional Tips:
- Explore real-time face detection using the camera preview.
- Implement additional functionalities like face tracking or emotion recognition (requires additional ML Kit components).
- Thoroughly test your app on various devices and lighting conditions.
XML `
<androidx.constraintlayout.widget.ConstraintLayout android:layout_height="match_parent" android:layout_width="match_parent" xmlns:tools="http://schemas.android.com/tools" xmlns:app="http://schemas.android.com/apk/res-auto" xmlns:android="" title="undefined" rel="noopener noreferrer">http://schemas.android.com/apk/res/android">
<ScrollView
    android:layout_width="wrap_content"
    android:layout_height="wrap_content"
    app:layout_constraintBottom_toBottomOf="parent"
    app:layout_constraintStart_toStartOf="parent"
    app:layout_constraintTop_toTopOf="parent">


    <RelativeLayout
        android:id="@+id/relativeLayout"
        android:layout_width="match_parent"
        android:layout_height="wrap_content"
        android:layout_marginStart="20dp"
        android:layout_marginEnd="20dp"
        app:layout_constraintEnd_toEndOf="parent"
        app:layout_constraintStart_toStartOf="parent"
        app:layout_constraintTop_toTopOf="parent">

        <!--text view to display the result text
                      after reading an image-->
        <TextView
            android:id="@+id/result_text_view"
            android:layout_width="match_parent"
            android:layout_height="wrap_content"
            android:gravity="center"
            android:text="LCOFaceDetection"
            android:textColor="#000000"
            android:textSize="18sp"
            app:layout_constraintEnd_toEndOf="parent"
            app:layout_constraintStart_toStartOf="parent"
            app:layout_constraintTop_toTopOf="parent"/>

        <!--a button with text 'ok' written on it-->
        <Button
            android:id="@+id/result_ok_button"
            android:layout_width="wrap_content"
            android:layout_height="wrap_content"
            android:layout_below="@id/result_text_view"
            android:layout_centerInParent="true"
            android:layout_marginTop="20dp"
            android:layout_marginBottom="5dp"
            android:background="#75DA8B"
            android:padding="16dp"
            android:text="ok"
            app:layout_constraintEnd_toEndOf="parent"
            app:layout_constraintStart_toStartOf="parent"
            app:layout_constraintTop_toBottomOf="@+id/result_text_view"/>

    </RelativeLayout>

</ScrollView>
</androidx.constraintlayout.widget.ConstraintLayout>
`
**Step 5: Firebase App Initializer
- Create a new java class by **java -> new -> class -> Name: LCOFaceDetection.java -> superclass: Application(android.app.Application). Below is the example source code for the java class. Java `
import android.app.Application; import com.google.firebase.FirebaseApp;
public class LCOFaceDetection extends Application { public final static String RESULT_TEXT = "RESULT_TEXT"; public final static String RESULT_DIALOG = "RESULT_DIALOG";
// initializing our firebase
@Override
public void onCreate()
{
    super.onCreate();
    FirebaseApp.initializeApp(this);
}
}
`
**Step 6: Inflating the Result Dialog Box
- Create a new java class namely, **ResultDialog.java and superclass, DialogFragment, which is the java file for the **fragment_resultdialog.xml. Below is the example code for java file. Java `
import android.os.Bundle; import android.view.LayoutInflater; import android.view.View; import android.view.ViewGroup; import android.widget.Button; import android.widget.TextView; import androidx.annotation.NonNull; import androidx.annotation.Nullable; import androidx.fragment.app.DialogFragment;
public class ResultDialog extends DialogFragment { Button okBtn; TextView resultTextView;
@Nullable
@Override
public View
onCreateView(@NonNull LayoutInflater inflater,
             @Nullable ViewGroup container,
             @Nullable Bundle savedInstanceState)
{

    // importing View so as to inflate
    // the layout of our result dialog
    // using layout inflater.
    View view = inflater.inflate(
        R.layout.fragment_resultdialog, container,
        false);
    String resultText = "";

    // finding the elements by their id's.
    okBtn = view.findViewById(R.id.result_ok_button);
    resultTextView
        = view.findViewById(R.id.result_text_view);

    // To get the result text
    // after final face detection
    // and append it to the text view.
    Bundle bundle = getArguments();
    resultText = bundle.getString(
        LCOFaceDetection.RESULT_TEXT);
    resultTextView.setText(resultText);

    // Onclick listener so as
    // to make a dismissable button
    okBtn.setOnClickListener(
        new View.OnClickListener() {
            @Override
            public void onClick(View v)
            {
                dismiss();
            }
        });
    return view;
}
}
`
**Step 7: Open Camera on a Real Device and Enabling Face Detection
- Below is the example code for the **main java file.
- There is a need of **FirebaseVision and **FirebaseVisionFaceDetector classes for this.
- Here’s a list of all the settings you can configure in your face detection model.
| Setting | Description |
|---|---|
| Performance mode | FAST (default) | ACCURATEFavor speed or accuracy when detecting faces. |
| Detect landmarks | NO_LANDMARKS (default) | ALL_LANDMARKSWhether to attempt to identify facial "landmarks": eyes, ears, nose, cheeks, mouth, and so on. |
| Detect contours | NO_CONTOURS (default) | ALL_CONTOURSWhether to detect the contours of facial features. Contours are detected for only the most prominent face in an image. |
| Classify faces | NO_CLASSIFICATIONS (default) | ALL_CLASSIFICATIONSWhether or not to classify faces into categoriessuch as "smiling", and "eyes open". |
| Minimum face size | float (default: 0.1f )The minimum size, relative to the image, of faces to detect. |
| Enable face tracking | false (default) | trueWhether or not to assign faces an ID, whichcan be used to track faces across images.Note that when contour detection is enabled, only one face is detected, so face tracking doesn't produce useful results. For this reason, and to improvedetection speed, don't enable both contour detection and face tracking. |
- It is suggested to read a detailed analysis of these classes and work on the code at the Firebase ML docs for text recognition. Java `
/package whatever do not write package name here/
import androidx.annotation.NonNull; import androidx.annotation.Nullable; import androidx.appcompat.app.AppCompatActivity; import androidx.fragment.app.DialogFragment; import android.content.Intent; import android.graphics.Bitmap; import android.os.Bundle; import android.provider.MediaStore; import android.view.View; import android.widget.Button; import android.widget.Toast; import com.google.android.gms.tasks.OnFailureListener; import com.google.android.gms.tasks.OnSuccessListener; import com.google.firebase.FirebaseApp; import com.google.firebase.ml.vision.FirebaseVision; import com.google.firebase.ml.vision.common.FirebaseVisionImage; import com.google.firebase.ml.vision.common.FirebaseVisionPoint; import com.google.firebase.ml.vision.face.FirebaseVisionFace; import com.google.firebase.ml.vision.face.FirebaseVisionFaceDetector; import com.google.firebase.ml.vision.face.FirebaseVisionFaceDetectorOptions; import com.google.firebase.ml.vision.face.FirebaseVisionFaceLandmark; import java.util.List;
public class MainActivity extends AppCompatActivity { Button cameraButton;
// whenever we request for our customized permission, we
// need to declare an integer and initialize it to some
// value .
private final static int REQUEST_IMAGE_CAPTURE = 124;
FirebaseVisionImage image;
FirebaseVisionFaceDetector detector;

@Override
protected void onCreate(Bundle savedInstanceState)
{
    super.onCreate(savedInstanceState);
    setContentView(R.layout.activity_main);

    // initializing our firebase in main activity
    FirebaseApp.initializeApp(this);

    // finding the elements by their id's allotted.
    cameraButton = findViewById(R.id.camera_button);

    // setting an onclick listener to the button so as
    // to request image capture using camera
    cameraButton.setOnClickListener(
        new View.OnClickListener() {
            @Override
            public void onClick(View v)
            {

                // making a new intent for opening camera
                Intent intent = new Intent(
                    MediaStore.ACTION_IMAGE_CAPTURE);
                if (intent.resolveActivity(
                        getPackageManager())
                    != null) {
                    startActivityForResult(
                        intent, REQUEST_IMAGE_CAPTURE);
                }
                else {
                    // if the image is not captured, set
                    // a toast to display an error image.
                    Toast
                        .makeText(
                            MainActivity.this,
                            "Something went wrong",
                            Toast.LENGTH_SHORT)
                        .show();
                }
            }
        });
}

@Override
protected void onActivityResult(int requestCode,
                                int resultCode,
                                @Nullable Intent data)
{
    // after the image is captured, ML Kit provides an
    // easy way to detect faces from variety of image
    // types like Bitmap

    super.onActivityResult(requestCode, resultCode,
                           data);
    if (requestCode == REQUEST_IMAGE_CAPTURE
        && resultCode == RESULT_OK) {
        Bundle extra = data.getExtras();
        Bitmap bitmap = (Bitmap)extra.get("data");
        detectFace(bitmap);
    }
}

// If you want to configure your face detection model
// according to your needs, you can do that with a
// FirebaseVisionFaceDetectorOptions object.
private void detectFace(Bitmap bitmap)
{
    FirebaseVisionFaceDetectorOptions options
        = new FirebaseVisionFaceDetectorOptions
              .Builder()
              .setModeType(
                  FirebaseVisionFaceDetectorOptions
                      .ACCURATE_MODE)
              .setLandmarkType(
                  FirebaseVisionFaceDetectorOptions
                      .ALL_LANDMARKS)
              .setClassificationType(
                  FirebaseVisionFaceDetectorOptions
                      .ALL_CLASSIFICATIONS)
              .build();

    // we need to create a FirebaseVisionImage object
    // from the above mentioned image types(bitmap in
    // this case) and pass it to the model.
    try {
        image = FirebaseVisionImage.fromBitmap(bitmap);
        detector = FirebaseVision.getInstance()
                       .getVisionFaceDetector(options);
    }
    catch (Exception e) {
        e.printStackTrace();
    }

    // It’s time to prepare our Face Detection model.
    detector.detectInImage(image)
        .addOnSuccessListener(new OnSuccessListener<List<FirebaseVisionFace> >() {
            @Override
            // adding an onSuccess Listener, i.e, in case
            // our image is successfully detected, it will
            // append it's attribute to the result
            // textview in result dialog box.
            public void onSuccess(
                List<FirebaseVisionFace>
                    firebaseVisionFaces)
            {
                String resultText = "";
                int i = 1;
                for (FirebaseVisionFace face :
                     firebaseVisionFaces) {
                    resultText
                        = resultText
                              .concat("\nFACE NUMBER. "
                                      + i + ": ")
                              .concat(
                                  "\nSmile: "
                                  + face.getSmilingProbability()
                                        * 100
                                  + "%")
                              .concat(
                                  "\nleft eye open: "
                                  + face.getLeftEyeOpenProbability()
                                        * 100
                                  + "%")
                              .concat(
                                  "\nright eye open "
                                  + face.getRightEyeOpenProbability()
                                        * 100
                                  + "%");
                    i++;
                }

                // if no face is detected, give a toast
                // message.
                if (firebaseVisionFaces.size() == 0) {
                    Toast
                        .makeText(MainActivity.this,
                                  "NO FACE DETECT",
                                  Toast.LENGTH_SHORT)
                        .show();
                }
                else {
                    Bundle bundle = new Bundle();
                    bundle.putString(
                        LCOFaceDetection.RESULT_TEXT,
                        resultText);
                    DialogFragment resultDialog
                        = new ResultDialog();
                    resultDialog.setArguments(bundle);
                    resultDialog.setCancelable(true);
                    resultDialog.show(
                        getSupportFragmentManager(),
                        LCOFaceDetection.RESULT_DIALOG);
                }
            }
        }) // adding an onfailure listener as well if
        // something goes wrong.
        .addOnFailureListener(new OnFailureListener() {
            @Override
            public void onFailure(@NonNull Exception e)
            {
                Toast
                    .makeText(
                        MainActivity.this,
                        "Oops, Something went wrong",
                        Toast.LENGTH_SHORT)
                    .show();
            }
        });
}
}
`