Relative Layout in Android (original) (raw)
Last Updated : 23 Jul, 2025
**Relative Layout in Android is a layout that arranges its child views in relation to each other. Unlike Linear Layout, which can make element arrangement complex, RelativeLayout simplifies the process by allowing flexible and dynamic positioning. It enables you to align views relative to each other or to the edges of the parent container, making it ideal for creating more complex and responsive UI designs.
There are so many properties that are supported by relative layouts. Some of the most used properties are listed below:
- layout_alignParentTop
- layout_alignParentBottom
- layout_alignParentRight
- layout_alignParentLeft
- layout_centerHorozontal
- layout_centerVertical
- layout_above
- layout_below
Benefits of Using RelativeLayout
- **Reduces nesting: RelativeLayout avoids the need for deeply nested layouts, which can help improve the performance of the app.
- **More flexible: It allows for precise control over the layout of views and is useful in responsive designs.
**Step-by-Step Implementation
**Step 1: Create a New Project
To create a new project in Android Studio please refer to How to Create/Start a New Project in Android Studio.
**Note: that select **Java/Kotlin as the programming language.
**Step 2: Working with the activity_main.xml file
Navigate to the **app > res > layout > activity_main.xml and add the below code to that file.
**activity_main.xml:
XML `
<Button
    android:id="@+id/button1"
    android:layout_width="wrap_content"
    android:layout_height="wrap_content"
    android:layout_marginTop="35sp"
    android:text="Top Left Button"
    android:layout_alignParentLeft="true"
    android:layout_alignParentTop="true"/>

<Button
    android:id="@+id/button2"
    android:layout_width="wrap_content"
    android:layout_height="wrap_content"
    android:layout_marginTop="35sp"
    android:text="Top Right Button"
    android:layout_alignParentTop="true"
    android:layout_alignParentRight="true"/>

<Button
    android:id="@+id/button3"
    android:layout_width="wrap_content"
    android:layout_height="wrap_content"
    android:text="Bottom Left Button"
    android:layout_alignParentLeft="true"
    android:layout_alignParentBottom="true"/>

<Button
    android:id="@+id/button4"
    android:layout_width="wrap_content"
    android:layout_height="wrap_content"
    android:text="Bottom Right Button"
    android:layout_alignParentRight="true"
    android:layout_alignParentBottom="true"/>

<Button
    android:id="@+id/button5"
    android:layout_width="fill_parent"
    android:layout_height="wrap_content"
    android:text="Middle Button"
    android:layout_centerVertical="true"
    android:layout_centerHorizontal="true"/>
`
Layout:

**Step 3: Working with the **MainActivity.java file
Go to the **MainActivity.java/ MainActivity.kt file and refer to the following code. Below is the code for the **MainActivity file. There is nothing to write inside the MainActivity file.
MainActivity File:
Java `
package com.gfg.relative_layout;
import android.os.Bundle; import androidx.appcompat.app.AppCompatActivity;
public class MainActivity extends AppCompatActivity { @Override protected void onCreate(Bundle savedInstanceState) { super.onCreate(savedInstanceState); setContentView(R.layout.activity_main); } }
Kotlin
package com.gfg.relative_layout_kotlin
import android.os.Bundle import androidx.appcompat.app.AppCompatActivity
class MainActivity : AppCompatActivity() { override fun onCreate(savedInstanceState: Bundle?) { super.onCreate(savedInstanceState) setContentView(R.layout.activity_main) } }
`
**Output:
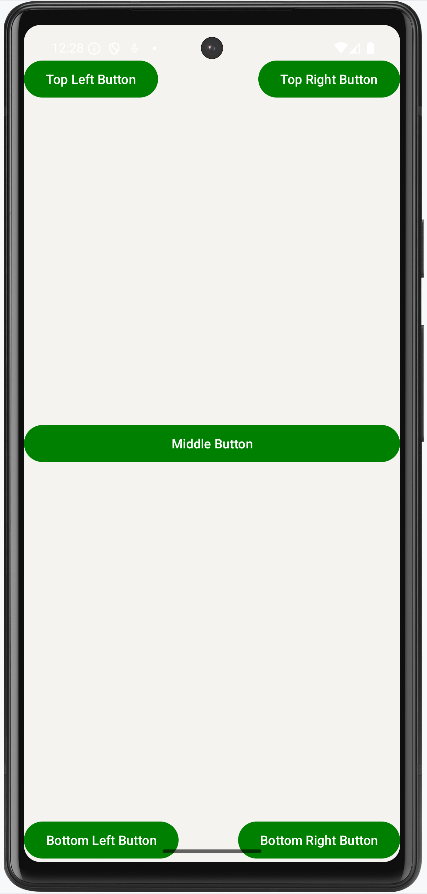
**Explanation of the above Program:
- First, we have written xml open tag which contains xml version and encoding type.
- In the next line, we have written an open tag for relative layout.
- Inside the relative layout, we have specified layout width, height, and orientation.
- Then we have created 5 buttons which are arranged at topRight, topLeft, bottonRight, bottomLeft, bottomRight, and center respectively.
- Finally, we have closed the relative layout tag.
- In the java code, there are just import statements.
- And in the main class, there is an onCreate() method. Which is used to create the activity.
- Activity is just a user interface.