ViewModel in Android Architecture Components (original) (raw)
Last Updated : 30 May, 2026
ViewModel is a Jetpack Architecture Component used to store and manage UI-related data in a lifecycle-aware manner. It helps retain data during configuration changes such as screen rotation, preventing data loss when an Activity or Fragment is recreated. By separating UI data from UI controllers, ViewModel makes Android applications more stable, maintainable, and easier to manage.
- Retains UI data during configuration changes like screen rotation.
- Separates UI logic from Activity and Fragment classes, resulting in cleaner code.
- Reduces crashes and data loss caused by Activity recreation.
Architecture of ViewModel in Android
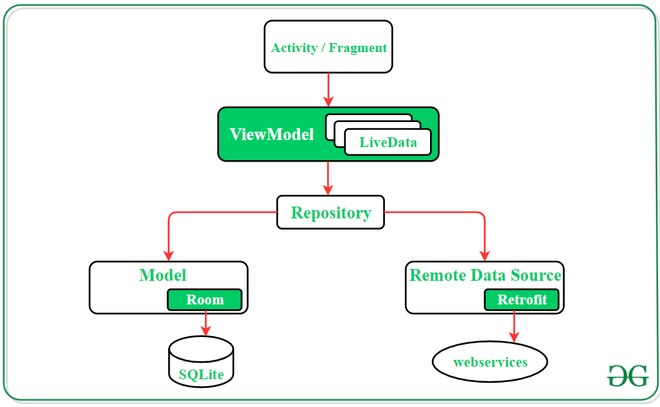
Working of ViewModel Architecture
- The Activity or Fragment requests data from the ViewModel.
- The ViewModel gets data through the Repository.
- The Repository fetches data from Room Database or Retrofit API.
- The data is returned to the ViewModel, and LiveData updates the UI automatically.
To create a ViewModel, create a separate class that extends the ViewModel class. The Activity or Fragment accesses the ViewModel using ViewModelProvider.
Example:
import androidx.lifecycle.ViewModel
class MainActivityViewModel : ViewModel() {
var number = 0
fun addOne() {
number++
}
}
**Implement ViewModel in Android App
Android Architecture Components provides the ViewModel helper class for the UI controller that is responsible for preparing data for the UI. ViewModel objects are automatically retained during configuration changes we will see that in the below example. Now let's get into the code,
**Step 1: Add these dependencies in the build.gradle file
dependencies {
implementation "androidx.lifecycle:lifecycle-viewmodel-ktx:2.8.0"
implementation "androidx.lifecycle:lifecycle-livedata-ktx:2.8.0"
implementation "androidx.lifecycle:lifecycle-runtime-ktx:2.8.0"
}

Also, add the following dependency to the **build.gradle(Module:app) file. We are adding these two dependencies because to avoid using **findViewById() in our **MainActivity.kt file. Try this out otherwise use the normal way like **findViewById().
_apply plugin: ‘kotlin-android’
_android {
buildFeatures {
viewBinding true
_}
_}

Below codes are without using ViewModel
**Step 2: Working with the activity_main.xml file
Navigate to the **app > res > layout > activity_main.xml and add the below code to that file. Below is the code for the **activity_main.xml file.
XML `
<androidx.constraintlayout.widget.ConstraintLayout xmlns:android="http://schemas.android.com/apk/res/android" xmlns:app="http://schemas.android.com/apk/res-auto" xmlns:tools="http://schemas.android.com/tools" android:layout_width="match_parent" android:layout_height="match_parent" tools:context=".MainActivity">
<TextView
    android:id="@+id/textView"
    android:layout_width="wrap_content"
    android:layout_height="wrap_content"
    android:text="0"
    app:layout_constraintBottom_toBottomOf="parent"
    app:layout_constraintEnd_toEndOf="parent"
    app:layout_constraintStart_toStartOf="parent"
    app:layout_constraintTop_toTopOf="parent"
    app:layout_constraintVertical_bias="0.369" />

<Button
    android:id="@+id/button"
    android:layout_width="wrap_content"
    android:layout_height="wrap_content"
    android:layout_marginTop="100dp"
    android:text="Click"
    app:layout_constraintBottom_toBottomOf="parent"
    app:layout_constraintEnd_toEndOf="parent"
    app:layout_constraintHorizontal_bias="0.498"
    app:layout_constraintStart_toStartOf="parent"
    app:layout_constraintTop_toBottomOf="@+id/textView"
    app:layout_constraintVertical_bias="0.0" />
</androidx.constraintlayout.widget.ConstraintLayout>
`
**Step 3: Working with the **MainActivity.kt file
Go to the **MainActivity.kt file and refer to the following code. Below is the code for the **MainActivity.kt file.
Kotlin `
import android.os.Bundle import androidx.activity.viewModels import androidx.appcompat.app.AppCompatActivity import com.example.viewmodeldemo.databinding.ActivityMainBinding
class MainActivity : AppCompatActivity() {
private lateinit var binding: ActivityMainBinding

private val viewModel: MainActivityViewModel by viewModels()

override fun onCreate(savedInstanceState: Bundle?) {
    super.onCreate(savedInstanceState)

    binding = ActivityMainBinding.inflate(layoutInflater)
    setContentView(binding.root)

    binding.textView.text = viewModel.number.toString()

    binding.button.setOnClickListener {

        viewModel.addOne()

        binding.textView.text =
            viewModel.number.toString()
    }
}
}
`
**Output:
Now just click on the button 3 to 4 times you will see the incremented number on the screen. Now just try to rotate your emulator or device.
You will see the number becomes 0, the question is why? How it erases the value by rotating the screen. Ok to get the answer we have to get some knowledge about the **Lifecycle of a ViewModel.
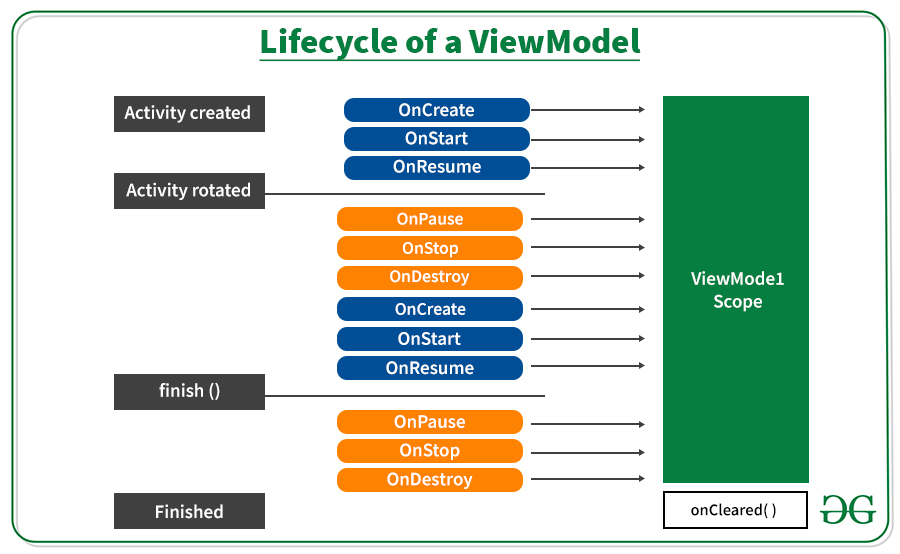
When a configuration change such as screen rotation occurs, the activity is destroyed and recreated, causing its data to be lost. To preserve data across such changes, Android provides ViewModel, which survives configuration changes and retains UI-related data. A ViewModel is typically created in onCreate() and remains available until the activity is permanently finished and destroyed.
Example with ViewModel
**Step 1: Create a Kotlin class file **MainActivityViewModel.kt. Our MainActivity class file extends the **ViewModel class.
**Refer to this article: How to Create Classes in Android Studio?
Kotlin `
import androidx.lifecycle.ViewModel
class MainActivityViewModel : ViewModel() {
var number = 0

fun addOne() {
    number++
}
}
`
**Step 2: Working with the **MainActivity.kt file
Go to the **MainActivity.kt file and update the following code. Below is the code for the **MainActivity.kt file. Comments are added inside the code to understand the code in more detail.
Kotlin `
import android.os.Bundle import androidx.appcompat.app.AppCompatActivity import androidx.lifecycle.ViewModelProvider import kotlinx.android.synthetic.main.activity_main.*
class MainActivity : AppCompatActivity() {
override fun onCreate(savedInstanceState: Bundle?) {
    super.onCreate(savedInstanceState)
    setContentView(R.layout.activity_main)

    // view model instance
    var viewModel: MainActivityViewModel = ViewModelProvider(this).get(MainActivityViewModel::class.java)

    // setting text view
    textView.text = viewModel.number.toString()

    //handling button click event
    button.setOnClickListener {
        viewModel.addOne()
        textView.text = viewModel.number.toString()
    }
}
}
`
**Output:
Even after rotating our screen, we get the same value. So that's it, this is the basic of ViewModel there are many other advanced things of view model we will cover later.
**Advantages of ViewModel Component
- Helps in data management during configuration changes
- Reduce UI bugs and crashes
- Best practice for software design