Django Class Based Views (original) (raw)
Last Updated : 15 May, 2025
Class-Based Views (CBVs) allow developers to handle HTTP requests in a structured and reusable way. With CBVs, different HTTP methods (like GET, POST) are handled as separate methods in a class, which helps with code organization and reusability.
Advantages of CBVs
- **Separation of Logic: CBVs separate different behaviors (GET, POST) into separate methods.
- **Reusable Components: Common functionality can be factored out into reusable mixins or base classes.
- **Built-in Generic Views: Django provides several built-in CBVs like CreateView, ListView, DetailView, etc., for common tasks.
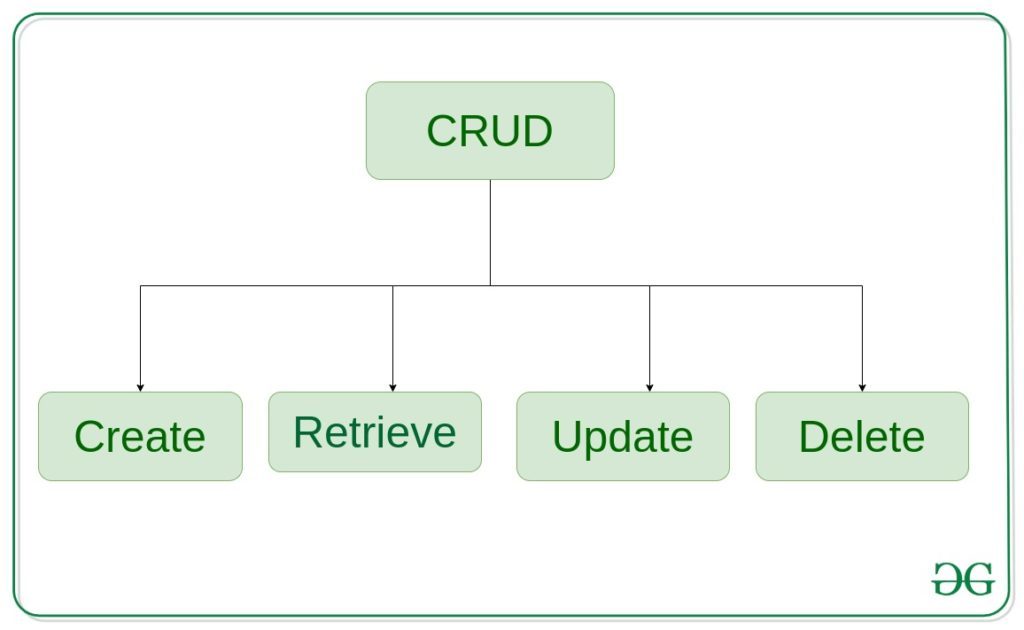
- **CreateView - create or add new entries in a table in the database.
- **Retrieve Views - read, retrieve, search, or view existing entries as a list(**ListView) or retrieve a particular entry in detail (**DetailView)
- **UpdateView - update or edit existing entries in a table in the database
- **DeleteView - delete, deactivate, or remove existing entries in a table in the database
- **FormView - render a form to template and handle data entered by user
Django Class Based Views CRUD Operations
Illustration of **How to create and use CRUD views using an example, consider a project named "geeksforgeeks" having an app named "geeks".
Refer to the following articles to check how to create a project and an app in Django.
Let’s now see how to implement CRUD operations using CBVs in Django.
Step 1: Define the Model
The first step is to define the model in Django. For our example, let’s create a model named GeeksModel to store the title and description of a record.
In **geeks/models.py:
Python `
from django.db import models
class GeeksModel(models.Model):
title = models.CharField(max_length = 200)
description = models.TextField()

def __str__(self):
    return self.title
`
**Explanation:
- **title: A CharField for the title of the record.
- **description: A TextField for the description of the record.
Run the following commands to create and apply database migrations:
Python manage.py makemigrations
Python manage.py migrate
Step 2: Create a ModelForm
To make it easier to create and update GeeksModel instances, let’s create a ModelForm. This form automatically generates a form for the model’s fields.
In **geeks/forms.py:
Python `
from django import forms from .models import GeeksModel
class GeeksForm(forms.ModelForm):
class Meta:
    model = GeeksModel
    fields = ["title", "description",]
`
**Explanation:
- **GeeksForm: A form class that generates a form for GeeksModel with fields title and description
Step 3: Create Class-Based Views
CreateView (For Creating Entries)
The CreateView class-based view provides the functionality to create new database records. We will use it to add new GeeksModel entries.
In **geeks/views.py:
Python `
from django.views.generic.edit import CreateView from .models import GeeksModel
class GeeksCreate(CreateView): model = GeeksModel fields = ['title', 'description'] template_name = 'geeks/geeksmodel_form.html' success_url = '/'
`
**Explanation:
- **model: Specifies the model that the view will work with.
- **fields: Specifies the fields that will be displayed on the form.
- **template_name: Points to the HTML template where the form will be rendered.
- **success_url: Defines the URL to redirect to after successfully creating a new entry.
reate the corresponding template **geeks/geeksmodel_form.html:
HTML `
{% csrf_token %} {{ form.as_p }}`
**URL Mapping: In geeks/urls.py, map the **GeeksCreate view:
Python `
from django.urls import path from .views import GeeksCreate
urlpatterns = [ path('create/', GeeksCreate.as_view(), name='geeks_create'), ]
`
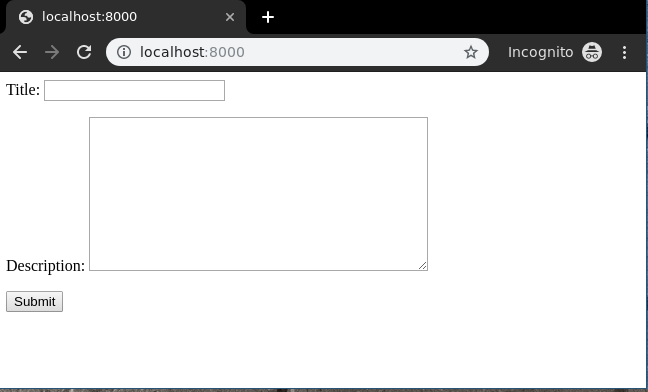
Let's check what is there on "http://localhost:8000/"
To check complete implementation of Class based CreateView, visit Createview – Class Based Views Django.
ListView (For Retrieving Multiple Entries)
The ListView class-based view is used to retrieve and display a list of records.
In **geeks/views.py:
Python `
from django.views.generic.list import ListView from .models import GeeksModel
class GeeksList(ListView): model = GeeksModel template_name = 'geeks/geeksmodel_list.html' context_object_name = 'geeks_list'
`
Create the corresponding template geeks/geeksmodel_list.html:
HTML `
-
{% for object in object_list %}
- {{ object.title }}
- {{ object.description }}
<hr/>
<!-- If object_list is empty  -->
{% empty %}
<li>No objects yet.</li>
{% endfor %}
`
**URL Mapping: In geeks/urls.py, map the **GeeksList view:
Python `
from django.urls import path from .views import GeeksList
urlpatterns = [ path('', GeeksList.as_view(), name='geeks_list'), ]
`
Let's check what is there on "http://localhost:8000/"

To check complete implementation of Class based ListView, visit ListView – Class Based Views Django
DetailView (For Retrieving a Single Entry)
The DetailView is used to display detailed information about a single record.
In **geeks/views.py:
Python `
from django.views.generic.detail import DetailView
from .models import GeeksModel
class GeeksDetailView(DetailView): # specify the model to use model = GeeksModel
`
Now create a url path to map the view. In geeks/urls.py,
Python `
from django.urls import path
importing views from views..py
from .views import GeeksDetailView urlpatterns = [ # is identification for id field, # slug can also be used path('/', GeeksDetailView.as_view()), ]
`
Create a template in templates/geeks/geeksmodel_detail.html,
HTML `
{{ object.title }}
{{ object.description }}
`
Let's check what is there on "http://localhost:8000/1/"

To check complete implementation of Class based DetailView, visit DetailView – Class Based Views Django
UpdateView (For Updating Entries)
The UpdateView allows you to edit an existing record.
In **geeks/views.py:
Python `
from django.views.generic.edit import UpdateView
from .models import GeeksModel
class GeeksUpdateView(UpdateView): model = GeeksModel
fields = [
    "title",
    "description"
]

success_url ="/"
`
Now create a url path to map the view. In geeks/urls.py,
Python `
from django.urls import path
from .views import GeeksUpdateView urlpatterns = [ path('/update', GeeksUpdateView.as_view()), ]
`
Create a template in templates/geeks/geeksmodel_form.html,
HTML `
{% csrf_token %} {{ form.as_p }}`
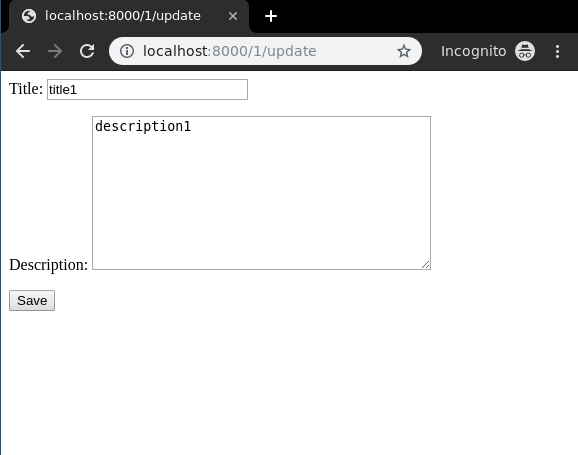
Let's check what is there on "http://localhost:8000/1/update/"
To check complete implementation of Class based UpdateView, visit UpdateView – Class Based Views Django.
DeleteView (For Deleting Entries)
The DeleteView allows you to delete a record from the database.
In **geeks/views.py:
Python `
from django.views.generic.edit import DeleteView from .models import GeeksModel
class GeeksDeleteView(DeleteView): model = GeeksModel success_url ="/"
`
Now create a url path to map the view. In geeks/urls.py,
Python `
from django.urls import path from .views import GeeksDeleteView urlpatterns = [ path('/delete/', GeeksDeleteView.as_view()), ]
`
Create a template in templates/geeks/geeksmodel_confirm_delete.html,
HTML `
{% csrf_token %}Are you sure you want to delete "{{ object }}"?
`
Let's check what is there on "http://localhost:8000/1/delete"

To check complete implementation of Class based DeleteView, visit DeleteView – Class Based Views Django
FormView (For Handling Forms)
The FormView is used to display and process forms. It provides a way to handle form submissions using CBVs.
In **geeks/views.py:
Python `
from django.views.generic.edit import FormView from .forms import GeeksForm
class GeeksFormView(FormView): form_class = GeeksForm template_name = "geeks / geeksmodel_form.html" success_url ="/thanks/"
`
Create a template for this view in geeks/geeksmodel_form.html,
HTML `
{% csrf_token %} {{ form.as_p }}`
Map a url to this view in geeks/urls.py,
Python `
from django.urls import path from .views import GeeksFormView urlpatterns = [ path('', GeeksFormView.as_view()), ]
`
Now visit "http://127.0.0.1:8000/"
To check complete implementation of Class based FormView, visit FormView – Class Based Views Django