Open Shortest Path First (OSPF) Router Roles and Configuration (original) (raw)
Last Updated : 11 Jul, 2025
Open Shortest Path First (OSPF) is a link-state routing protocol widely used in IP networks to determine the most efficient path for data transfer. It operates within a single Autonomous System (AS) and uses a hierarchical structure to manage routing. OSPF divides a large network into areas, with Area 0 being the backbone area, ensuring scalable and efficient routing in complex network topologies.
- OSPF routers are classified based on their roles, such as the Designated Router (DR), Backup Designated Router (BDR), and non-DR routers.
- The DR and BDR reduce the number of adjacencies in a network, thereby optimizing routing by limiting the number of OSPF Hello packets exchanged.
- Configuration of OSPF routers involves setting up network interfaces, router IDs, and OSPF areas to determine how routers interact and share routing information.
- OSPF's use of cost as its metric allows for efficient route selection based on link bandwidth, making it ideal for larger and more dynamic networks.
**Open Shortest Path First (OSPF) Router Roles
In OSPF, an area is a collection of contiguous networks and routers that share a common topology table and Area ID. Each router can belong to one or more areas, with the Area ID being associated with the router’s interface. This structure helps in managing large networks efficiently.

OSPF Network Topology
OSPF routers perform different roles within these areas to optimize routing:
Internal Router
- An Internal Router is a router that operates entirely within a single OSPF area. It only exchanges routing information within that area and does not participate in routing between areas.
- Internal routers have interfaces that are solely part of one area. They only maintain the OSPF topology table for the area they belong to and do not handle inter-area routing. Their primary function is to manage routing within the same OSPF area.
Backbone Router
- A Backbone Router is responsible for connecting multiple OSPF areas to the backbone area (Area 0). It plays a critical role in ensuring communication between routers in different OSPF areas.
- Backbone routers aggregate and summarize routes between areas, helping optimize the routing process by reducing the size of routing tables and minimizing unnecessary route advertisements across the OSPF network.
Area Border Router (ABR)
An Area Border Router (ABR) is a router that connects multiple OSPF areas, including the backbone area (Area 0). ABRs perform the essential function of distributing routing information between areas and managing the exchange of routing data. These routers also summarize inter-area routes to prevent excessive route advertisements and keep OSPF routing tables efficient.
Autonomous System Boundary Router (ASBR)
- An ASBR is a router that connects an OSPF Autonomous System (AS) to external networks, such as other routing protocols like EIGRP or BGP. It plays a pivotal role in integrating OSPF with external routing environments.
- ASBRs redistribute external routes into the OSPF network, allowing OSPF routers to become aware of routes from other routing protocols. This ensures that OSPF can route data efficiently even when external networks are involved.
**Note: A router can be backbone router and Area Boundary Router at the same time i.e a router can perform more than one role at a time.
**Open Shortest Path First (OSPF) Configuration Steps
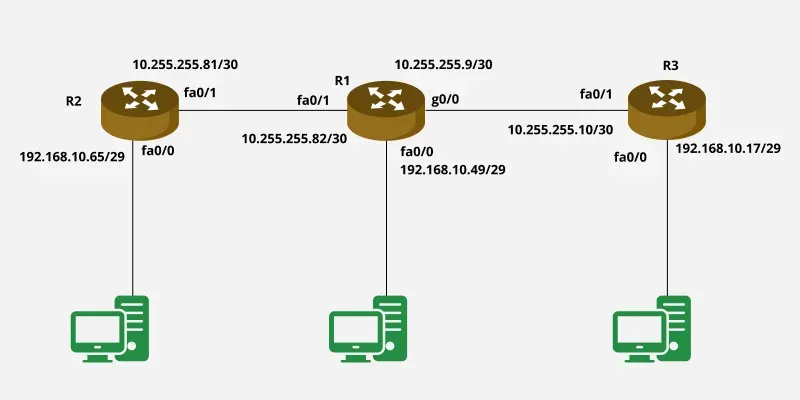
Configuring Open Shortest Path First (OSPF) on routers involves a few essential steps to ensure that routing information is correctly exchanged and that OSPF functions efficiently within the network. Below is the step-by-step guide to configuring OSPF based on a small topology with three routers, R1, R2, and R3.
OSPF Configuration
Step 1: Enable OSPF and Assign a Process ID
First, enable OSPF on each router and assign a process ID. The process ID is locally significant and does not need to match on other routers.
**For R1:
R1(config)# router ospf 1
Step 2: Define OSPF Networks and Areas
Next, define the networks to be advertised by OSPF and assign them to the correct areas. The network command is used, followed by the network address, wildcard mask, and the OSPF area ID.
**For R1:
R1(config-router)# network 192.168.10.48 0.0.0.7 area 1
R1(config-router)# network 10.255.255.80 0.0.0.3 area 1
R1(config-router)# network 10.255.255.8 0.0.0.3 area 1
Repeat similar steps for R2 and R3, ensuring to assign the correct networks and area IDs based on their interfaces.
**For R2:
R2(config)# router ospf 1
R2(config-router)# network 192.168.10.64 0.0.0.7 area 1
R2(config-router)# network 10.255.255.80 0.0.0.3 area 1
**For R3:
R3(config)# router ospf 1
R3(config-router)# network 192.168.10.16 0.0.0.7 area 1
R3(config-router)# network 10.255.255.8 0.0.0.3 area 1
Step 3: Verify Configuration
Once OSPF has been configured on all routers, verify the OSPF settings using the following command on R3 (or any router):
R3# show ip protocols
Step 4: Optional - Configure OSPF Router ID
To uniquely identify the router within the OSPF domain, configure a router ID manually. If not set, OSPF uses the highest IP address of the active interfaces.
**For R1:
R1(config-router)# router-id 1.1.1.1
Step 5: Fine-Tune OSPF Settings (Optional)
You can also fine-tune OSPF settings such as adjusting OSPF timers, modifying link costs, and setting up authentication for better performance and security.