Privacy Enhanced Mail (PEM) (original) (raw)
Last Updated : 18 May, 2026
PEM (Privacy Enhanced Mail) is an email security standard developed to protect electronic communications from unauthorized access and tampering. It combines cryptographic techniques with encoding methods to ensure that email messages remain secure, authentic and reliable during transmission. Although PEM is largely outdated today, its security principles are still used in modern protocols such as S/MIME and PGP/GPG.
- Uses encryption to keep email content confidential
- Applies digital signatures to verify sender identity
- Uses hashing algorithms to detect message modification
- Encodes binary data using Base64 for email compatibility
- Forms the foundation of modern secure email technologies
Security Services Provided by PEM
Common Security Services Provided by Privacy Enhanced Mail.
- **Confidentiality: Confidentiality ensures that unauthorized users cannot read email contents. PEM achieves confidentiality by encrypting email messages using symmetric encryption algorithms such as: DES (Data Encryption Standard).
- **Integrity: Integrity ensures that the message is not modified during transmission. PEM uses cryptographichash functions such as: MD2, MD5, SHA-256 (modern implementation).
- **Authentication: Authentication confirms the identity of the sender. PEM uses digital signatures created with: RSA public-key cryptography.
- **Non-Repudiation: Non-repudiation prevents the sender from denying that they sent the message.
Working of Privacy Enhanced Mail
PEM operates through four major phases.
Step 1: Canonical Conversion
Before encryption or signing, the email is converted into a standard format. This process is necessary because different operating systems handle text differently: Windows uses CRLF, Linux uses LF, Older systems may use different formats.
- Prevent hash mismatches.
- Ensure interoperability.
- Standardize message formatting.
Step 2: Digital Signature Generation
The sender creates a digital signature to prove authenticity. This ensures: Authentication, Integrity, Non-repudiation.
- Generate a message digest using a hash algorithm.
- Encrypt the digest using the sender’s private key.
- Attach the digital signature to the email.
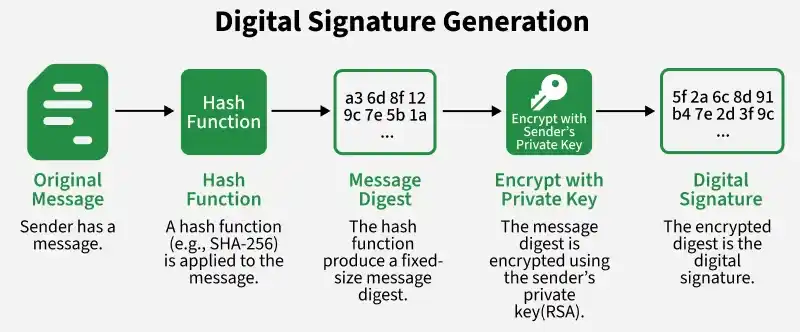
Digital Signature Generation.
Step 3: Message Encryption
The original message and signature are encrypted together using a symmetric encryption algorithm. This hybrid encryption approach combines: Fast symmetric encryption, Secure public-key encryption.
- Generate a random session key.
- Encrypt the email content using the session key.
- Encrypt the session key using the receiver’s public key.
- Attach the encrypted session key to the email.
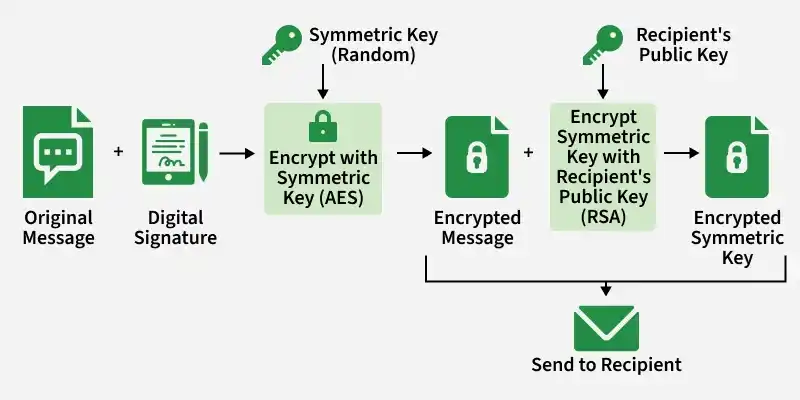
Message Encryption
Step 4: Base64 Encoding
Email systems originally supported only ASCII text. Encrypted data contains binary information that may not travel safely through email servers. PEM converts binary data into Base64 text encoding.
- 24-bit binary blocks are divided into: Four 6-bit groups.
- Each group maps to a Base64 character.
- Output becomes email-safe ASCII text.
Simulating PEM-Like Email Security in Kali Linux
Since original PEM implementations are outdated, we can simulate PEM’s cryptographic workflow using: OpenSSL, GPG, Kali Linux.
- **Kali Linux: A virtual machine or dedicated system with OpenSSL and GPG installed (pre-installed in Kali).
- **Two Test Users: Simulate two users (e.g., gfg1 and gfg12) with email-like communication.
- **Lab Environment: Ensure you’re working in a controlled, legal setup (e.g., local VM). Do not test on real email systems without permission.
Step 1: Set Up the Environment
- Boot Kali Linux and open a terminal.
- Verify OpenSSL and GPG are installed.
**Command:
openssl version
gpg --version
**Output:
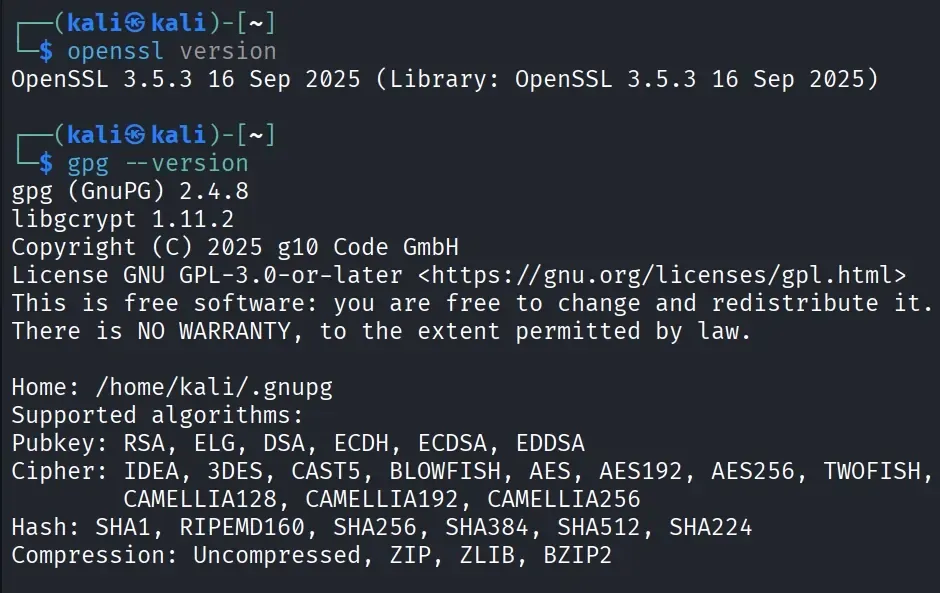
Environment SetUp
Step 2: (mkdir)Create Working Directories
These directories simulate two users communicating securely.
**Command:
mkdir gfg1
mkdir gfg2
**Output:
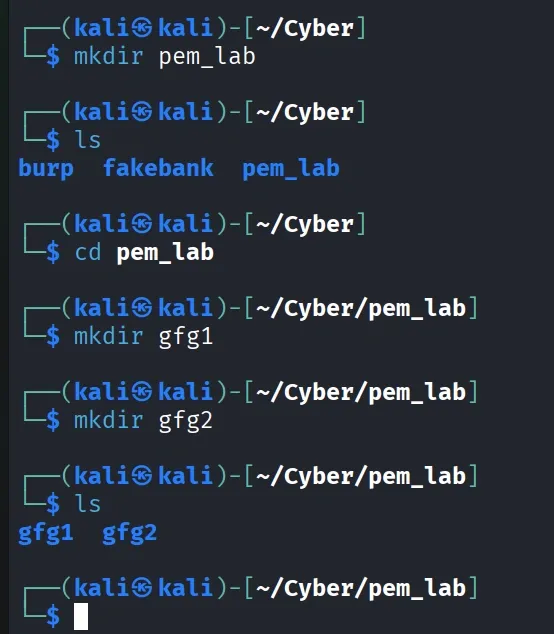
Working Directories.
Step 3. Generate RSA Key Pairs
- Create private key for gfg1 and gfg2.
- Public keys for encryption/verification.
**Command:
openssl genrsa -out gfg1_private.pem 2048
openssl genrsa -out gfg2_private.pem 2048
- Extract the public key
- Private keys for decryption/signing
**Command:
openssl rsa -in gfg1_private.pem -pubout -out gfg1_public.pem
openssl rsa -in gfg2_private.pem -pubout -out gfg2_public.pem
**Output:
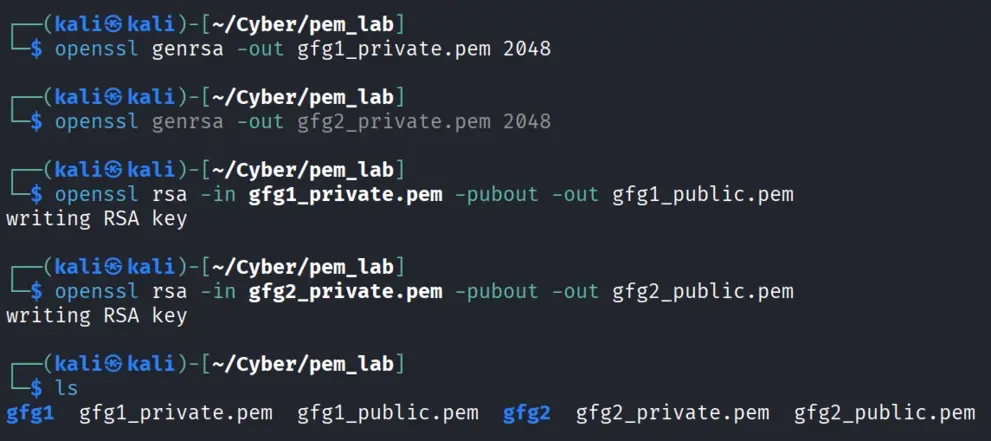
RSA Key Pairs.
Step 4: Create and Encrypt a Message
**Create a Message:
- gfg1 writes a message in a text file
**Command:
echo "Hello Everyone." > message.txt
**Generate a Symmetric Key:
- Create a random symmetric key
- This creates a random 128-bit AES key.
**Command:
openssl rand -out session_key.bin 16
**Ouptut:
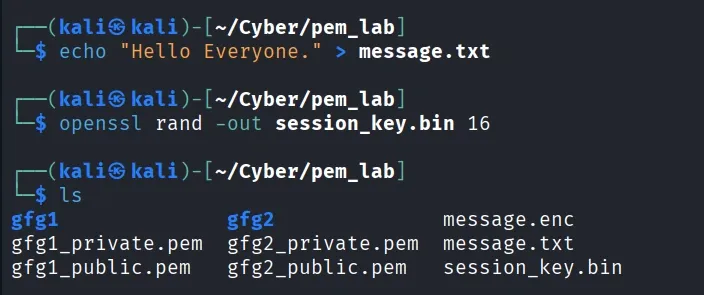
Create Message
**Encrypt the Message with the Symmetric Key:
- Encrypt message.txt using AES-128.
**Command:
openssl enc -aes-128-cbc -in message.txt -out message.enc -pass file:session_key.bin -pbkdf2
- Creates message.enc (encrypted message).
**Ouput:
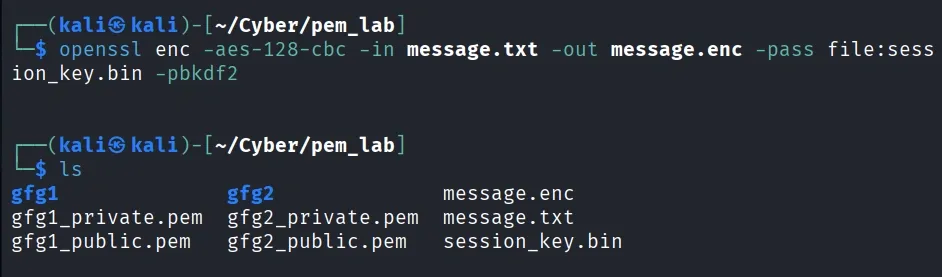
Encryption
**Encrypt the Symmetric Key with gfg2’s Public Key:
- Encrypt session_key.bin for gfg2.
**Command:
openssl pkeyut1 -encrypt -in session_key.bin -pubin -inkey gfg2_public.pem -out session_key.enc -pkeyopt rsa_padding_mode:oaep
- Creates session_key.enc, which only gfg2 can decrypt with his private key.
**Output:
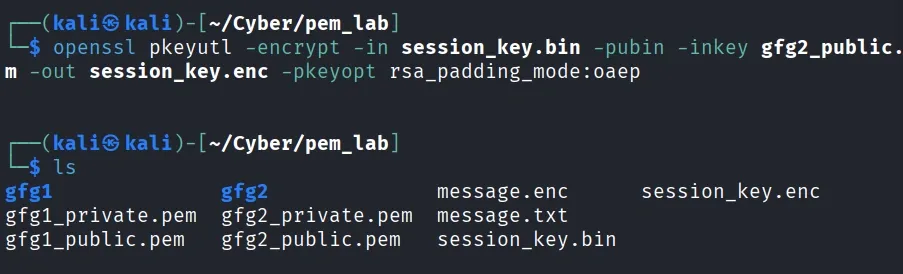
Encryption with gfg2 Public Key.
Step 5: Digitally Sign the Message
**Create a Hash of the Message:
- Generate a SHA-256 hash.
**Command:
openssl dgst -sha256 -out message.digest message.txt
**Sign the Hash with Alice’s Private Key:
- Create a digital signature.
openssl dgst -sha256 -sign gfg1_private.pem -out message.sig message.txt
**Output: Creates message.sig
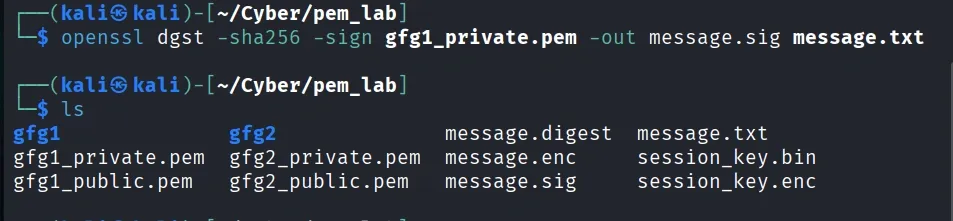
Sign The Message.
Step 6: Simulate Sending the Message
**Package Files:
- gfg1 sends gfg2 three files: message.enc , session_key.enc and message.sig (signature).
- Copy files to gfg2’s directory.
cp message.enc session_key.enc message.sig gfg2/

Simulating Sending The Message.
Step 7: gfg2 Decrypts and Verifies the Message
- gfg2 uses his private key to decrypt the session key.
**Command:
openssl pkeyutl -decrypt -in session_key.enc -inkey gfg2_private.pem -out session_key.dec -pkeyopt rsa_padding_mode:oaep
**Output: Creates session_key.dec
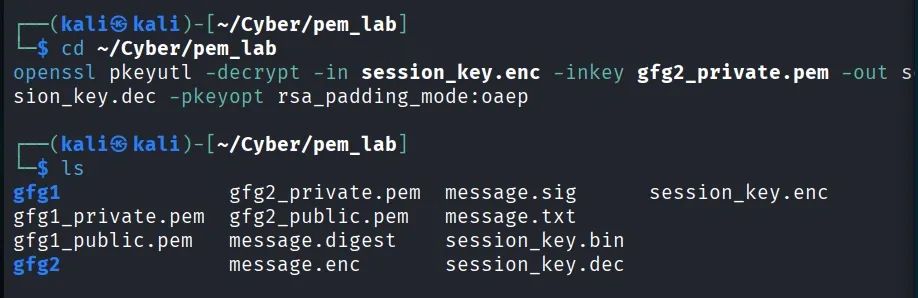
Session Key.dec
- Use the symmetric key to decrypt the message
**Command:
openssl enc -aes-128-cbc -d -in message.enc -out message.dec.txt -pass file:session_key.dec -pbkdf2
**Output:
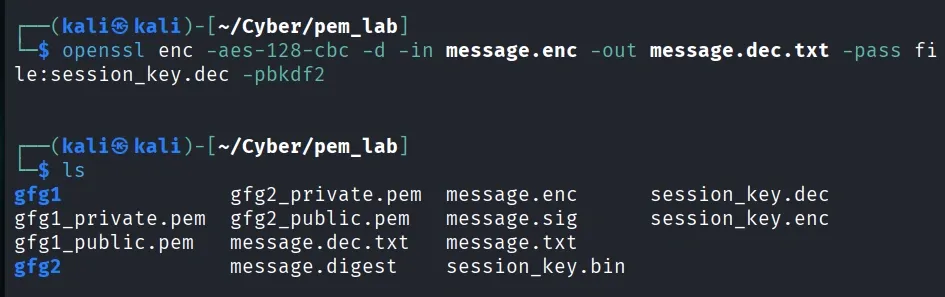
Decryption
**Verify the message’s authenticity using gfg1’s public key:
- If verification succeeds, the message is authentic and unchanged.
**Command:
openssl dgst -sha256 -binary message.txt > message.hash
openssl pkeyutl -verify -inkey gfg1_public.pem -pubin -sigfile message.sig -in message.hash
**Output:
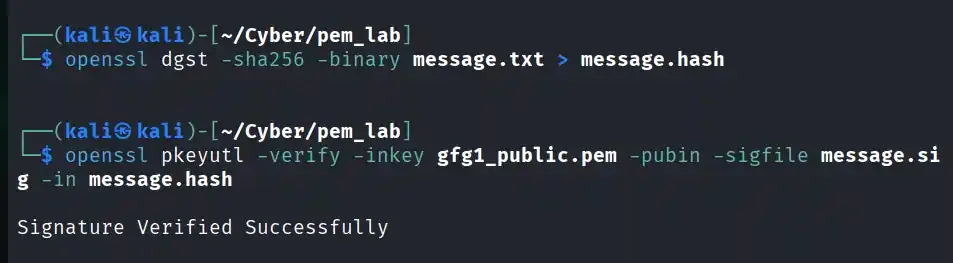
Signature Verification
Step 8: (cat) Review the PEM File Format
- Inspect a PEM file.
**Command:
cat gfg1_private.pem
**Output:
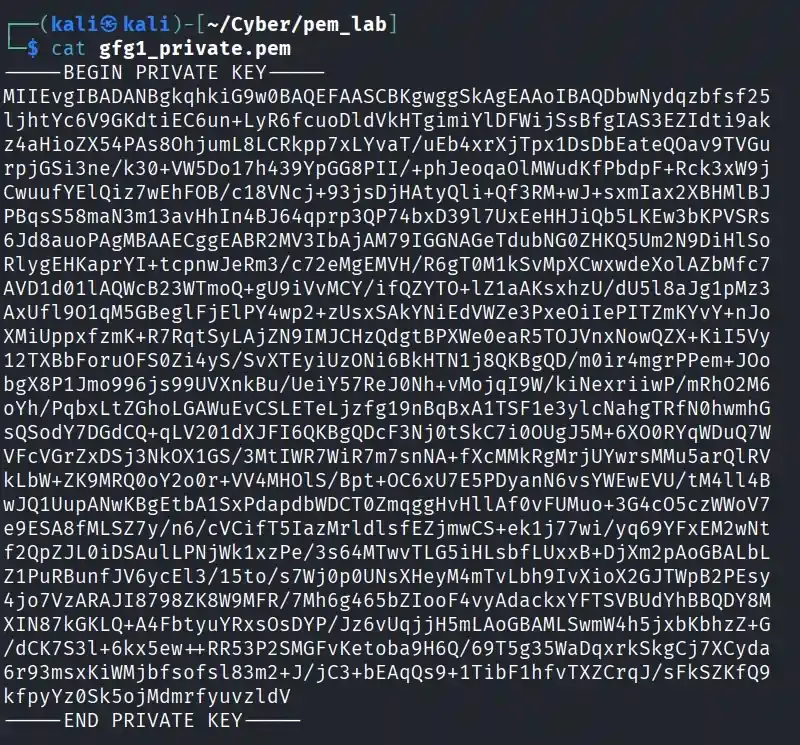
PEM File Format
- PEM files use Base64 encoding with headers/footers to store cryptographic objects, a format still used for certificates and keys today.