Creating and Deploying an Atlas Cluster in MongoDB (original) (raw)
Last Updated : 17 Feb, 2025
MongoDB Atlas is a fully-managed cloud database platform that simplifies deploying, managing, and scaling MongoDB clusters in the cloud. Whether you're a developer or a database administrator, understanding how to set up and deploy a MongoDB Atlas cluster is crucial for leveraging MongoDB’s powerful features in the cloud
In this article, We will learn about the essential steps of **creating and deploying an Atlas cluster in MongoDB, covering everything from registering your account to connecting your cloud database to MongoDB Compass.
What is MongoDB Atlas?
**MongoDB Atlas is a cloud service provided by MongoDB, Inc. that allows developers to run, manage, and scale MongoDB databases on the cloud. Atlas is a fully managed service, meaning MongoDB handles provisioning, scaling, and maintenance tasks, allowing you to focus on developing applications rather than managing infrastructure. Atlas supports cloud providers like AWS, Google Cloud, and Microsoft Azure.
There are two key types of clusters in MongoDB:
- **Replica Sets: A set of duplicate MongoDB servers maintaining copies of the same data to ensure high availability and redundancy.
- **Sharded Clusters: Data is distributed across several MongoDB servers to improve performance and handle larger datasets.
How to Setup Atlas Cluster in MongoDB
Setting up an Atlas cluster in MongoDB involves creating the cluster, configuring network access, setting up a user for authentication, and connecting to the cluster. Follow these steps to easily deploy a MongoDB instance on the cloud, ensuring scalability and high availability for your application.
1. Creating Atlas Cluster
Now, the first step in deploying a MongoDB cluster is to **create your cluster in Atlas. Let’s walk through the process:
- First, we need to go to MongoDB Atlas and register as a user.
- After that, Fill in all the mandatory or required details about yourself and the project for which you are using Atlas cloud and accept the terms & conditions then click on "**Finish".
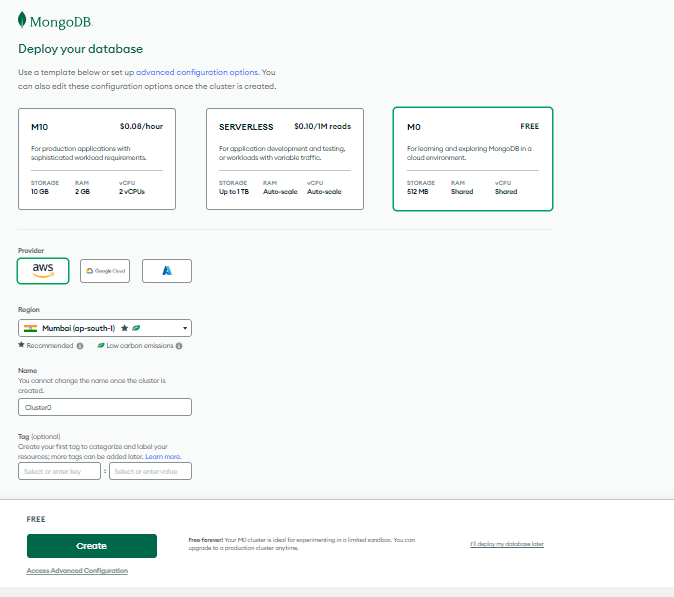
- Choose the Cloud database Tier for Cluster from the given below in the **MongoDB atlas page as per your project convenience. Now, Let's use the "**M0" Free version, and in the region select "**Mumbai" if you want to name your cluster so that you can rename it as well but by, default it will have the name "**cluster0" if you are creating for the first time then Click on "**Create".
2. Whitelisting of IP Address
Now, you will be redirected to the home page, where you will be able to see all the details about your **databases, **organizations, **projects, and other relevant information the next steps are:
- Click on "**Database" on the left panel of your screen. After that you will be able to see your created cluster by name, We have created a Cluster named "**Cluster0" you can see a button "**Connect" and then simply click on it.
-min.jpg)
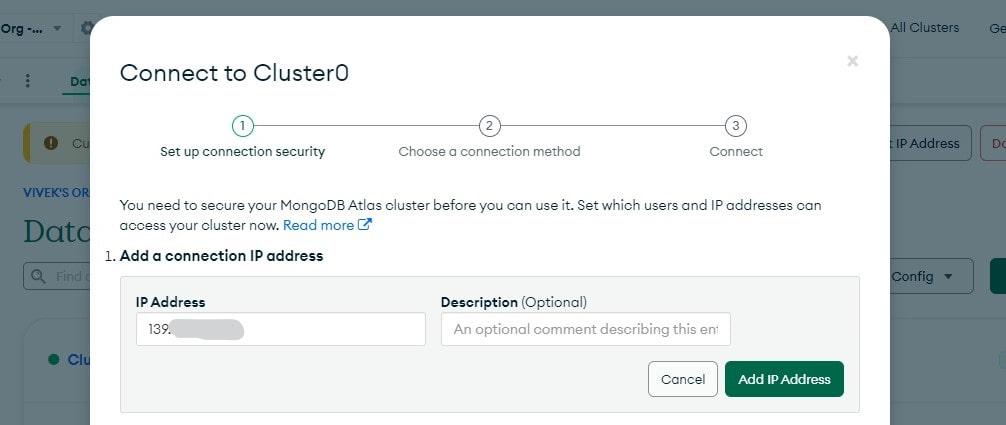
- Next, we will have to click on "**Add your Current IP Address" and it will fetch our IP Address automatically and ask you for reconfirmation.
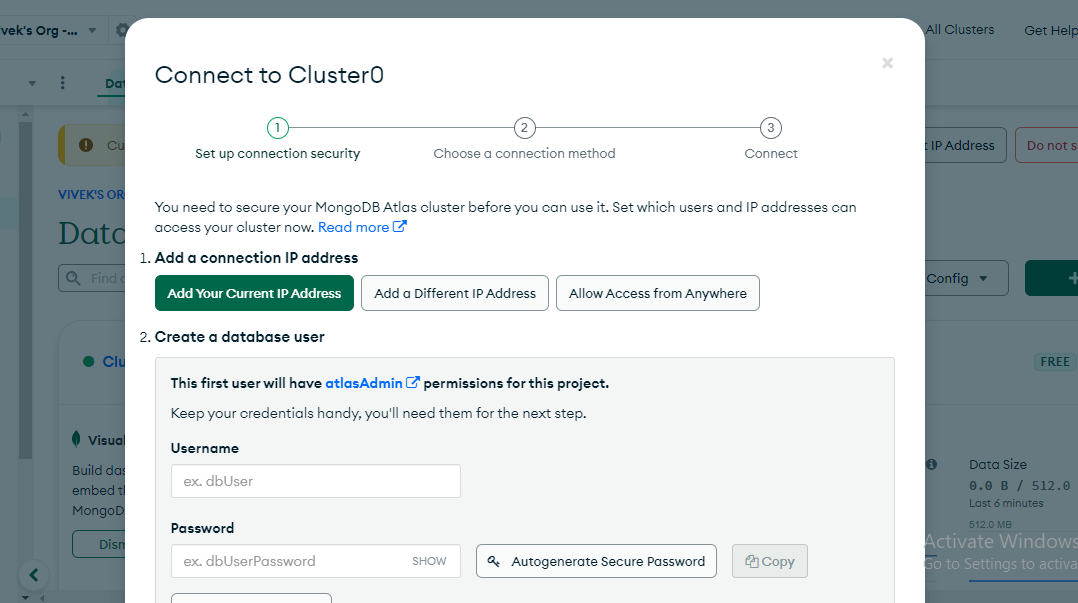
- Click on "**Add IP Address". Now, you have successfully added your current IP Address.
3. Setup a MongoDB user for your Cluster
Now, you need to create a user for your cluster So, that you can connect your Cloud database to your application. The Steps for Creating **Username and **Password for **Authentication are given below :
- On the Dashboard alongside the cluster name, you can see the "**Connect" button, then click on it.
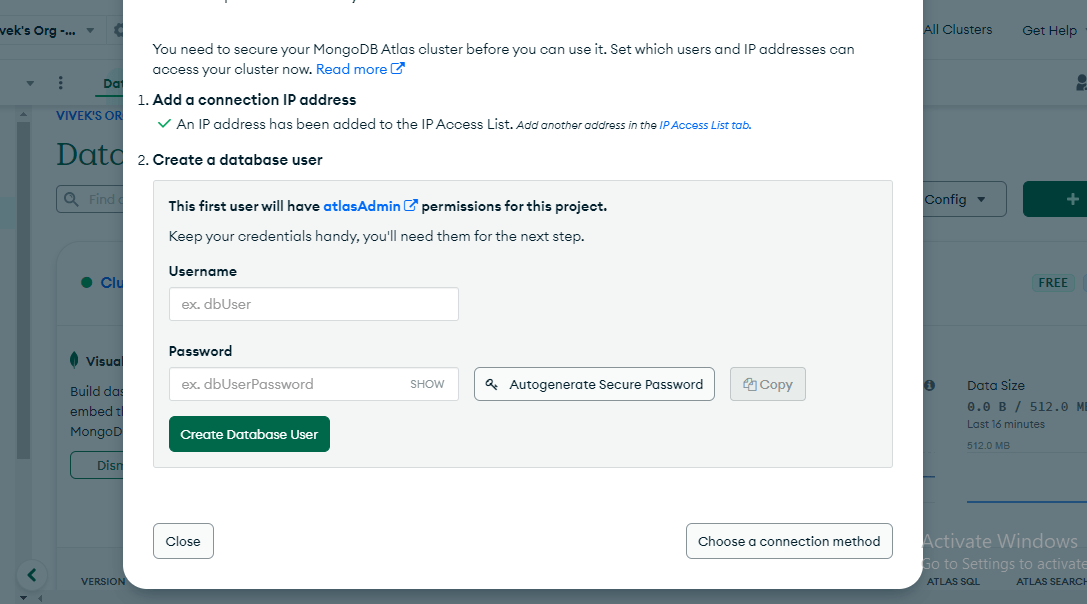
- After that you can see an option "**Create a database user", In this you can create a username and a password for the Database user and click on "**Create database user". If you don't want to create a password you can also click on "**Autogenerate secure Password" and simply copy it and save the password in your local file because you will not be able to get it again.
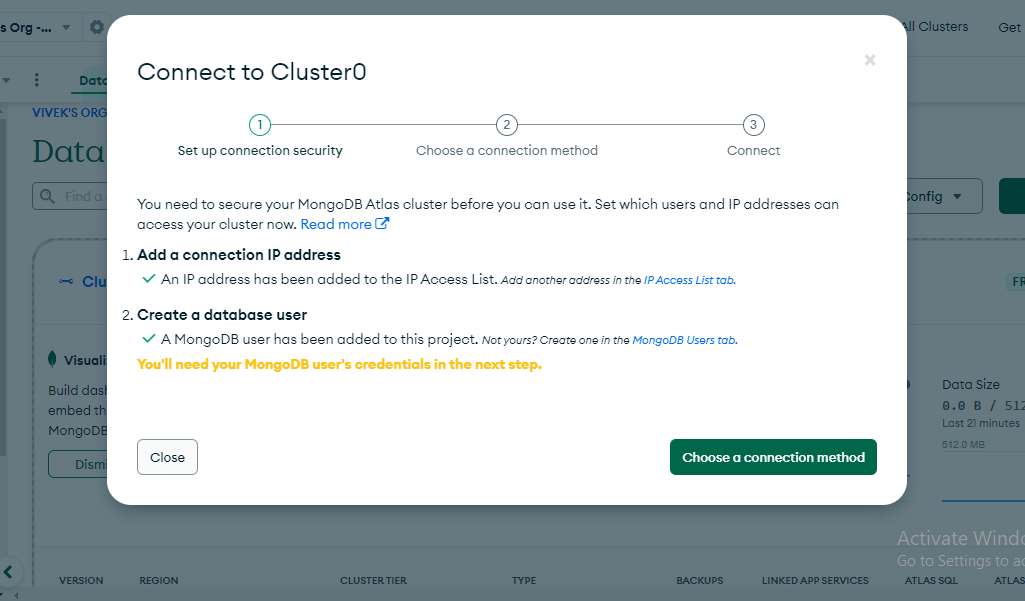
4. Connecting Atlas Cluster to MongoDB Compass
Now, The last step is to deploy or connect your Atlas cloud database. To connect, you can connect through **MongoDB Compass or **MongoDB shell. So, Connecting through MongoDB Compass is easy.
In this, we are connecting through MongoDB Compass because it is GUI based and it is very easy for a beginner to connect through MongoDB Compass.
- First, go and Download the MongoDB Compass.
- Then, Go to your MongoDB Atlas Cluster Dashboard and click on the "**Connect" Button.
- After that, Click on "**Choose a connection method" or it will automatically take you to that part if you have already completed **steps 2 and steps 3 described above in this article.
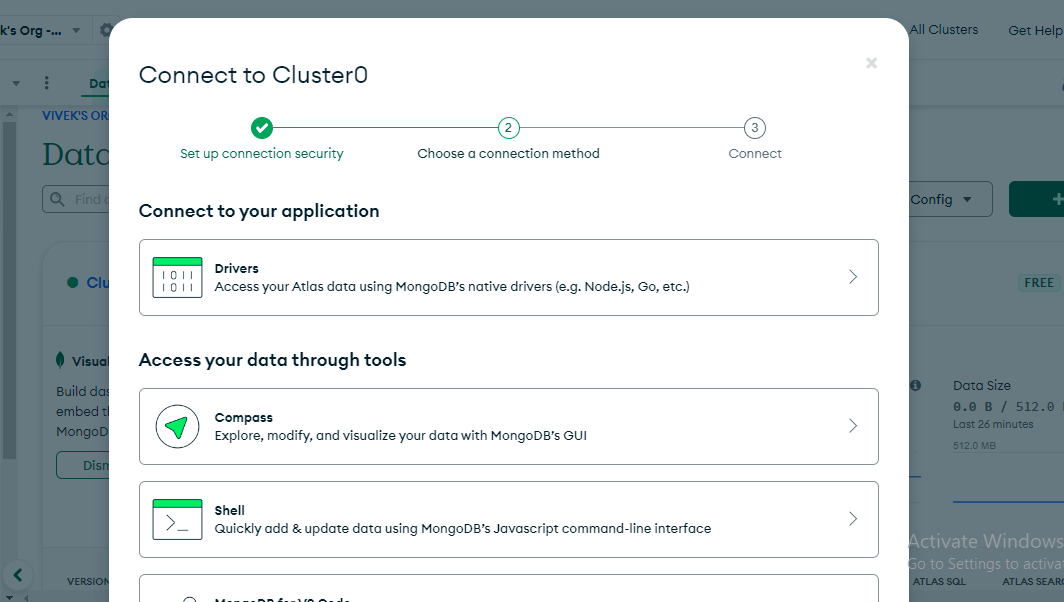
- Now, here you can click on "**Compass".
- After that click on "**I have MongoDB Compass Installed" copy the connection string and replace the password with the password you have created for the database user in **step 3.
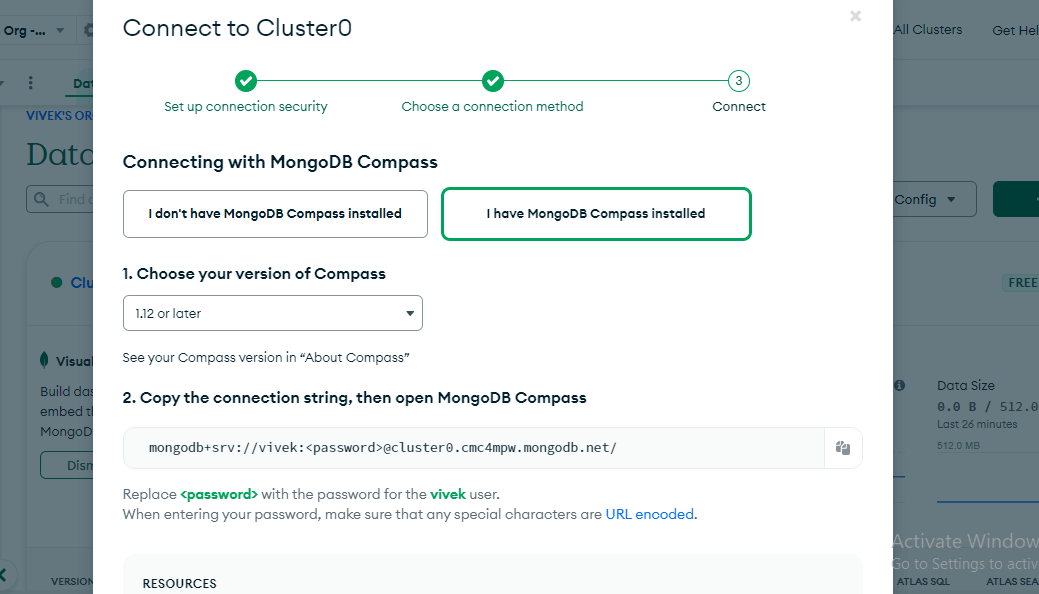
- Now, Open the MongoDB Compass Paste the connection string with your database password and, Click on "**Connect".
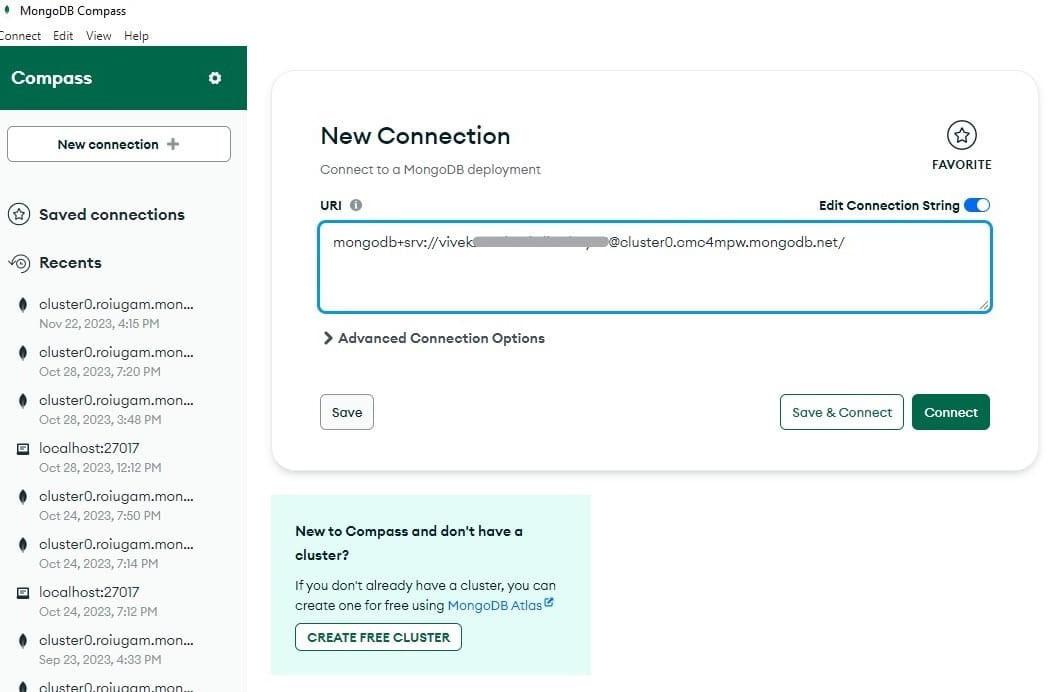
- You have been successfully connected to the cloud database.

You have successfully connected your Database with MongoDB Atlas Cluster and If you want to know more about MongoDB you can visit their official site and read the documentation.
Conclusion
Setting up an Atlas cluster in MongoDB involves several straightforward steps: creating the cluster, whitelisting your IP address, setting up a MongoDB user, and finally, connecting the cluster to MongoDB Compass. Following this guide ensures a smooth and efficient setup, enabling us to utilize MongoDB's powerful **cloud database capabilities. Whether you're working on a personal project or deploying an enterprise-grade application, MongoDB Atlas ensures that your database infrastructure is robust and easy to manage.