RAID (Redundant Arrays of Independent Disks) (original) (raw)
Last Updated : 18 Apr, 2026
RAID is a technique that combines multiple hard drives or SSDs into a single system to improve performance, data safety or both. If one drive fails, data can still be recovered from the others.
**Note: Different RAID levels offer different combinations of speed, storage capacity and fault tolerance.
RAID Works
In RAID (Redundant Array of Independent Disks), data is not stored on just one hard drive but is distributed across multiple drives.
- The data is split into small blocks (like dividing a file into chunks). These blocks are written across multiple drives in parallel.
- **Mirroring (RAID 1): Exact copy of data is kept on another drive.
- **Parity (RAID 5, RAID 6): A calculated value (parity block) is stored to allow data recovery in case of failure.
- **Fault Tolerance: If one drive fails, RAID uses the redundant data (mirror or parity) to reconstruct missing data.
**Note: This improves performance by allowing multiple drives to read/write data simultaneously.
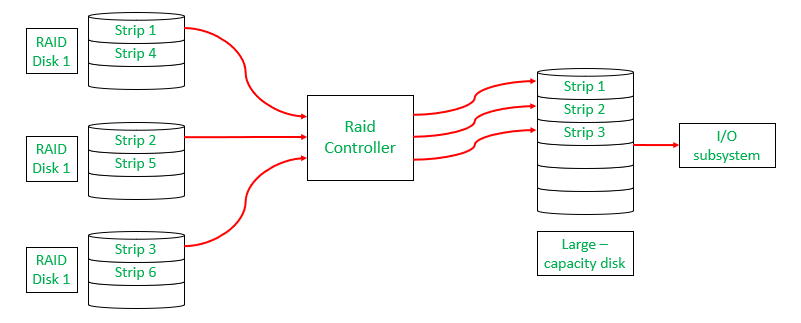
RAID Controller
A RAID controller manages multiple hard drives, making them work together as one system. It helps improve speed and adds data protection by handling drive failures. Think of it as a smart manager that boosts performance and keeps your data safe.
RAID Controller
Types of RAID Controller
There are three types of RAID controller:
**1. Hardware-Based:
Uses a dedicated physical controller to manage hard drives.
- Offers high speed and reliability
- Can work independently from the computer's processor
- Often built into the motherboard or as a separate card
- Think of it as a captain managing the drives smoothly.
**2. Software-Based:
Uses the computer’s processor and memory to manage RAID.
- No special hardware needed
- Cost-effective, but may reduce overall system performance
- Slower than hardware RAID
- Acts like a helpful assistant, but shares the load with other tasks.
**3. Firmware-Based (Fake RAID):
Built into the computer's BIOS/firmware and works during boot-up.
- Needs a driver after the OS loads
- Cheaper than hardware RAID, but still uses CPU resources
- Also known as hybrid RAID or fake RAID
- A startup helper that hands over the job to software once the system runs.
Data Redundancy
Data redundancy, although taking up extra space, adds to disk reliability. This means,
- That in case of disk failure, if the same data is also backed up onto another disk, we can retrieve the data and go on with the operation.
- On the other hand, if the data is spread across multiple disks without the RAID technique, the loss of a single disk can affect the entire data.
Key Evaluation Points for a RAID System
When evaluating a RAID system, the following critical aspects should be considered:
1. Reliability
Refers to the system's ability to tolerate disk faults and prevent data loss.
**Example:
- RAID 0 offers no fault tolerance; if one disk fails all data is lost.
- RAID 5 can tolerate one disk failure due to parity data.
- RAID 6 can handle two simultaneous disk failures.
2. Availability
The fraction of time the RAID system is operational and available for use.
**Example:
- RAID 1 (Mirroring) allows immediate data access even during a single disk failure.
- RAID 5 and 6 may degrade performance during a rebuild, but data remains available.
3. Performance
Measures how efficiently the RAID system handles data processing tasks. This includes:
- **Response Time: How quickly the system responds to data requests.
- **Throughput: The rate at which the system processes data (e.g., MB/s or IOPS).
**Key Factors:
- RAID levels affect performance differently:
- RAID 0 offers high throughput but no redundancy.
- RAID 1 improves read performance by serving data from either mirrored disk but may not improve write performance significantly.
- RAID 5/6 introduces overhead for parity calculations, affecting write speeds.
- Workload type (e.g., sequential vs. random read/write operations).
**Performance Trade-offs: Higher redundancy often comes at the cost of slower writes (due to parity calculations).
4. Capacity
The amount of usable storage available to the user after accounting for redundancy mechanisms. For a set of N disks, each with B blocks, the available capacity depends on the RAID level:
- **RAID 0: All N×B blocks are usable (no redundancy).
- **RAID 1: Usable capacity is B (only one disk's capacity due to mirroring).
- **RAID 5: Usable capacity is (N−1)×B (one disk's worth of capacity used for parity).
- **RAID 6: Usable capacity is (N−2)×B (two disks’ worth used for parity).
**Trade-offs: Higher redundancy \text{(RAID 5/6)} reduces available capacity compared to non-redundant setups (RAID 0).
Different RAID Levels
- RAID-0 (Striping)
- RAID-1 (Mirroring)
- RAID-2 (Bit-Level Striping with Dedicated Parity)
- RAID-3 (Byte-Level Striping with Dedicated Parity)
- RAID-4 (Block-Level Striping with Dedicated Parity)
- RAID-5 (Block-Level Striping with Distributed Parity)
- RAID-6 (Block-Level Striping with two Parity Bits)
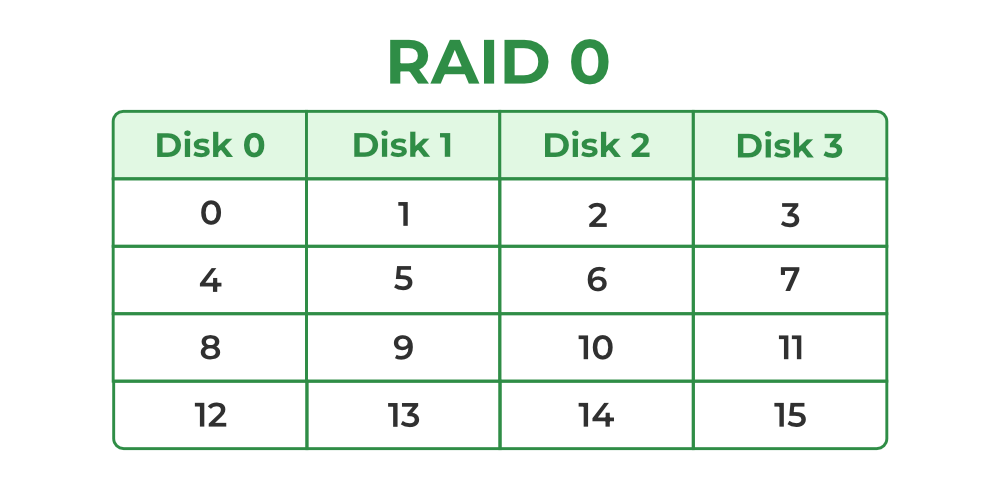
1. RAID-0 (Striping)
RAID-0 improves system performance by splitting data into smaller "blocks" and spreading them across multiple disks. This process is called "striping." It enhances data access speed by enabling parallel read/write operations but provides no redundancy or fault tolerance.
RAID-0
- A set of blocks distributed across the disks forms a "stripe." For instance, "0, 1, 2, 3" is one stripe.
- Instead of placing just one block into a disk at a time, we can work with two (or more) blocks placed into a disk before moving on to the next one.
**Evaluation:
- **Reliability: 0, There is no duplication of data. Hence, a block once lost cannot be recovered.
- ****Capacity:**N*B, The entire space is being used to store data. Since there is no duplication, N disks each having B blocks are fully utilized.
**Benefits:
- It is easy to implement.
- It utilizes the storage capacity in a better way.
**Limitations:
- A single drive loss can result in the complete failure of the system.
- It's not a good choice for a critical system.
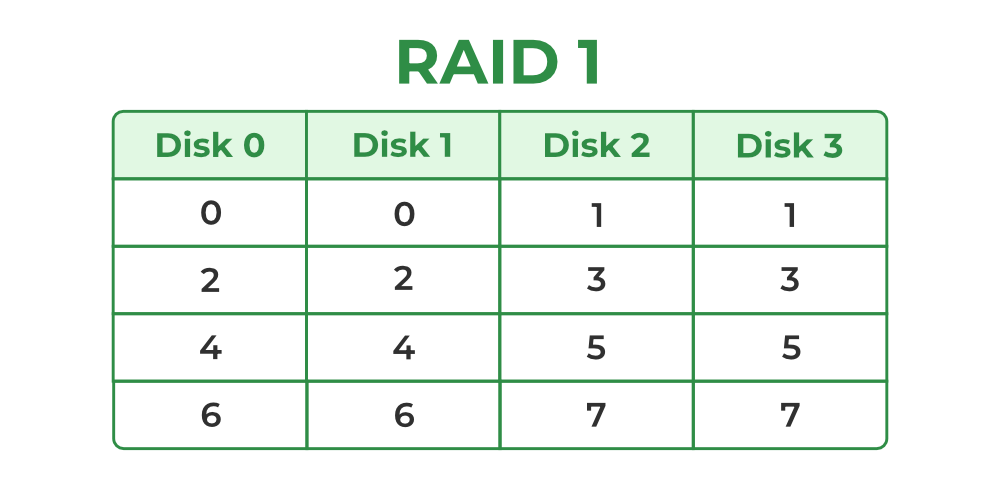
2. RAID-1 (Mirroring)
RAID-1 enhances reliability by creating an identical copy (mirror) of each data block on separate disks. This ensures that even if one disk fails, the data remains accessible from its duplicate. While this configuration is highly reliable, it requires significant storage overhead.
Raid-1
**Mirroring: Each block of data is written to two (or more) disks.
**For example:
- Block 0 is stored on Disk 0 and its duplicate on Disk 1.
- Block 1 is stored on Disk 2 and its duplicate on Disk 3.
**Mirroring Level 2: In the figure, "mirroring level 2" indicates that there are two copies of each block, distributed across different disks. RAID 0 was unable to tolerate any disk failure. But RAID 1 is capable of reliability.
**Evaluation: Assume a RAID system with mirroring level 2.
- **Reliability: \text{1 to N/2}, If we are lucky enough and disks 0 and 2 fail, then this can be handled as the blocks of these disks have duplicates on disks 1 and 3. So, in the best case, N/2 disk failures can be handled.
- **Capacity: \text{(N*B)/ 2}, Only half the space is being used to store data. The other half is just a mirror of the already stored data.
**Benefits:
- It covers complete redundancy.
- It can increase data security and speed.
**Limitations:
- It is highly expensive.
- Storage capacity is less.
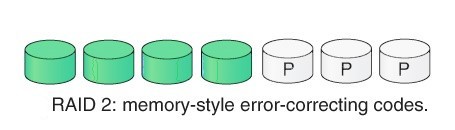
3. RAID-2 (Bit-Level Striping with Dedicated Parity)
RAID-2 is a specialized RAID level that uses bit-level striping combined with error correction using Hamming Code. In this configuration, data is distributed at the bit level across multiple drives and a dedicated parity drive is used for error detection and correction. While it offers strong fault tolerance, its complexity and cost make it rarely used in practice.
RAID 2
**Benefits:
- In case of Error Correction, it uses hamming code.
- It Uses one designated drive to store parity.
**Limitations:
- It has a complex structure and high cost due to extra drive.
- It requires an extra drive for error detection.
4. RAID-3 (Byte-Level Striping with Dedicated Parity)
RAID-3 enhances fault tolerance by employing byte-level striping across multiple drives and storing parity information on a dedicated parity drive. The dedicated parity drive allows for the reconstruction of lost data if a single drive fails. This configuration is suitable for workloads requiring high throughput for sequential data but is less efficient for random I/O operations.
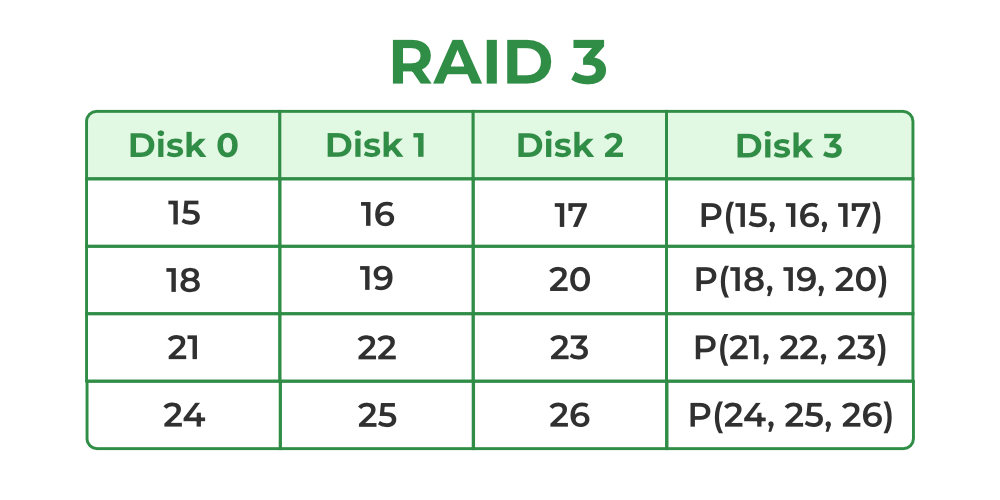
Raid-3
- Here Disk 3 contains the Parity bits for Disk 0, Disk 1 and Disk 2. If data loss occurs, we can construct it with Disk 3.
**Evaluation:
- **Reliability: RAID-3 can tolerate the failure of one disk. The lost data can be reconstructed using the parity drive and the remaining data drives.
- **Capacity: Usable Capacity=(N−1)×B where N is the total number of drives and B is the number of blocks per drive. The capacity of one drive is reserved for storing parity information.
**Benefits:
- Data can be transferred in bulk.
- Data can be accessed in parallel.
**Limitations:
- It requires an additional drive for parity.
- In the case of small-size files, it performs slowly.
Read about Difference Between RAID 2 and RAID 3.
5. RAID-4 (Block-Level Striping with Dedicated Parity)
RAID-4 introduces block-level striping across multiple disks, combined with a dedicated parity disk to provide fault tolerance. Data is written in blocks and a separate disk stores parity information calculated using the XOR function. This setup allows for data recovery in case of a single disk failure, making RAID-4 more reliable than RAID-0 but less efficient in write-intensive scenarios due to reliance on a dedicated parity disk.

Raid-4
- In the figure, we can observe one column (disk) dedicated to parity.
- Parity is calculated using a simple XOR function. If the data bits are 0,0,0,1 the parity bit is XOR(0,0,0,1) = 1. If the data bits are 0,1,1,0 the parity bit is XOR(0,1,1,0) = 0. A simple approach is that an even number of ones results in parity 0 and an odd number of ones results in parity 1.
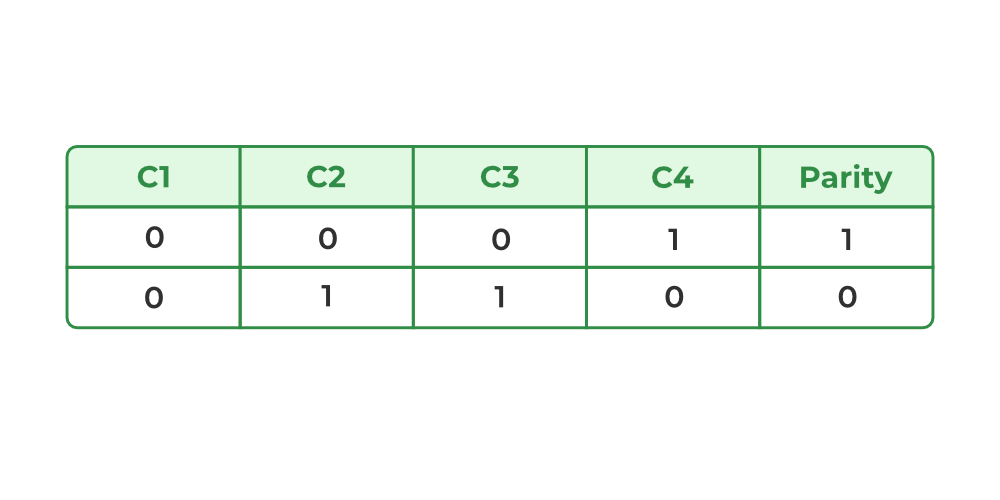
Raid-4
- Assume that in the above figure, C3 is lost due to some disk failure. Then, we can recompute the data bit stored in C3 by looking at the values of all the other columns and the parity bit. This allows us to recover lost data.
Read about Difference Between RAID 3 and RAID 4.
**Evaluation:
- **Reliability: 1, RAID-4 allows recovery of at most 1 disk failure (because of the way parity works). If more than one disk fails, there is no way to recover the data.
- **Capacity:(N-1)*B, One disk in the system is reserved for storing the parity. Hence, (N-1) disks are made available for data storage, each disk having B blocks.
**Benefits: It helps in reconstructing the data if at most one data is lost.
**Limitations: It can't help reconstructing data when more than one is lost.
6. RAID-5 (Block-Level Striping with Distributed Parity)
RAID-5 builds on RAID-4 by distributing parity information across all disks instead of storing it on a dedicated parity drive. This distributed parity significantly improves write performance, especially for random write operations, while maintaining fault tolerance for single disk failures. RAID-5 is one of the most commonly used RAID configurations due to its balance between reliability, performance and storage efficiency.

Raid-5
**Block-Level Striping: Data is divided into blocks and striped across all drives in the array.
**Distributed Parity: Parity bits, calculated using the XOR function, are distributed across all drives in a rotating pattern.
**Example:
- Disk 0: Data (D1, D2), Parity (P1)
- Disk 1: Data (D3, D4), Parity (P2)
- Disk 2: Data (D5, D6), Parity (P3)
**Data Recovery: In case of a single disk failure, the missing data can be reconstructed by XOR-ing the remaining data blocks and parity information.
**Evaluation:
- **Reliability: 1, RAID-5 allows recovery of at most 1 disk failure (because of the way parity works). If more than one disk fails, there is no way to recover the data. This is identical to RAID-4.
- **Capacity:(N-1)*B, Overall, space equivalent to one disk is utilized in storing the parity. Hence, (N-1) disks are made available for data storage, each disk having B blocks.
**Benefits:
- Data can be reconstructed using parity bits.
- It makes the performance better.
**Limitations:
- Its technology is complex and extra space is required.
- If both discs get damaged, data will be lost forever.
7. RAID-6 (Block-Level Striping with two Parity Bits)
RAID-6 is an advanced version of RAID-5 that provides enhanced fault tolerance by introducing double distributed parity. This allows RAID-6 to recover from the failure of up to two disks simultaneously, making it more reliable for critical systems with larger arrays. However, the added parity calculations can impact write performance.

Raid-6
**Block-Level Striping: Data is divided into blocks and striped across all disks in the array.
**Double Distributed Parity: Two sets of parity information are calculated for every block and distributed across all disks in the array in a rotating pattern.
**Example:
- Disk 0: Data (D1, D2), Parity (P1)
- Disk 1: Data (D3, D4), Parity (P2)
- Disk 2: Data (D5, P1), Parity (P3)
- Disk 3: Parity (P2, P3), Data (D6)
**Data Recovery: If one or two disks fail, the missing data can be reconstructed using the remaining data and parity information.
**Evaluation:
- **Reliability: RAID-6 can tolerate the simultaneous failure of two disks, providing greater fault tolerance than RAID-5.
- **Capacity: Usable Capacity=(N−2)×B where N is the total number of disks and B is the number of blocks per disk.
**Benefits:
- Very high data Accessibility.
- Fast read data transactions.
**Limitations:
- Due to double parity, it has slow write data transactions.
- Extra space is required.
**8. RAID-10 (RAID 1+0) – (Mirroring + Striping)
RAID-10 first mirrors the data (RAID-1) and then stripes across mirrored pairs (RAID-0).
It requires a minimum of **4 disks.
**How it Works
- Data is mirrored → two copies stored on paired disks.
- Then striped → blocks are distributed across mirrored pairs.
**Evaluation
- **Reliability: Very high — Can tolerate multiple disk failures as long as both failures are not in the same mirror pair.
- **Performance: Excellent read and write speed (better than RAID-5/6 for random I/O).
- **Capacity:
Usable = (N/2) × B (because half the disks are used for mirroring).
**Benefits:
- Very fast read/write performance.
- Rebuild is quick from the mirror copy.
- Excellent for databases and high-traffic systems.
**Limitations:
- Highly expensive (50% storage loss).
- If both disks in one mirror pair fail → complete data loss.
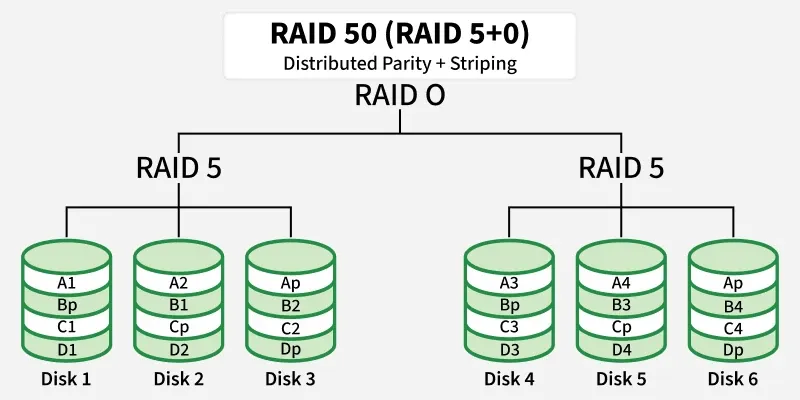
**9. RAID-50 (RAID 5+0) – (Distributed Parity + Striping)
RAID-50 combines **RAID-5 arrays (distributed parity) and then stripes across them.
Minimum requirement: **6 disks (two RAID-5 groups with 3 disks each).
**How it Works
- Multiple RAID-5 groups are created.
- A RAID-0 stripe is applied across these groups.
**Evaluation
- **Reliability: Can tolerate one disk failure per RAID-5 group, but two failures in the same group cause data loss.
- **Performance: Higher than a single RAID-5 array—striping increases bandwidth.
- **Capacity:
Usable = (N – number of RAID-5 groups) × B
(each group loses one disk to parity).
**Benefits:
- Good performance for both read and write.
- More reliable than a single RAID-5.
- Good balance of speed and storage efficiency.
**Limitations:
- Still vulnerable if two disks in the same RAID-5 group fail.
- More complex to configure and maintain.
**10. RAID-60 (RAID 6+0) – (Double Parity + Striping)
RAID-60 uses **RAID-6 groups (two parity blocks) and then stripes across them.
Minimum requirement: **8 disks (two groups of 4 disks each).
**How it Works
- Multiple RAID-6 arrays are created.
- RAID-0 stripes data across the RAID-6 groups.
**Evaluation
- **Reliability: Very high — tolerates two disk failures in each RAID-6 group.
- **Performance: Better than single RAID-6, especially for reads.
- **Capacity:
Usable = (N – 2 × number of RAID-6 groups) × B
(each RAID-6 group uses two parity disks).
**Benefits:
- Extremely fault-tolerant.
- Suitable for large enterprise storage.
- High read speed and good availability even during rebuild.
**Limitations:
- Expensive due to double parity.
- Write speeds slower than RAID-10 or RAID-50.
- Requires many disks.

**RAID Levels Comparison Table (0–6, 10, 50, 60)
| RAID Level | Technique | Fault Tolerance | Usable Capacity | Performance | Advantages | Disadvantages |
|---|---|---|---|---|---|---|
| **RAID 0 | Block-Level Striping | **0 disks | **N × B | Excellent read/write | Fastest performance, full capacity | No redundancy, one disk failure → total data loss |
| **RAID 1 | Mirroring | **Up to N/2 disks (best case) | ****(N × B) / 2** | Good read, average write | High reliability, easy recovery | 50% storage loss, expensive |
| **RAID 2 | Bit-Level Striping + Hamming Code | **1 disk | ****(N − parity drives) × B** | Fast | Strong error correction | Complex, rarely used |
| **RAID 3 | Byte-Level Striping + Dedicated Parity | **1 disk | ****(N − 1) × B** | Good sequential performance | High throughput for large files | Slow for small/random I/O, parity disk bottleneck |
| **RAID 4 | Block-Level Striping + Dedicated Parity | **1 disk | ****(N − 1) × B** | Fast reads | Single parity disk makes writes slow | Parity disk bottleneck |
| **RAID 5 | Block-Level Striping + Distributed Parity | **1 disk | ****(N − 1) × B** | Good read, moderate write | Balanced cost + performance + redundancy | Slow random writes due to parity |
| **RAID 6 | Block-Level Striping + Double Distributed Parity | **2 disks | ****(N − 2) × B** | Good read, slower write | Can survive **2 disk failures, very reliable | More parity → slower writes |
| **RAID 10 (1+0) | Mirroring + Striping | **1 disk per mirror pair | ****(N × B) / 2** | Excellent read/write | Fastest + redundancy | Needs even # of disks, expensive |
| **RAID 50 (5+0) | Block Striping over RAID-5 arrays | **1 disk per RAID-5 group | **G × (n − 1) × B | High performance & good redundancy | High speed + better fault tolerance than RAID 5 | **Cannot tolerate >1 disk failure per group; rebuilds are slow; parity overhead; complex setup |
| **RAID 60 (6+0) | Block Striping over RAID-6 arrays | **2 disks per RAID-6 group | **G × (n − 2) × B | Very high redundancy + good speed | Survives 2 failures per group, very reliable | **High cost; requires many disks; slower writes due to double parity; complex configuration |
Read Related articles - Storage Area Networks & Network Attached Storage