Implementing Neural Networks Using TensorFlow (original) (raw)
Last Updated : 29 May, 2026
Deep learning is a branch of machine learning that uses neural networks with multiple layers to learn complex patterns from data. These networks automatically extract features and make intelligent predictions, enabling important applications across various domains.
- Learns complex patterns and relationships from large datasets
- Uses multilayer neural networks for automatic feature extraction
- Widely used in image recognition, NLP, speech processing and predictive analytics
- Improves performance with deeper architectures and optimized training techniques
Implementation
Step 1: Install TensorFlow
Install TensorFlow to set up the environment for building and training deep learning models.
pip install -U tensorflow
Step 2: Download and Read the Dataset
The Red Wine Quality dataset is used for this classification task. The dataset is loaded into a Pandas DataFrame for preprocessing and model training.
Python `
import numpy as np import pandas as pd
df = pd.read_csv('winequality-red.csv',sep=';')
df.head()
`
**Output

Step 3: Data Preparation and Train-Test Splitting
The dataset is divided into training and validation sets for model training and evaluation.
- 75% of the data is used for training
- Remaining data is used for validation
- This helps evaluate model performance on unseen data Python `
import tensorflow as tf
train_df = df.sample(frac=0.75, random_state=4)
val_df = df.drop(train_df.index)
`
Step 4: Feature Scaling and Data Separation
Neural networks perform better when input features are scaled to a similar range. The dataset is normalized and then separated into input features and target values.
Python `
max_val = train_df.max(axis= 0) min_val = train_df.min(axis= 0)
range = max_val - min_val train_df = (train_df - min_val)/(range)
val_df = (val_df- min_val)/range X_train = train_df.drop('quality',axis=1) X_val = val_df.drop('quality',axis=1) y_train = train_df['quality'] y_val = val_df['quality']
input_shape = [X_train.shape[1]]
input_shape
`
**Output:
[11]
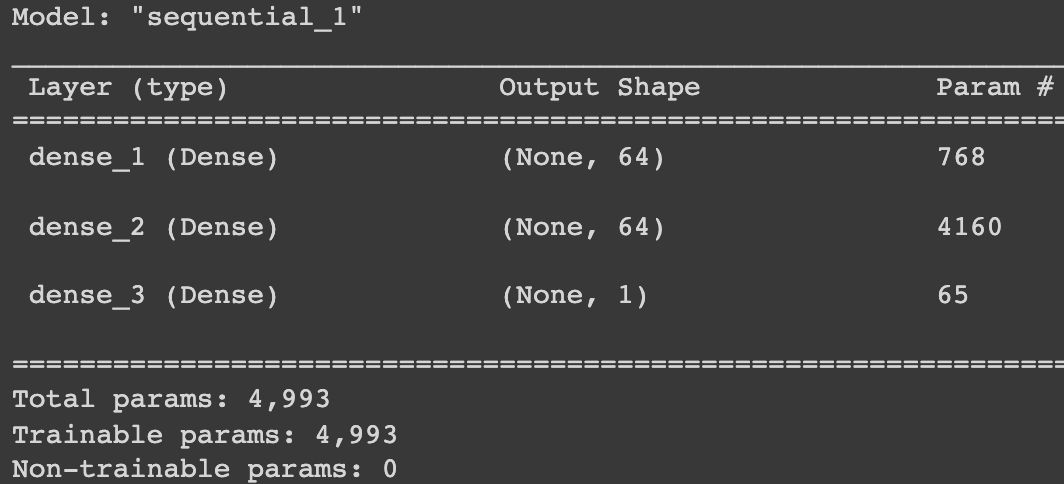
Step 5: Create the Neural Network Model
Keras is used to build a neural network using the Sequential model.
- Dense layers are used to create the network
- ReLU activation introduces non-linearity
- The output layer predicts wine quality Python `
model = tf.keras.Sequential([
tf.keras.layers.Dense(units=64, activation='relu',
                      input_shape=input_shape),
tf.keras.layers.Dense(units=64, activation='relu'),
tf.keras.layers.Dense(units=1)
]) model.summary()
`
**Output:
Step 6: Compile the Model
The model is compiled by configuring the optimizer, loss function and evaluation metrics.
- Adam optimizer improves training efficiency
- MAE (Mean Absolute Error) measures prediction error Python `
model.compile(optimizer='adam', loss='mae')
`
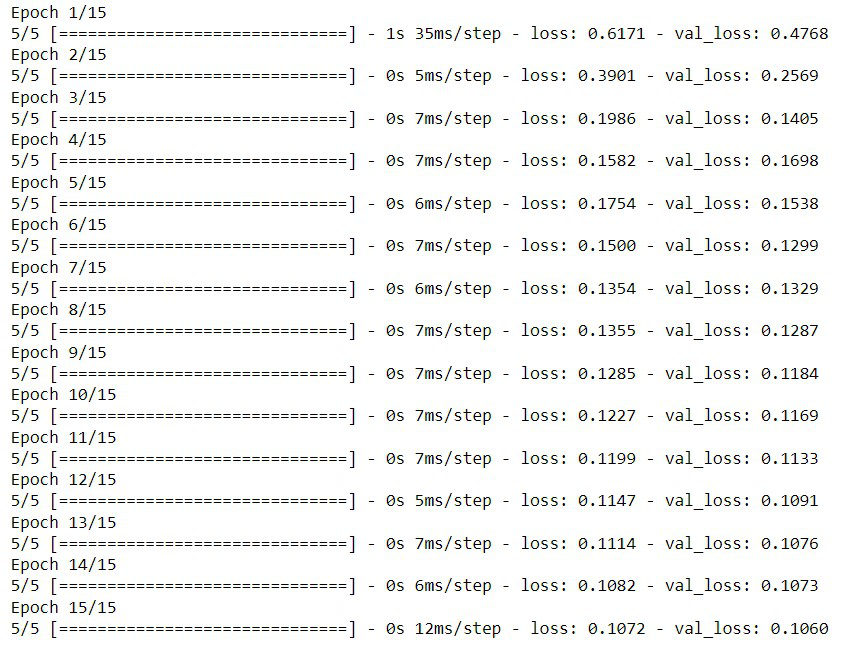
Step 7: Train the Neural Network Model
The model is trained using the fit() method with training and validation datasets.
- Batch size improves training efficiency
- Validation data monitors performance during training
- Early Stopping can help prevent overfitting Python `
losses = model.fit(X_train, y_train,
               validation_data=(X_val, y_val),
               batch_size=256,
               epochs=15,
)
`
**Output:
Step 8: Predictions and Evaluate Accuracy
After training, the model predicts wine quality using the predict() method.
Python `
model.predict(X_val.iloc[0:3, :])
`
**Output:
array([[0.40581337],
[0.5295989 ],
[0.3883106 ]], dtype=float32)
Step 9: Compare Predictions with Actual Values
Python `
y_val.iloc[0:3]
`
**Output:
0 0.4
9 0.4
12 0.4
Name: quality, dtype: float64
Step 10: Visualize Training and Validation Loss
Training and validation loss curves help analyze model performance and identify overfitting.
Python `
loss_df = pd.DataFrame(losses.history) loss_df.loc[:,['loss','val_loss']].plot()
`
**Output:
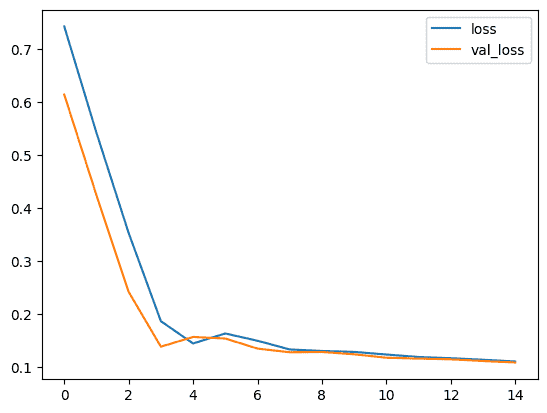
output
You can download the code from here.
While training, the training loss usually decreases continuously, but an increasing validation loss indicates overfitting. Techniques like Early Stopping can automatically stop training at the optimal epoch.