Kubernetes Kubectl (original) (raw)
Last Updated : 9 Apr, 2026
Kubectl (often pronounced cube-control or cube-c-t-l) is the command-line interface (CLI) for Kubernetes. It acts as your control panel, allowing you to run commands against a Kubernetes cluster. Behind the scenes, kubectl is essentially a translator.
- It takes your command-line instructions, converts them into HTTP/HTTPS API requests and securely passes them to the Kubernetes Master Node (specifically, the API Server).
- From there, Kubernetes handles the creation, deletion, modification, or viewing of your resources.
Kubernetes Internals
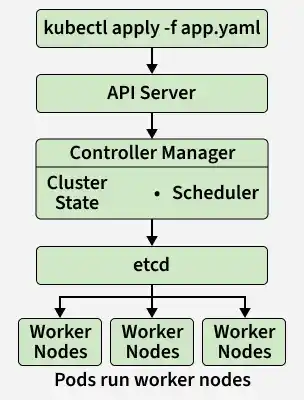
To understand kubectl, it helps to understand the environment it controls. Kubernetes orchestrates containerised applications using a Master-Worker node architecture:
- **API Server: The front door of the Kubernetes control plane. This is the exact component
kubectltalks to. - **Etcd: A highly available key-value store that holds all cluster data and configurations.
- **Controller Manager: Maintains the desired state of your applications (e.g., making sure if you want 4 replicas, exactly 4 are running).
- **Scheduler: Assigns newly created workloads (Pods) to available Worker Nodes.
When you type a command, kubectl authenticates with the cluster, sends the request to the API Server, and the API Server coordinates with the Etcd, Controller Manager, and Scheduler to execute your will.
Architecture of Kubernetes Cluster
The Kubectl is a client-side tool that acts as a bridge between the users and the K8s cluster. It provides an interactive command-line interface for the users to run the commands with kubectl against the Kubernetes cluster.
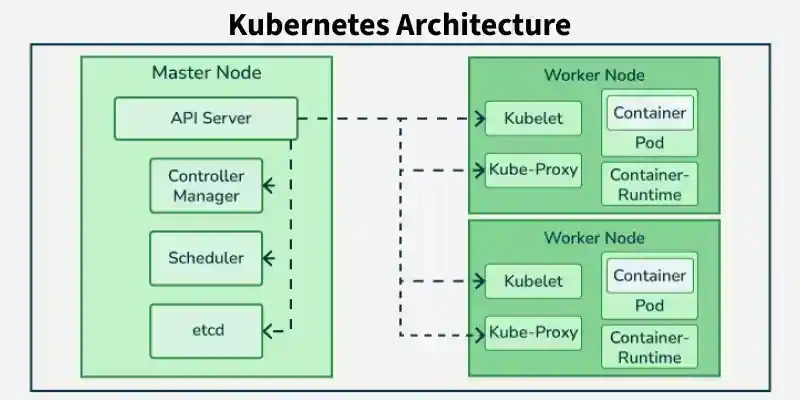
Kubernetes Cluster
The Architecture involves once the users/client executes a command through the command line it is authenticated with the master node of k8s Cluster through the Kubernetes API server. Based on the type of API request Kubernetes API server facilitates the orchestration and coordination of Kubernetes resources such as Control Manager, Kubernetes Scheduler, and Etcd resources.
**Installation of Kubectl
You can setup the installation of Kubectl on any of the following sources of environment.
- Linux
- macOS
- Windows
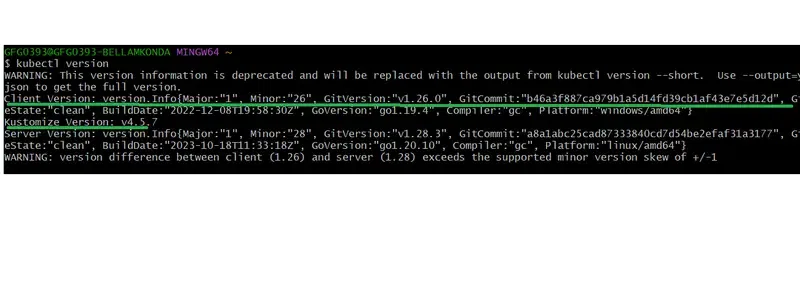
Once you install Kubectl on kuba respective environment you can cross-check by running the below command.
$ kubectl version
In the following screenshot you versioning details of kubectl:
To know more about of kubectl, please read this cheatsheet: kubectl cheatsheet
**Syntax
$ kubectl [command] [TYPE] [NAME] [flags]
- **[command]: The action you want to perform (e.g.,
create,get,describe,delete,apply). - **[TYPE]: The Kubernetes resource you are targeting (e.g.,
pod,namespace,deployment,service). Note: This is case-sensitive. - **[NAME]: The specific name of the resource (e.g.,
my-nginx-pod). - **[flags]: Optional modifiers used to specify environments, output formats, or namespaces (e.g.,
-n my-namespaceor-o yaml).
How to run the commands for resources that kubectl provides.
Create a Resource Using Kubectl
In Kubernetes, a resource gets created inside a namespace which resource using which we can create other resources in a separate environment.
First, we are creating a namespace inside which we will create our Pod.
$ kubectl create namespace geeksforgeeks
We can create a Pod using the below YAML file.
apiVersion: v1 kind: Pod metadata: name: geeksforgeeks namespace: geeksforgeeks spec: containers:
- name: nginx
image: nginx:1.14.2
ports:
- containerPort: 80
The above file is a configuration file using which we are creating a pod of name geeksforgeeks in namespace geeksforgeeksnamespace which is an Nginx server. Similarly, we can create other resources like secrets, replica sets, etc by just changing the name in front of the kind and mentioning the key value in metadata and spec accordingly.
$ kubectl create -f geeksforgeekspod.yaml
The above discussed commands are implemented in the screenshot, try on implementing this

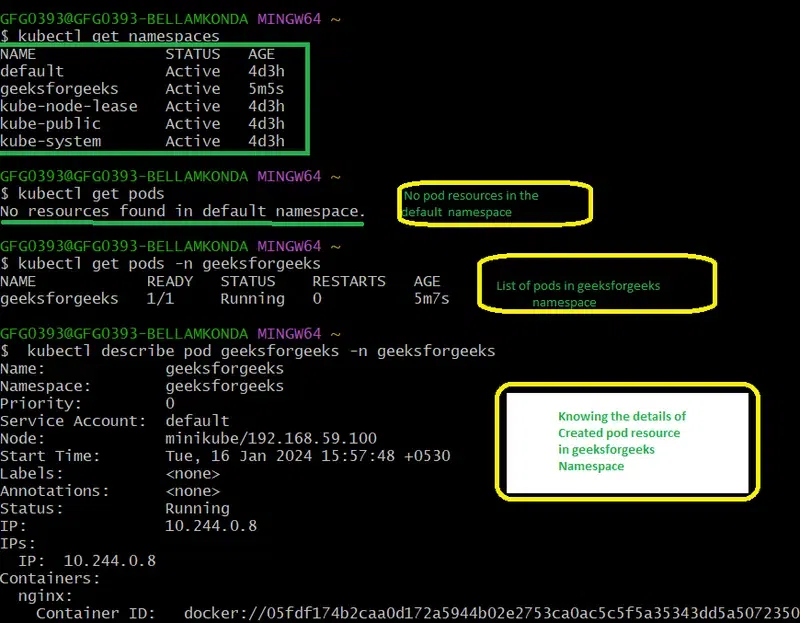
To Get the Resources
Command to see all the namespaces.
kubectl get namespaces
To see the namespace geeksforgeeksnamespace run the below command.
$ kubectl get namespaces
Command to see the list of all pods.
$ kubectl get pods
This will show the pods in the default namespace. To list all the pods in a particular namespace we can pass the flag -n and the name of the namespace with `kubectl get pods` command.
$ kubectl get pods -n
So if we have to list down the pod that we have created in namespace geeksforgeeksnamespace, run the below command.
$ kubectl get pod -n geeksforgeeks
Describe a Resource
While get gives you a summary, describe gives you the deep technical details, status, and event logs of a specific resource. This is crucial for troubleshooting.
$ kubectl describe resource_name -n namespace_name
So now we will describe our pod.
$ kubectl describe pod geeksforgeeks -n geeksforgeeks
Name: geeksforgeeks Namespace: geeksforgeeksnamespace Priority: 0 Node: cluc-control-plane/172.19.0.8 Start Time: Sun, 15 May 2022 11:17:36 +0000 Labels: Annotations: cni.projectcalico.org/containerID: ce6d80d1a912 a3edda623aeab52c2995aee87e7c225d6258f888d70a36c79b68 cni.projectcalico.org/podIP: 10.244.206.106/32 cni.projectcalico.org/podIPs: 10.244.206.106/32 Status: Running IP: 10.244.206.106 IPs: IP: 10.244.206.106 Containers: nginx: Container ID: containerd://b265bb64e9cea231b9e52a150f2 1399b4d051000c2c5dc9bc03cf1de42d060ae Image: nginx:1.14.2 Image ID: docker.io/library/nginx@sha256:f7988fb6c02e0 ce69257d9bd9cf37ae20a60f1df7563c3a2a6abe24160306b8d Port: 80/TCP Host Port: 0/TCP State: Running Started: Sun, 15 May 2022 11:19:20 +0000 Ready: True Restart Count: 0 Environment: Mounts: /var/run/secrets/kubernetes.io/serviceaccount from kube-api-access-gz2zs (ro) Conditions: Type Status Initialized True Ready True ContainersReady True PodScheduled True Volumes: kube-api-access-gz2zs: Type: Projected (a volume that contains injected data from multiple sources) TokenExpirationSeconds: 3607 ConfigMapName: kube-root-ca.crt ConfigMapOptional: DownwardAPI: true QoS Class: BestEffort Node-Selectors: Tolerations: node.kubernetes.io/not-ready:NoExecute op=Exists for 300s node.kubernetes.io/unreachable:NoExecute op=Exists for 300s Events:
Creating namespace with name "geeksforgeeks" and creating pod with name "geeksforgeeks" inside this namespace is showed in this screenshot:
Delete the Resources
kubectl delete command is used to delete the resources by passing their name and namespace if we are deleting other resources other than a namespace.
$ kubectl delete resource resource_name -n namespace_name
Now we will delete the pod and namespace.
$ kubectl delete pod geeksforgeeks -n geeksforgeeks
You can verify whether the pod is deleted or not by running kubectl get pod -n geeksforgeeksnamespace.
Now we will delete the namespace instead of -n option as follows.
$ kubectl delete namespace geeksforgeeks
**Note: If we delete the namespace before the pod then the pod will delete automatically with other resources in that namespace.
The following screenshot shows the practical deleting pods in namespaces and deleting namespaces:

Popular Commands Usage Of Kubectl
There are many commands in kubectl and their popularity depends on the requirements and its specific Use case. However, here some of the commands list that are some commonly used and popular kubectl commands:
The following command helps in listing all the pods in the specified namespace.
kubectl get pods -n namespace1
The following command is used to describe a Deployment resource in Kubernetes.
kubectl describe deployment
The following command is used to scale/adjust the replicas for a deployment up or down.
kubectl scale deployment --replicas=
The following command is used to create a Kubernetes service and to expose the pods to the cluster through a YAML file.
kubectl apply -f <service-definition.yaml>
The following command is used for deleting a specific resource in a Kubernetes such as a pod, or deployment.
kubectl delete pod mypod
The above specific commands you can use depend on the tasks you are going to perform within your Kubernetes cluster. Additionally it is always a recommended idea to refer the official documentation of Kubernetes for detailed information on kubectl commands and their usage.
Run Kubernetes Yaml Code Files With Kubectl
By defining the desired resources with Yaml syntax, you can create and run a Kubernetes YAML file using the 'kubectl' command for configuring those appliances to the Kubernetes cluster. Here is the step-by-step process of guidelines to create and run the k8s file with kubectl:
Create a Yaml File
On using a text editor create a YAML file describing the specification of resources that to create or modify. For Example a 'Deployment.yaml' file is created as a sample.
apiVersion: apps/v1 kind: Deployment metadata: name: mydeployment spec: replicas: 4 selector: matchLabels: app: myapp1 template: metadata: labels: app: myapp1 spec: containers: - name: mycontainer1 image: nginx:latest
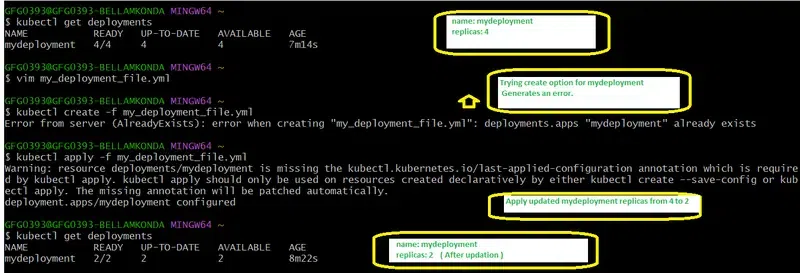
The following screenshot shows the creation of deployment practically with name "deployment" with replicas - 4

Applying The Configuration
Use the Deployment.yaml file with the 'kubectl apply' command to apply the configurations to the Kubernetes cluster. here I am using default namespace, to specify the use -n namespace_name at the end of the command.
kubectl create -f Deployment.yaml
When your are applying the configuration for the first time with the specified yaml file we use create option. i.e., kubectl create -f <file_name>. While the option `kubectl apply` can be used for the both creation and updating the configuration of the file ie., kubectl apply -f <file_name>
The following screenshot shows the practical on updating the deployment configuration file with changing its replicas from 4 to 2.
**To Check The Status Of The Resources in K8s
- To verify whether the applied configurations of the resources from the file is created or updated successfully or not. Try on running the kubectl get command with the resource name i.e., kubectl get <resource_name>
kubectl get deployments kubectl get pods
**Describing the Resources ( Optional )
- For knowing the detailed information about a specific resource, try on specifying resource type and resource type name with kubectl command.
kubectl describe deployment mydeployment
**Updating The Resources ( Optional )
To make changes any changes to your resources, you can update the YAML file, and then reapply the configuration using kubectl apply command with .
kubectl apply -f Deployment.yaml
**Deleting The Resources (Optional)
To delete a specific resource that you created try on running the `kubectl delete` command with resource type and resource type name.
kubectl delete -f Deployment.yaml
- **Management of Resources: Kubectl provides efficient management of Kubernetes resources such as pods, deployments, and Kubernetes services in the cluster with seamless interaction over performing operations such as creating, delete, modifying, and list of the resources.
- **Cluster Inspection and Debugging: It is helpful in offering effective commands to inspect and debug the cluster resources. Users can fetch detailed information regarding the resources such as pods, nodes, and configurations for troubleshooting and performance analysis.
- **Context Switching and Multi-Cluster Management: kubectl allows users to support context switching and seamless management of the Kubernetes cluster. It provides effective commands for both switching context and management of k8s cluster with namespaces.
- **Plugin Extensibility: kubectl allows the users the extend its functionality through Krew plugin manager for automation of tasks providing new effective commands to enhance overall user experience.
Kubectl Plugins
You can supercharge kubectl using plugins. These extend its core functionality and save you time:
- **Krew: The official package manager for
kubectlplugins. It acts like an "app store" for command-line tools. - **kubectx & kubens: The ultimate time-savers.
kubectxallows you to seamlessly switch between different Kubernetes clusters, whilekubenslets you switch your default namespace so you don't have to keep typing-n <namespace>. - **kube-ps1: Adds your current Kubernetes cluster and namespace to your terminal prompt, preventing you from accidentally running commands in the wrong environment.
Alternatives to Kubectl
While kubectl is the gold standard, other tools offer different workflows:
- **K9s (Terminal UI): An interactive, visually pleasing terminal interface. It allows you to navigate your cluster using arrow keys and hotkeys rather than typing out long commands. Highly recommended for daily debugging.
- **Helm: The package manager for Kubernetes. Instead of managing dozens of individual YAML files, Helm packages them into "Charts," allowing you to install complex applications (like a database or monitoring stack) with a single command.
- **OC (OpenShift CLI): Built specifically for Red Hat's OpenShift platform, it includes all
kubectlfeatures plus extra commands tailored to OpenShift environments.