Understanding Jenkins CI/CD Pipeline (original) (raw)
Last Updated : 25 Aug, 2025
Jenkins is an open-source automation server that enables developers to reliably build, test, and deploy applications. It supports continuous integration and continuous delivery (CI/CD) workflows that allow teams to frequently deliver high-quality software. Jenkins provides an automation engine with an extensive plugin ecosystem that offers integrations for practically any DevOps toolchain. Its capabilities include:
- Automates the software delivery pipeline (build → test → deploy).
- Integrates seamlessly with version control systems like Git.
- Runs automated tests on each code change to ensure quality.
- Supports CI/CD workflows for faster and more reliable releases.
- Offers 1,800+ plugins to connect with almost any DevOps toolchain.
- Scales easily to handle distributed builds across multiple agents.
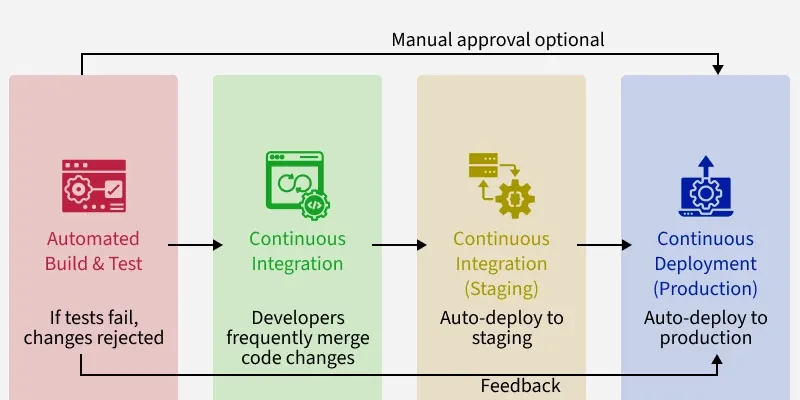
First, an automated build compiles the code and runs tests immediately. If the tests fail, the changes are rejected. This catches errors early. Next is continuous integration. Developers frequently merge their code changes into the main branch. With each merge, builds and tests are run to ensure nothing breaks.
Then comes continuous delivery. The changes are deployed to testing/staging servers. This is like a dress rehearsal before the actual release. Finally, in continuous deployment, the changes are deployed directly to production with little manual intervention. This enables quick delivery of features to users.
Key components and concepts
- **Jobs: The basic building blocks in Jenkins, used to run tasks like tests, builds, and deployments. They can be triggered automatically and configured with inputs, environments, and reports.
- **Pipelines: Chain multiple jobs into an end-to-end workflow, providing visibility and control over the entire delivery process from code to production.
- **Agents: Distributed servers or environments where Jenkins executes jobs. They help scale capacity but require managing distributed resources.
- **Plugins: With 1,600+ options, plugins extend Jenkins to integrate with tools like Git, Docker, Kubernetes, and more—adding features for notifications, dashboards, analysis, and security.
Understanding Jenkins Pipelines
Jenkins Pipelines bring all these stages together, creating an automated workflow that delivers software quickly, securely, and reliably.
- **Code: Developers write source code and manage it in Git repositories, which track all changes. Webhooks notify Jenkins on new commits, triggering build pipelines automatically.
- **Build: Jenkins fetches the latest code and uses build tools like Maven, Gradle, or MSBuild via plugins to compile, package (JARs, WARs, containers), and run unit tests and code checks.
- **Test: Jenkins coordinates different test types (UI, performance, security, compatibility) using frameworks like Selenium, providing detailed reports, logs, and metrics.
- **Signing/Security: Builds undergo code signing, vulnerability scans, and manual approvals to enforce governance and security policies.
- **Deploy: Jenkins deploys validated code to testing, staging, or production using containers or cloud platforms like AWS, Azure, Kubernetes, and Docker.
- **Inform: Teams get automated email updates and dashboards showing pipeline status, logs, and reports.
Demonstrate pipeline examples for web apps, mobile apps, and API testing
Jenkins pipelines automate continuously releasing high-quality app updates by coordinating infrastructure. They enable engineer teams to deliver frequently.
- First, deploying web apps to Kubernetes. When developers push code, Jenkins starts the pipeline. It builds a Docker container image with the code and sends it to a registry. Jenkins then updates Kubernetes config files with the new image details and tells Kubernetes to deploy the web app using this image.
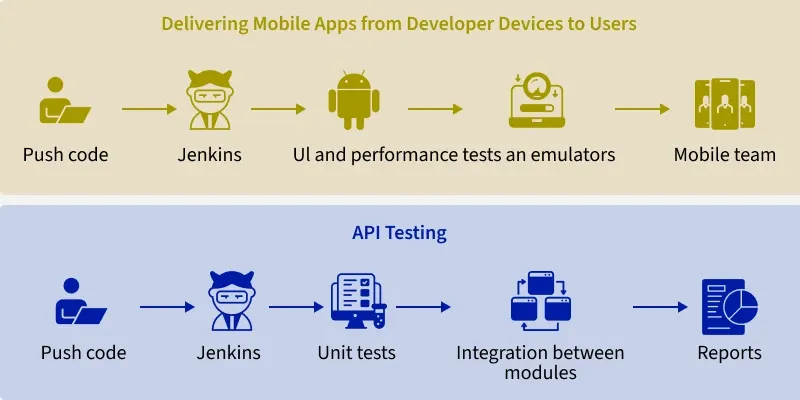
- Now delivering mobile apps from developer devices to users. The pipeline starts after code is added to the main codebase. It compiles Android and iOS app versions. Then it runs UI and performance tests on these builds in emulators. If tests pass, Jenkins submits the build for publishing in the Play Store or App Store and tells the mobile team.
- Finally, API testing. Jenkins kicks off this pipeline when developers merge code. It runs unit tests on individual modules. Integration tests check modules work together correctly. Load tests hit the API server to measure performance. Jenkins shows reports on test results, code coverage, and issues. Based on results, it promotes the API to higher environments or warns developers of broken builds.
Creating Jenkins Jobs
First, you'll want to log into your Jenkins dashboard. This is like entering a workshop full of tools to help build your software. Once inside, click "New Item" to start a new project. Give your job a nice name - maybe after your favorite movie character or snack food.
**Than picking your job type. There are a few options here that do different things:
- **Freestyle project - Lets you run custom commands and scripts. Like following a recipe step-by-step.
- **Pipeline - For stacking tasks together into an automated workflow. Kind of like an assembly line!
- **Multibranch Pipeline - When you have code in multiple branches, and want to build from each. Like building several models of a toy from different molds.
There are a few more types too, but these cover most use cases. Next, configure your job's settings. Here you can pick and choose what you want it to do - things like:
- Fetch code from version control
- Build and compile the code
- Run automated tests
- Deploy it somewhere after a successful build
The options are endless. Set up your job just as you need it. Finally, save your job and click "Build Now" to test it out. Watch your job execute each step and voila - you've successfully automated the build process!
Now whenever new code lands, your job will wake up and do its work automatically. No more manual building or testing. With Jenkins, you can set up an assembly line for your software projects!
-(1).png)
Stages in Jenkins pipelines
pipeline {
agent any
stages {
stage('Checkout') {
steps {
git 'https://github.com/org/repo'
}
}
stage('Build') {
steps {
// compile code
// save build artifacts to S3 bucket
}
}
stage('Test') {
steps {
// download artifacts from S3
// load test data into Postgres DB
// run integration tests
// continue only if all tests pass
}
}
stage('Deploy') {
steps {
// download artifacts from S3
// deploy to Kubernetes cluster
}
}
}
}
Here is a more detailed explanation of each of the 4 stages in the pipeline:
- **Get latest code: Uses the git step to check out code from a Git repository. Provides the URL to the repo as a parameter. Clones the latest commit to the local workspace. Ensures all subsequent steps have access to the freshest source code.
- **Build code: Compiles the application source code into executables/packages. Saves the build artifacts like JARs, containers, etc to cloud storage. Uses S3 or an equivalent object store for storing the outputs. Makes the build outputs available for later stages.
- **Test code: Fetches the build artifacts from the storage location. Loads test data and schemas into a Postgres database. Executes automated integration tests against the application. Continues only if all test cases pass as expected. Gates deployment on successfully passing tests.
- **Deploy code: Downloads the vetted build artifacts for deployment. Deploys the application to a Kubernetes cluster. Pushes the containers to the target runtime environment. Makes the built and tested application available to users. This pipeline has discrete steps for each major phase of the CD process - repo checkout, build, test, and deploy. Each stage focuses on one concern and uses standard tools. This modular design enables extensibility and maintainability.
Declarative Pipeline Vs Scripted Pipeline
When I first started using Jenkins for continuous integration and delivery, the concept of pipelines seemed confusing and complex. There were two primary approaches for defining and creating pipelines in Jenkins - declarative pipelines and scripted pipelines. Both approaches could accomplish the core goal of automating software workflows, but in markedly different ways.
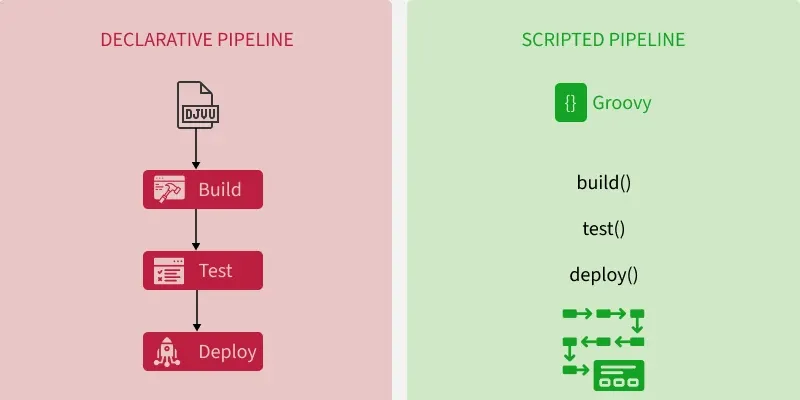
Declarative pipelines take a more structured, easy-to-visualize approach. The Jenkinsfile format allows you to lay out pipeline stages, such as build, test, and deploy, in a linear, sequential order. Each stage has a clean block defining what steps should occur within that stage. To me, this maps very cleanly to the progression of taking code from version control, through build, validation, and release processes. I can look at the Jenkinsfile like a flowchart and understand the logical order of events.
Scripted pipelines offer much more flexibility and customization capability, at the cost of increased complexity. Steps are defined procedurally using Groovy code encapsulated within methods like build(), test(), etc. The logic flow is harder for me to follow, as I have to trace through the method calls to see the overall sequence. The highly customizable nature of scripted pipelines enables much more sophisticated orchestration, but requires more Groovy programming expertise.
Declarative pipelines are best for simple, linear CI/CD workflows, while scripted pipelines offer greater flexibility and customization for complex scenarios.
Declarative Pipeline Code Syntax
pipeline {
agent any
stages {
stage('Build') {
steps {
// build steps
}
}
stage('Test') {
steps {
// test steps
}
}
stage('Deploy') {
steps {
// deploy steps
}
}
}
}
Scripted Pipeline Code Syntax
node {
stage('Build') {
// build steps
}
stage('Test') {
// test steps
}
stage('Deploy') {
// deploy steps
}
}
Key best practices of Jenkins
I have been writing about DevOps tools like Jenkins for a while. I have seen how using Jenkins pipelines can really help software teams work better. Jenkins lets you automate a lot of manual work. But many teams just starting with Jenkins struggle. They don't always use best practices. Then their pipelines become messy, break often, and have security holes. Teams end up wasting time babysitting jobs or fixing issues.
Based on my research and talks with engineers, I want to share tips on how to use Jenkins right. I'll talk about ways to structure code for reliability and security. I'll discuss how to define infrastructure as code so it's reproducible. I'll cover good plugins to use, scaling your setup, and baking security in from the start. I'll use real examples from companies like Square, Twilio, and Adobe. These teams use Jenkins well to improve their development.
Jenkins is powerful but you need to be careful. Governance is important - you need a balance between giving developers freedom while maintaining control centrally. I'll examine how mature teams strike this balance. The goal is to help teams use Jenkins to enhance their workflows, not hinder them. With the right practices, Jenkins can help deliver software faster and more reliably.