Working with Jenkins Plugins (original) (raw)
Last Updated : 30 Apr, 2026
Jenkins plugins are essential for enhancing the functionality of the Jenkins CI/CD tool. They serve as the building blocks that allow Jenkins to expand beyond its basic setup, offering over 2,000 community-contributed tools to customize your automation.
- Plugins bridge the gap between Jenkins and the rest of your tech stack, connecting it to tools like GitHub, Docker, Slack, and AWS to create a unified workflow.
- You can easily search, install, and update plugins directly through the Jenkins Dashboard, allowing you to add complex features with just a few clicks.
Jenkins Plugins Workflow
1. Test Execution Integration
- Integrates with tools like Selenium, Cucumber, TestNG, and JUnit.
- Automatically generates and publishes test reports.
2. Reporting
- Provides detailed insights into test results with plugins like Allure and HTML Publisher.
- Visualizes build trends, pass/fail ratios, and test execution details.
3. CI/CD Integration
- Accelerates feedback loops.
- Identifies defects early by integrating tools like Git and Maven.
4. Notification and Collaboration
- Sends automated alerts using email or communication tools like Slack and Microsoft Teams.
- Accessing Plugins in Jenkins
Key Plugins for Test Automation
The following are the key plugins used for Test Automation:
**1. JUnit Plugin
- Publishes test results from JUnit or other xUnit test frameworks.
- Displays test reports in the Jenkins UI and tracks test pass/fail history across builds.
2. TestNG Results Plugin
- Publishes and displays results for TestNG-based tests.
- Includes detailed reports on passed, failed, and skipped tests.
3. Maven Integration Plugin
- Automates building and testing for Maven projects.
- Manages the build lifecycle, dependencies, and report generation.
4. HTML Publisher Plugin
- Allows Jenkins to publish and display custom HTML reports, such as those generated by frameworks like Selenium or JUnit.
- Useful for visualizing test automation results.
5. Allure Report Plugin
- Integrates with Allure to generate detailed and visually appealing reports for various test frameworks, including JUnit, TestNG, and Selenium.
- Provides insights into test execution, including duration, environment, and failure analysis.
Plugin Purpose
- JUnit Plugin Parses test results from JUnit and displays pass/fail statistics in Jenkins.
- TestNG Plugin Integrates TestNG results with Jenkins, showing method-level execution statistics.
- Maven Integration Simplifies the creation of Maven-based Jenkins jobs.
- HTML Publisher Publishes HTML reports generated by automation frameworks.
- Allure Reports Generates visually appealing and detailed test execution reports.
- Cucumber Reports Publishes JSON-based Cucumber reports in an easy-to-read HTML format.
- Git Plugin Integrates Jenkins with Git repositories.
- Email Extension Sends email notifications based on test results or build statuses.
How to Use Jenkins Plugins
**Publishing Cucumber Reports
**Objective: Generate a readable report from Cucumber's JSON output.
Step 1: Install the Cucumber Reports Plugin
- Install Cucumber Reports Plugin:
- Navigate to Available Plugins and search for "Cucumber Reports."
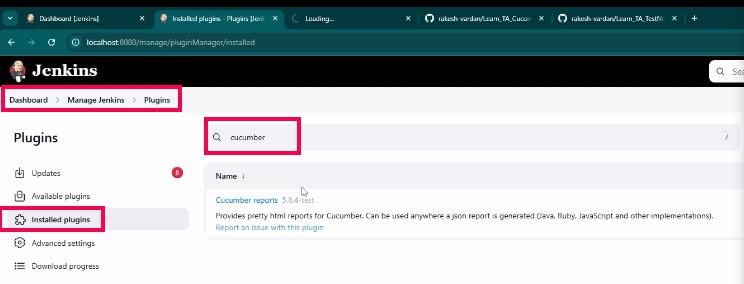
Available Plugins and search for "Cucumber Reports."
- Install the plugin.
Step 2: Configure Jenkins Job
- Firstly check the cucumber project run locally as expected
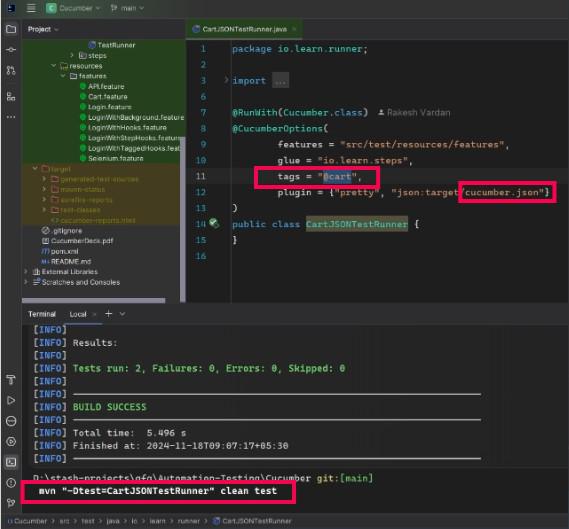
cucumber project run locally
- Add a build step to execute your Cucumber project.
build step to execute your Cucumber project.
- Copy the project from existing project which you are already created:
Copy the project from existing project
- Updates the goal as per our requirement:
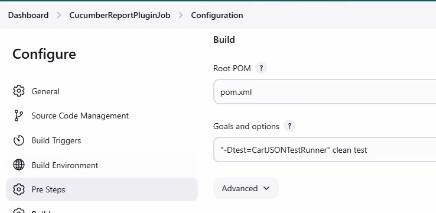
Updates the goal as per our requiremen
- Ensure the test runner generates a cucumber.json file.
Step 3: Post-Build Actions
- Select Cucumber Reports.
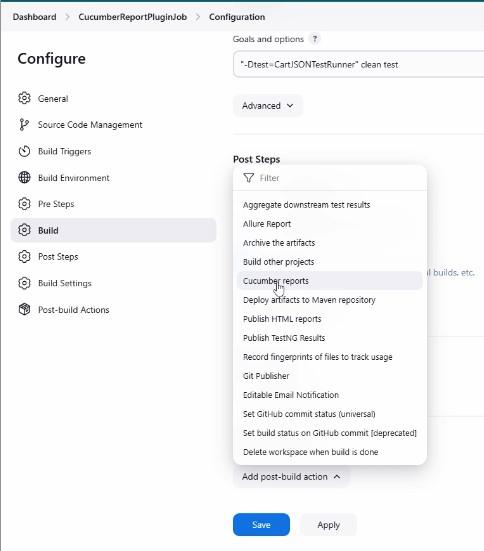
Select Cucumber Reports
- After that save the project and build the project.
Step 4: Run the Job
- View the generated report in the Jenkins dashboard.
**Output
- A detailed HTML report showing:
- Passed, failed, and skipped steps.
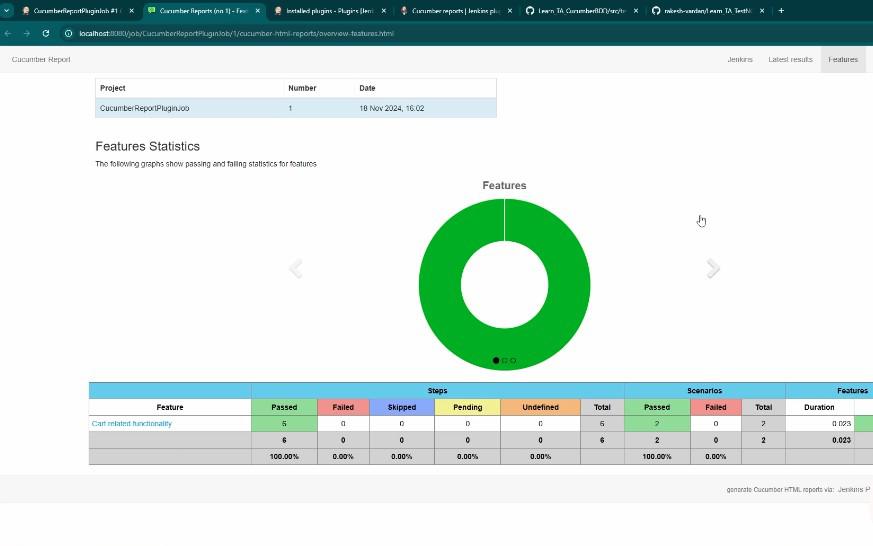
generated report in the Jenkins dashboard
- Execution time for each step.
- Overall test summary.
Integrating jenkins with TestNG
Objective: Visualize TestNG execution results in Jenkins.
Step 1: Install TestNG Results Plugin:
- Search for "TestNG Results" in Available Plugins and install it.
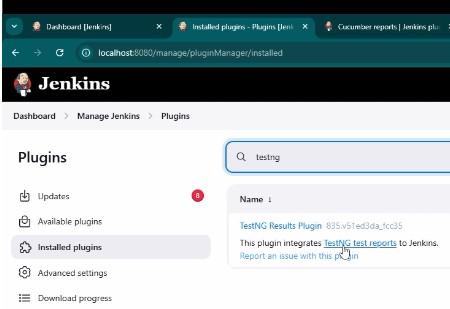
TestNG Results plugin
Step 2: Configure Job
- Execute TestNG tests and ensure the results are saved in XML format in locally first
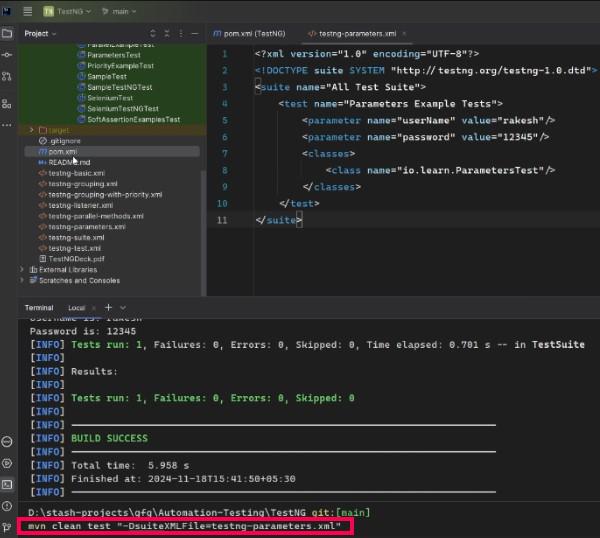
Configure Job
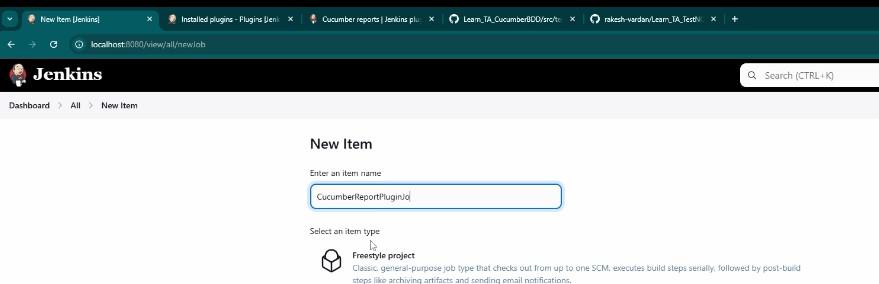
- Create a new project in jenkins.
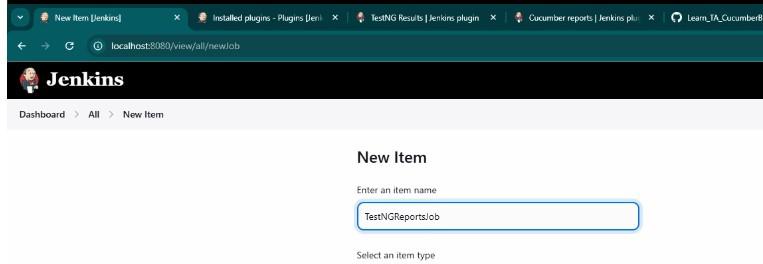
create a new testng job in jenkins
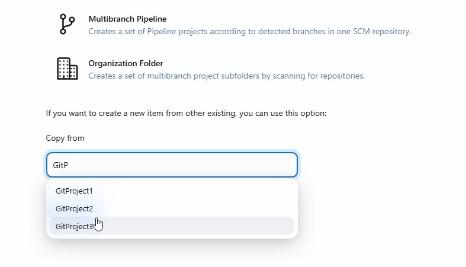
- Use the same as last we used copy the project using the last project configuration which we used.
copy the project using the last project
Use this Repository URL for the Project: Repository
- Update the Repository URL in the Jenkins project configuration
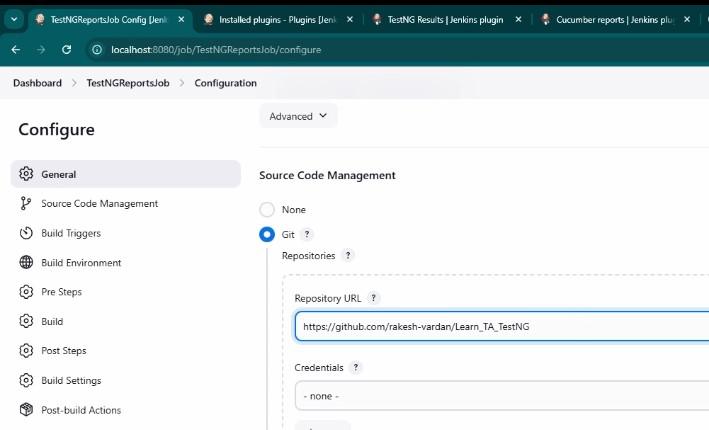
Update the Repository URL
- The goals and options of the project is like these:
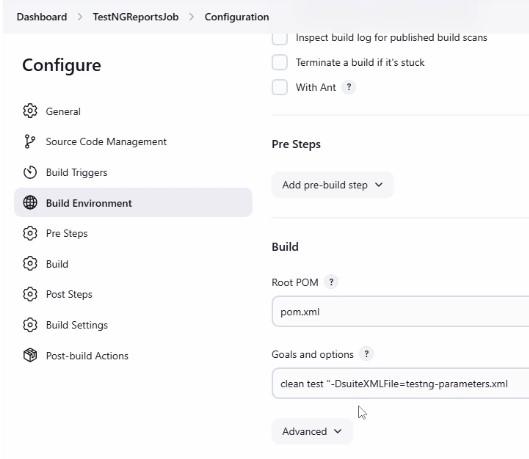
The goals
Step 3: Post-Build Action
- Select Publish TestNG Results.
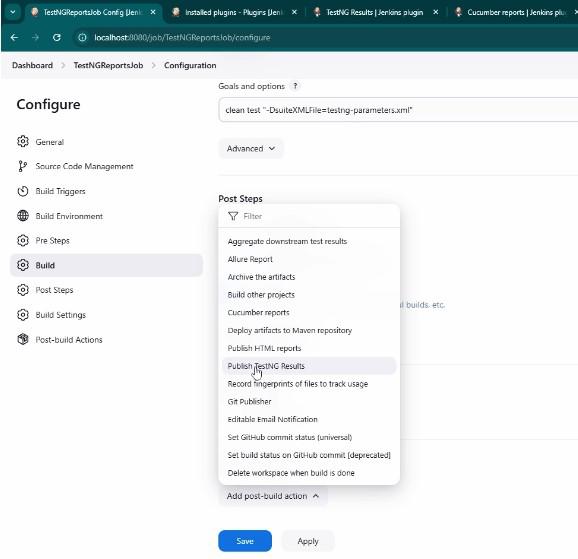
Select Publish TestNG Results
- Provide the path to the TestNG results file.
Step 4: Run Job
- View method-level statistics and overall execution details.
**Output:

Run Job
- Execution trends and test statuses displayed in Jenkins.
- Here are the testNG results :
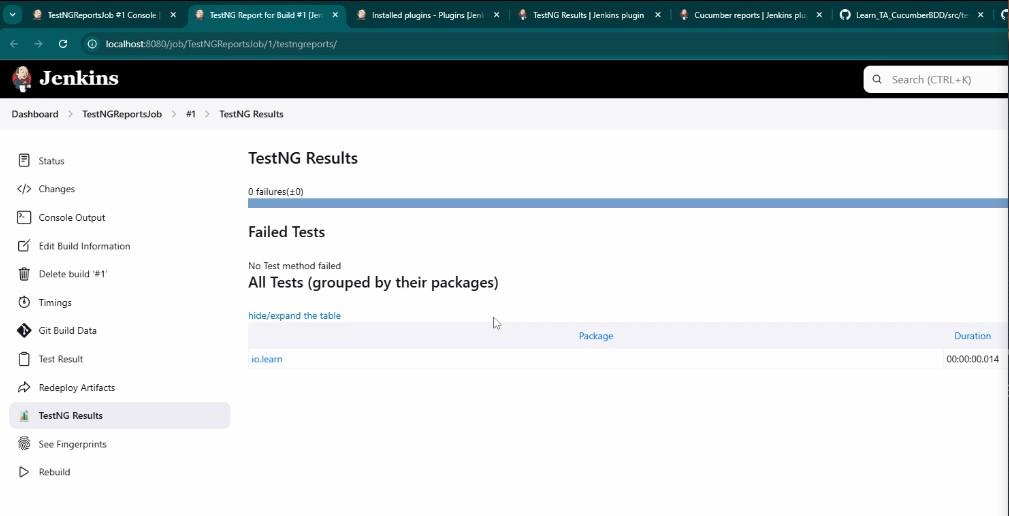
testNG results
3. Publishing HTML Reports
Objective: Display custom HTML reports generated by automation frameworks.
Step 1: Install HTML Publisher Plugin:
- Search for "HTML Publisher" and install the plugin.
Step 2: Configure Job
- Create a new job
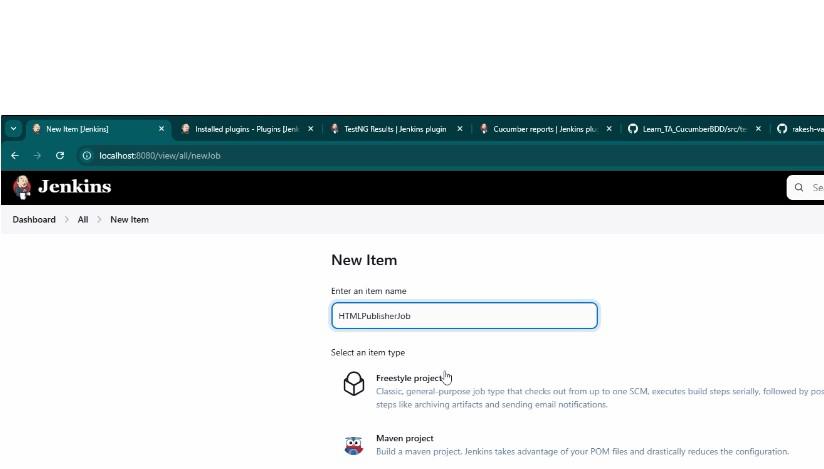
Create a new job
- Copy the same project which we last used:

Copy the same project
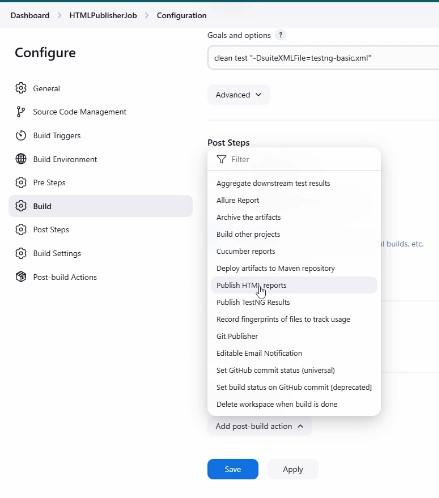
We used all configuration of the last project only we change the report template with the HTML publisher:
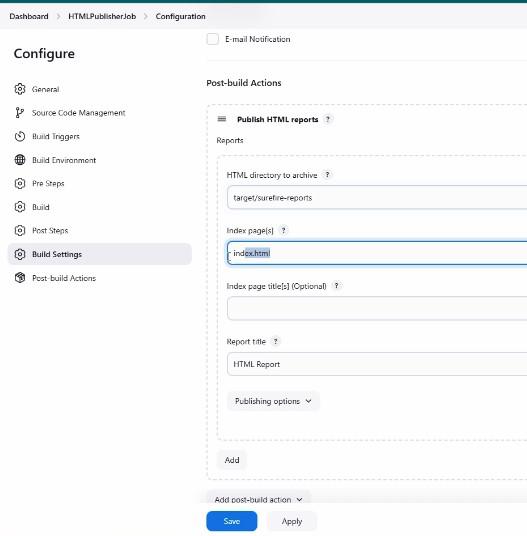
- Select Publish HTML Reports.
- Provide the directory and file path.
report template with the HTML publisher
- Ensure your automation framework generates an HTML report.
- Specify the report directory and file name (e.g., **target/surefire-reports/index.html).
Specify the report directory and file name
Step 3: Run Job
- Access the HTML report from the Jenkins dashboard.
**Output
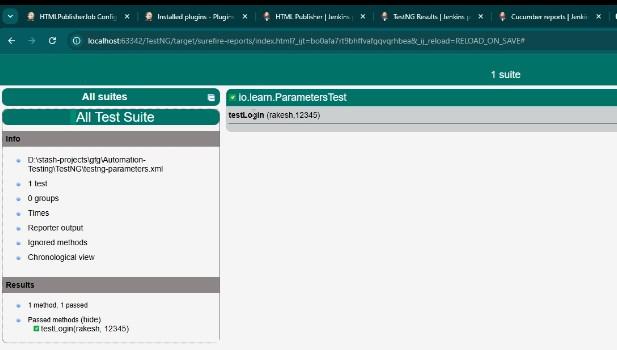
Access the HTML report
- Fully formatted HTML reports, accessible via Jenkins.