Expense Tracker Using Angular (original) (raw)
Last Updated : 14 Aug, 2024
Managing expenses efficiently is very important for personal finance. In this article, we'll walk through creating a simple yet effective Expense Tracker application using Angular 17. This project will showcase Angular's powerful features and provide a hands-on example of how to manage financial data.
**Project Preview
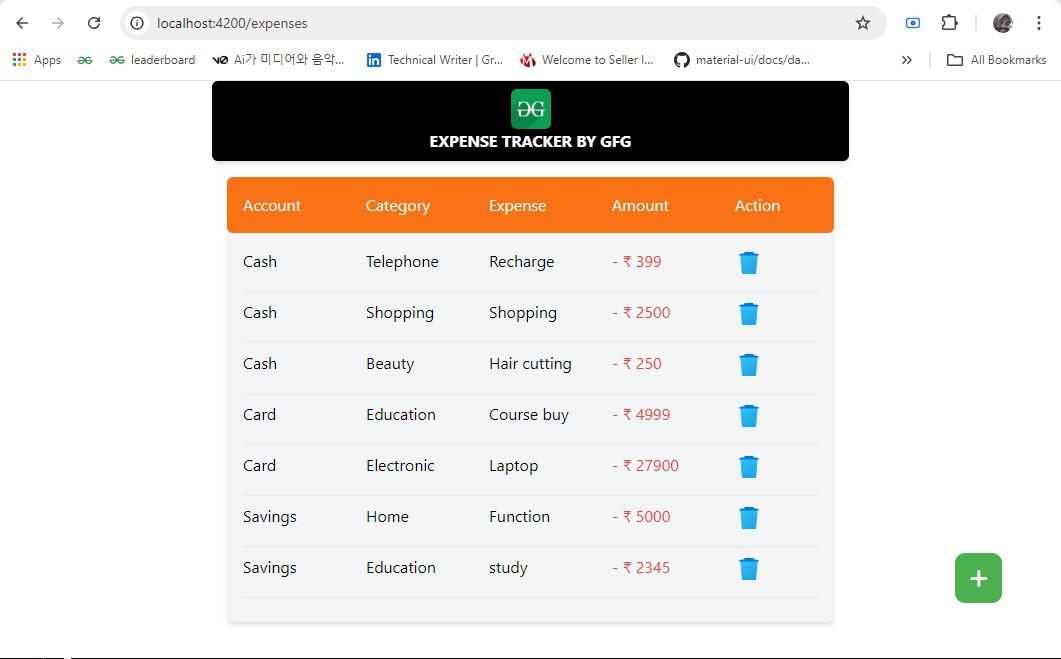
Expense Tracker Using Angular
Prerequisites
Approach
- We’ll create Angular components for adding, listing, and managing expenses.
- We’ll use Angular services to handle data interactions, such as saving expenses to a local storage or a backend API.
- Angular modules will help organize our application and manage different parts of the app.
Steps to Create the Application
**Step 1: Install Required Modules
First, let's set up our Angular project and install the necessary modules. Open your terminal and run the following commands:
ng new expense-tracker
cd expense-tracker
npm install tailwindcss
npm install postcss
**Step 2 : Configure TailwindCSS and PostCSS
**1. Create a tailwind.config.js file in the root directory by using the following command and add the following code in the file.
npx tailwindcss init
module.exports = {
content: ['./src/**/*.{html,ts}'],
theme: {
extend: {},
},
plugins: [],
};
**2. Create a postcss.config.js(src/postcss.config.js) file in the root directory:
module.exports = {
plugins: {
tailwindcss: {},
autoprefixer: {},
},
};
**3. Add TailwindCSS to your styles.css/ style.less:
@tailwind base;
@tailwind components;
@tailwind utilities;
**Step 3: Setting Up the Project
Next, let’s initialize our project and set up the basic components:
**1. Create components for adding and listing expenses:
ng generate component expense-list
ng generate component navbar
**2: Create a service to handle expense data. Run:
ng generate service services/expense
Dependencies
"dependencies": {
"@angular/animations": "^17.3.0",
"@angular/common": "^17.3.0",
"@angular/compiler": "^17.3.0",
"@angular/core": "^17.3.0",
"@angular/forms": "^17.3.0",
"@angular/platform-browser": "^17.3.0",
"@angular/platform-browser-dynamic": "^17.3.0",
"@angular/router": "^17.3.0",
"postcss": "^8.4.41",
"rxjs": "7.8.0",0.14.3"
"tailwindcss": "^3.4.9",
"tslib": "^2.3.0",
"zone.js": "
}
Folder Structure
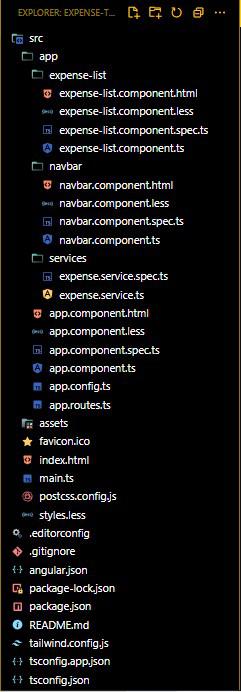
Folder Structure
**Example: Create the required files as seen in the folder structure and add the following codes.
App Component Code
Below mentioned is the App Component which is the first component which gets loaded which an Angular Application is built. It initalizes all other components in order to run them.
HTML `
HTML
<!-- Font Awesome CDN -->
<link rel="stylesheet" href="
https://cdnjs.cloudflare.com/ajax/libs/font-awesome/6.0.0-beta3/css/all.min.css">
CSS
/* src/style.less*/ @tailwind base; @tailwind components; @tailwind utilities;
JavaScript
// src/app/app.routes.ts import { Routes } from '@angular/router'; import { ExpenseListComponent } from './expense-list/expense-list.component';
export const routes: Routes = [ { path: '', redirectTo: '/expenses', pathMatch: 'full' }, { path: 'expenses', component: ExpenseListComponent },
];
JavaScript
// src/app/app.component.ts import { Component } from '@angular/core'; import { RouterOutlet } from '@angular/router';
@Component({ selector: 'app-root', standalone: true, imports: [RouterOutlet], templateUrl: './app.component.html', styleUrl: './app.component.less' }) export class AppComponent { title = 'expense-tracker'; }
`
Expense-List Component Code
Below mentioned is the Expense-List Component through which displays the list of Expenses added by the user having Account, Category, Expense, Amount and Action as the details of the expenses.
HTML `
<button (click)="openExpenseForm()" class="add-expense-button">
            </div>
            <div class="mt-2 mb-2">
                <hr>
            </div>
        </div>
    </div>

</div>
    <div class="flex justify-center font-bold text-gray-400">
        <h3>EXPENSE</h3>
    </div>
    <form (ngSubmit)="addExpense()">

        <div class="flex justify-between p-2">
            <label class="font-bold text-gray-400">
                Expense Name:
            </label>
            <div>
                <input type="text" [(ngModel)]="newExpense.name" name="name"
                    placeholder="Enter your expense name..." class="p-2 border rounded ml-2 w-full">
            </div>

        </div>
        <div class="flex justify-between p-2">
            <label class="font-bold text-gray-400">
                Amount:
            </label>
            <div>
                <input type="number" [(ngModel)]="newExpense.amount" name="amount"
                       placeholder="Enter amount"
                    class="p-2 border rounded ml-2 w-full" required>
            </div>
        </div>
        <div class="flex justify-between p-2 w-full">
            <label class="font-bold text-gray-400">
                Category:
            </label>
            <div>
                <select [(ngModel)]="newExpense.category" name="category" class="p-2 border
                                                                                 rounded  " required>

                    <option *ngFor="let cat of categories" [value]="cat">{{ cat }}</option>
                </select>


            </div>
        </div>
        <div class="flex justify-between p-2">
            <label class="font-bold text-gray-400">
                Account:
            </label>
            <div>
                <select [(ngModel)]="newExpense.account" name="account" class="p-2 border
                                                                               rounded w-[100%]"
                    required>

                    <option *ngFor="let acc of accounts" [value]="acc">{{ acc }}</option>
                </select>


            </div>
        </div>

        <div class="flex justify-between p-4 gap-4">
            <button type="button" (click)="closeExpenseForm() "
                class="bg-red-600 shadow-md rounded-md text-white p-2 w-full">Cancel</button>

            <button type="submit" class="bg-blue-600 shadow-md rounded-md text-white
                                         p-2 w-full ">Save</button>

        </div>

    </form>
</div>
CSS
/src/app/expense-list.component.less/ .add-expense-button { background-color: #4CAF50; /* Green */ border: none; color: white; padding: 10px 15px; text-align: center; text-decoration: none; display: inline-block; font-size: 20px; margin: 10px 0; cursor: pointer; border-radius: 10px; position: fixed; left: 90%; top: 80%;
}
.add-expense-button i { font-size: 20px; }
.expense-form { border: 1px solid #ccc; padding: 20px; border-radius: 5px; position: absolute; top: 50%; left: 50%; transform: translate(-50%, -50%); width: 60%;
z-index: 10;}
.expense-form form { display: flex; flex-direction: column; }
.expense-form label { margin-bottom: 10px; }
.expense-form input { margin-left: 10px; }
JavaScript
// src/app/expense-list.component.ts import { Component, OnInit } from '@angular/core'; import { ExpenseService } from '../services/expense.service'; import { CommonModule } from '@angular/common'; import { FormsModule } from '@angular/forms'; import { NavbarComponent } from "../navbar/navbar.component" @Component({ selector: 'app-expense-list', standalone: true, imports: [CommonModule, FormsModule, NavbarComponent], templateUrl: './expense-list.component.html', styleUrl: './expense-list.component.less' }) export class ExpenseListComponent { expenses: any[] = []; isFormVisible = false; newExpense = { name: '', amount: 0, category: '', account: '' }; categories = ['Baby', 'Beauty', 'Bills', 'Car', 'Clothing', 'Education', 'Electronic', 'Entertainment', 'Food', 'Health', 'Home', 'Insurance', 'Shopping', 'Social', 'Sport', 'Tax', 'Telephone', 'Transportation']; // Example categories accounts = ['Savings', 'Cash', 'Card'] constructor(private expenseService: ExpenseService) { }
ngOnInit() {
    // Subscribe to the expenses observable
    this.expenseService.expenses$.subscribe(expenses => {
        this.expenses = expenses;
    });
}

openExpenseForm() {
    this.isFormVisible = true;
}

closeExpenseForm() {
    this.isFormVisible = false;
    this.newExpense = { name: '', amount: 0, category: '', account: '' };
}

addExpense() {
    if (this.newExpense.name && this.newExpense.amount && this.newExpense.category
    && this.newExpense.account) {
        this.expenseService.addExpense(this.newExpense);
        this.closeExpenseForm();
    }
}

deleteExpense(expense: any) {
    const index = this.expenses.findIndex(e => e === expense);
    // Find index based on the expense object
    if (index >= 0) {
        this.expenseService.deleteExpense(index);
    } else {
        console.error('Expense not found for deletion');
    }
}
}
`
Navbar Component Code
Below mentioned is the Navbar Component through which we are demonstrating the navbar of our Expense Tracker which displays Expense Tracker by GFG as heading for the application having a white color text and Black Coloured Background.
HTML `
JavaScript
// src/app/navbar.component.ts import { Component } from '@angular/core';
@Component({ selector: 'app-navbar', standalone: true, imports: [], templateUrl: './navbar.component.html', styleUrl: './navbar.component.less' }) export class NavbarComponent {
}
`
Services
Below mentioned is the Expenses Service through which we are demonstrating an interface named as 'Expense' through which we can add and delete expenses.
JavaScript `
// src/app/services/expenses.service.ts import { Injectable } from '@angular/core'; import { BehaviorSubject } from 'rxjs';
interface Expense { name: string; amount: number; category: string; account: string; }
@Injectable({ providedIn: 'root' }) export class ExpenseService { private expensesKey = 'expenses'; private expenses = new BehaviorSubject<Expense[]>(this.getExpenses()); expenses$ = this.expenses.asObservable();
private getExpenses(): Expense[] {
    try {
        const savedExpenses = localStorage.getItem(this.expensesKey);
        return savedExpenses ? JSON.parse(savedExpenses) : [];
    } catch (error) {
        console.error('Failed to parse expenses from localStorage', error);
        return [];
    }
}

private saveExpenses(expenses: Expense[]) {
    try {
        localStorage.setItem(this.expensesKey, JSON.stringify(expenses));
    } catch (error) {
        console.error('Failed to save expenses to localStorage', error);
    }
}

addExpense(expense: Expense) {
    const currentExpenses = this.expenses.value;
    currentExpenses.push(expense);
    this.saveExpenses(currentExpenses);
    this.expenses.next([...currentExpenses]);
}


deleteExpense(index: number) {
    const currentExpenses = this.expenses.value;
    if (index >= 0 && index < currentExpenses.length) {
        currentExpenses.splice(index, 1);
        this.saveExpenses(currentExpenses);
        this.expenses.next([...currentExpenses]);
    } else {
        console.error('Invalid index for deletion');
    }
}
}
`
Steps to Run the Application
ng serve --open
Open your browser and navigate to **http://localhost:4200