Flutter ShaderMask Widget (original) (raw)
Last Updated : 23 Jul, 2025
**ShaderMask is a widget in Flutter that applies a shader to its child. It allows you to create various visual effects by manipulating the colors and gradients of the child widget. In this article, we are going to implement the ShaderMask widget and explore some of it.
**Basic Syntax of ShaderMask Widget
Dart `
ShaderMask( shaderCallback: (Rect bounds) { // Define the shader here return Shader; }, // Optional, specifies how the // shader blends with the child blendMode: BlendMode.modulate, // The widget you want // to apply the shader to child: Widget, )
`
**Required Tools
To build this app, you need the following items installed on your machine:
- Visual Studio Code / Android Studio
- Android Emulator / iOS Simulator / Physical Device.
- Flutter Installed
- Flutter plugin for VS Code / Android Studio.
Step-by-Step Implementations
Step 1: Create a new Flutter Application
Create a new Flutter application using the command Prompt. To create a new app, write the following command and run it.
flutter create app_name
To know more about it refer this article: Creating a Simple Application in Flutter.
Step 2: Import the Package
First of all, import material.dart file.
import 'package:flutter/material.dart';
Step 3: Execute the main Method
Call the runApp() method in the main() method to start the app.
Dart `
void main() { runApp(MyApp()); }
`
Step 4: Create MyApp Class
In this class, we are going to implement the MaterialApp, Here, we are also setting the Theme of our App.
Dart `
class MyApp extends StatelessWidget { @override Widget build(BuildContext context) { return MaterialApp( theme: ThemeData( primarySwatch: Colors.green, // Set the app's primary theme color ), debugShowCheckedModeBanner: false, home: ShaderMaskExampleScreen(), ); } }
`
Step 5: Create ShaderExampleScreen Class
In this class, we are going to implement the ShaderExampleScreen widget that helps to add shader color effects to its child.
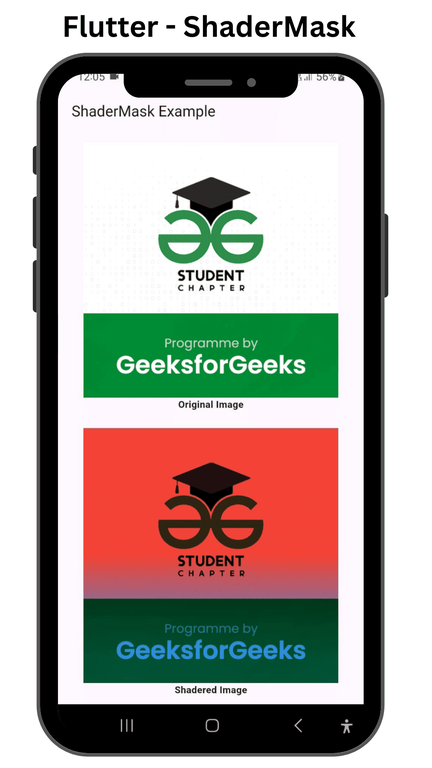
ShaderMask(
shaderCallback: (Rect bounds) {
// Create a linear gradient shader for the mask
return LinearGradient(
colors: [Colors.red, Colors.blue],
stops: [0.5, 0.9],
begin: Alignment.topCenter,
end: Alignment.bottomCenter,
).createShader(bounds);
},
child: Image.network(
'https://media.geeksforgeeks.org/wp-content/cdn-uploads/20220512131412/Student-Chapter-Article-Banner.png',
width: 300.0,
height: 300.0,
fit: BoxFit.cover,
),
),
**Code:
Dart `
class ShaderMaskExampleScreen extends StatelessWidget { @override Widget build(BuildContext context) { return Scaffold( appBar: AppBar(title: Text('ShaderMask Example')), body: Center( child: Column( mainAxisAlignment: MainAxisAlignment.center, children: [ // Original Image Image.network( 'https://media.geeksforgeeks.org/wp-content/cdn-uploads/20220512131412/Student-Chapter-Article-Banner.png', width: 300.0, height: 300.0, fit: BoxFit.cover, ), Text( "Original Image", style: TextStyle(fontWeight: FontWeight.bold), ),
        SizedBox(height: 20.0), // Add some spacing between the images
        // Image with ShaderMask
        ShaderMask(
          shaderCallback: (Rect bounds) {
            // Create a linear gradient shader for the mask
            return LinearGradient(
              colors: [Colors.red, Colors.blue],
              stops: [0.5, 0.9],
              begin: Alignment.topCenter,
              end: Alignment.bottomCenter,
            ).createShader(bounds);
          },
          child: Image.network(
            'https://media.geeksforgeeks.org/wp-content/cdn-uploads/20220512131412/Student-Chapter-Article-Banner.png',
            width: 300.0,
            height: 300.0,
            fit: BoxFit.cover,
          ),
        ),
        Text(
          "Shadered Image",
          style: TextStyle(fontWeight: FontWeight.bold),
        ),
      ],
    ),
  ),
);
} }
`
Complete Source Code
**main.dart:
main.dart `
import 'package:flutter/material.dart';
void main() { runApp(MyApp()); }
class MyApp extends StatelessWidget { @override Widget build(BuildContext context) { return MaterialApp( theme: ThemeData( primarySwatch: Colors.green, // Set the app's primary theme color ), debugShowCheckedModeBanner: false, home: ShaderMaskExampleScreen(), ); } }
class ShaderMaskExampleScreen extends StatelessWidget { @override Widget build(BuildContext context) { return Scaffold( appBar: AppBar(title: Text('ShaderMask Example')), body: Center( child: Column( mainAxisAlignment: MainAxisAlignment.center, children: [ // Original Image Image.network( 'https://media.geeksforgeeks.org/wp-content/cdn-uploads/20220512131412/Student-Chapter-Article-Banner.png', width: 300.0, height: 300.0, fit: BoxFit.cover, ), Text( "Original Image", style: TextStyle(fontWeight: FontWeight.bold), ),
        SizedBox(height: 20.0), // Add some spacing between the images
        // Image with ShaderMask
        ShaderMask(
          shaderCallback: (Rect bounds) {
            // Create a linear gradient shader for the mask
            return LinearGradient(
              colors: [Colors.red, Colors.blue],
              stops: [0.5, 0.9],
              begin: Alignment.topCenter,
              end: Alignment.bottomCenter,
            ).createShader(bounds);
          },
          child: Image.network(
            'https://media.geeksforgeeks.org/wp-content/cdn-uploads/20220512131412/Student-Chapter-Article-Banner.png',
            width: 300.0,
            height: 300.0,
            fit: BoxFit.cover,
          ),
        ),
        Text(
          "Shadered Image",
          style: TextStyle(fontWeight: FontWeight.bold),
        ),
      ],
    ),
  ),
);
} }
`
**Output: