Flutter State Management Provider (original) (raw)
Last Updated : 23 Jul, 2025
In this article, we are going to learn how state management is achieved in Flutter using providers. But before that, we need to know what a state is. As we know that everything in Flutter is a widget, and there are mainly two kinds of widgets: **Stateless Widgets and Stateful Widgets. Stateless widgets are those widgets whose state cannot be changed once created. It can only be when it is reinitialized. On the other hand, Stateful widgets are dynamic, which means their state can change at any time throughout their lifecycle without reinitializing them.
**What is a State?
State is the information that is read once the widget is built. It can be changed or modified throughout the lifecycle of the app. According to the official documentation of Flutter, Flutter is declarative, which means that the UI in Flutter is a function of the state. That means the UI of a Flutter app is built based on the state of the widgets.
In the case of a stateful widget, the **setState() method is used to change the state and that forces the UI to rebuild. However, it is not an efficient method for state management and will learn state management using the provider package which is a better state management technique in the latter half of this article.
Now, before using the provider package, we need to understand the three basic concepts about it:
- ChangeNotifier
- ChangeNotifierProvider
- Consumer
**ChangeNotifier
It is a class that provides **notifications for changes to its listeners. It is a simpler way to use for a small number of listeners. It uses the **notifyListeners() method to notify its listeners about changes in the model.
For example, let us create a class CounterModel which will extend ChangeNotifier, and it will have a function incrementCounter() which will increment the counter and notify its listeners about the changes using notifyListeners(), and UI will get updated.
Dart `
import 'package:flutter/material.dart';
// CounterModel class that extends ChangeNotifier to manage state class CounterModel with ChangeNotifier { // Private counter variable int _counter = 0;
// Constructor to initialize the counter
CounterModel(this._counter);

// Getter to access the counter value
int get counter => _counter;

// Method to increment the counter and notify listeners
void incrementCounter() {
    _counter++;
    notifyListeners();
}
}
`
**ChangeNotifierProvider
In simple terms, ChangeNotifierProvider is just a widget that **provides anContext instance of a ChangeNotifier. The code snippet below will give you a better idea of how it works.
Dart `
class MyApp extends StatelessWidget { @override Widget build(BuildContext context) { return MaterialApp( debugShowCheckedModeBanner: false, home: ChangeNotifierProvider( // Provide CounterModel to the widget tree // Initialize CounterModel with 0 create: (_) => CounterModel(0), // Child widget that consumes the model child: CounterModelView(), ), ); } }
`
**Consumer
It is a widget that contains a builder function and is used to build the UI based on changes in the model. The builder function will have three parameters **context, counter, and child.
- Context is the same as every other build function of the widget.
- The counter is the CounterModel member that was observed for change.
- The third argument, child, is used for optimization. Dart `
// Consumer widget to listen to changes in CounterModel Consumer( builder: (context, counterModel, child) { // Display counter value return Text( "The value of counter is: ${counterModel.counter}", style: const TextStyle(fontSize: 20), ); }, ),
`
Use code below, To call **IncrementCounter() that is in CounterModel class that used to update the state i.e, counter value.
Dart `
// Increment counter when button is pressed context.read().incrementCounter();
`
Let's implement a provider in a simple counter Flutter app.
**Step-by-Step to Implementation
Step 1: Create a new Flutter Application
Create a new Flutter application using the command Prompt. To create a new app, write the following command and run it.
flutter create app_name
To know more about it refer this article: Creating a Simple Application in Flutter
Step 2: Adding the Dependency
To add the dependency to the **pubspec.yaml file, add **provider as a dependency in the dependencies part of the pubspec.yaml file__,_ as shown below:
Dart `
dependencies: flutter: sdk: flutter provider: ^6.1.4
`
Now, run the command below in the terminal.
flutter pub get
**Or
Run the below command in the terminal.
flutter pub add provider
Step 3: Import dependencies
To use libraries, import all of them in the respective .dart file.
import 'package:provider/provider.dart';
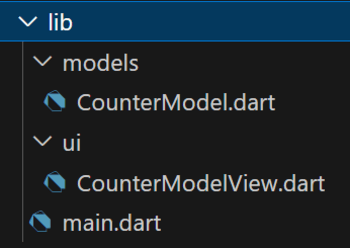
Step 4: Folder Structure
Follow the folder structure below for better understanding.
Step 5: Working with CounterModel.dart
**CounterModel.dart contains a class named **CounterModel that extends **ChangeNotifier, and that contains
- **A private counter variable: Used to store the counter value.
- **Constructor: Used to initialize the counter.
- **Getter: Used to access the current counter value.
- **incrementCounter() Method: Used to increment the counter and notify listeners.
**CountModel.dart:
Dart `
// CounterModel class that extends ChangeNotifier to manage state import 'package:flutter/material.dart';
class CounterModel with ChangeNotifier { // Private counter variable int _counter = 0;
// Constructor to initialize the counter CounterModel(this._counter);
// Getter to access the counter value int get counter => _counter;
// Method to increment the counter and notify listeners void incrementCounter() { _counter++; notifyListeners(); } }
`
Step 6: Working with main.dart
Add the boilerplate code below in main.dart to initialize the **CounterModel using **ChangeNotifierProvider in the main function and which contains below attributes.
- **create: Used to initialize CounterModel with 0, so that we can see ****'0'** as count when the app is opened for the first time. If you initialize the CounterModel with 1,i.e, **CounterModel(1), the a then we will see ****'1'** as count when the app is opened.
- **child: Used to call a widget that consumes the model.
**main.dart:
Dart `
import 'package:flutter/material.dart'; import './models/CounterModel.dart'; import './ui/CounterModelView.dart'; import 'package:provider/provider.dart';
void main() => runApp(MyApp());
class MyApp extends StatelessWidget { @override Widget build(BuildContext context) { return MaterialApp( debugShowCheckedModeBanner: false, home: ChangeNotifierProvider( // Provide CounterModel to the widget tree // Initialize CounterModel with 0 create: (_) => CounterModel(0), // Child widget that consumes the model child: CounterModelView(), ), ); } }
`
Step 7: Working with CounterModelView.dart
CounterModelView.dart contains the UI part of the app, which gets the updated state using a **Consumer that contains the following attributes:
- **builder: (context, counterModel, child): Used to take care of the process of updating the UI when the state is updated.
- **context: It is used to access the widget tree.
- **counterModel: It is used to call the getter variable **counter to get the updated state, i.e, the value of count for updating the UI of app.
- **child: It is a widget that is passed down the widget tree.
**CounterModelView.dart:
Dart `
// Stateful widget to display and interact with the counter import 'package:flutter/material.dart'; import 'package:flutter_geeks/models/CounterModel.dart'; import 'package:provider/provider.dart';
class CounterModelView extends StatefulWidget { const CounterModelView({super.key});
@override State createState() => _CounterModelViewState(); }
// State class for CounterModelView class _CounterModelViewState extends State { @override Widget build(BuildContext context) { return Scaffold( appBar: AppBar( title: const Text("Counter App"), // App bar title backgroundColor: Colors.green, // App bar background color foregroundColor: Colors.white, // App bar text color ), body: Center( // Consumer widget to listen to changes in CounterModel child: Consumer( builder: (context, counterModel, child) { // Display counter value return Text( "The value of counter is: ${counterModel.counter}", style: const TextStyle(fontSize: 20), ); }, ), ), floatingActionButton: FloatingActionButton( backgroundColor: Colors.green, foregroundColor: Colors.white, onPressed: () { // Increment counter when button is pressed context.read().incrementCounter(); }, child: const Icon(Icons.add), // Button icon ), ); } }
`
**Complete Source Code
CounterModel.dart `
// CounterModel class that extends ChangeNotifier to manage state import 'package:flutter/material.dart';
class CounterModel with ChangeNotifier { // Private counter variable int _counter = 0;
// Constructor to initialize the counter CounterModel(this._counter);
// Getter to access the counter value int get counter => _counter;
// Method to increment the counter and notify listeners void incrementCounter() { _counter++; notifyListeners(); } }
CounterModelView.dart
// Stateful widget to display and interact with the counter import 'package:flutter/material.dart'; import 'package:flutter_geeks/models/CounterModel.dart'; import 'package:provider/provider.dart';
class CounterModelView extends StatefulWidget { const CounterModelView({super.key});
@override State createState() => _CounterModelViewState(); }
// State class for CounterModelView class _CounterModelViewState extends State { @override Widget build(BuildContext context) { return Scaffold( appBar: AppBar( title: const Text("Counter App"), // App bar title backgroundColor: Colors.green, // App bar background color foregroundColor: Colors.white, // App bar text color ), body: Center( // Consumer widget to listen to changes in CounterModel child: Consumer( builder: (context, counterModel, child) { // Display counter value return Text( "The value of counter is: ${counterModel.counter}", style: const TextStyle(fontSize: 20), ); }, ), ), floatingActionButton: FloatingActionButton( backgroundColor: Colors.green, foregroundColor: Colors.white, onPressed: () { // Increment counter when button is pressed context.read().incrementCounter(); }, child: const Icon(Icons.add), // Button icon ), ); } }
main.dart
import 'package:flutter/material.dart'; import './models/CounterModel.dart'; import './ui/CounterModelView.dart'; import 'package:provider/provider.dart';
void main() => runApp(MyApp());
class MyApp extends StatelessWidget { @override Widget build(BuildContext context) { return MaterialApp( debugShowCheckedModeBanner: false, home: ChangeNotifierProvider( // Provide CounterModel to the widget tree // Initialize CounterModel with 0 create: (_) => CounterModel(1), // Child widget that consumes the model child: CounterModelView(), ), ); } }
`
**Output:
**Explanation of the above Program:
The app flow goes like this, when we initialize the class with particular parameter, like **CounterModel(0) then the constructor updates the value of private variable and next that updated value is again reinitialized to getter variable, so that we can directly call getter variable like this **counterModel.counter for the updated state, if we call CounterModel(1) then the private variable will initialize to value ****'1'**, then we will see 1 in UI. When we call the **incrementCounter() method, the state is updated, and it notifies to **Consumer that the counter has been incremented, so the value is updated in the UI.