Formatting Cells using openpyxl in Python (original) (raw)
Last Updated : 22 Aug, 2024
When it comes to managing Excel files programmatically, Python offers a powerful tool in the form of the openpyxl library. This library not only allows us to read and write Excel documents but also provides extensive support for cell formatting. From fonts and colors to alignment and borders, openpyxl makes it easy to customize our Excel sheets to fit our needs precisely. In this article, we will learn how to format cells using OpenPyxl
Getting Started with openpyxl
Formatting cells in Excel using the openpyxl library involves several steps that allow us to customize the appearance and functionality of our spreadsheets programmatically. Here's a step-by-step guide to help us get started:
Install openpyxl
First, we need to install the openpyxl library in our Python environment.
pip install openpyxl
Create a Workbook
We can create a work book by creating an instance of **Workbook class.
Python `
from openpyxl import Workbook
Create a Workbook
wb = Workbook()
Get the work sheet
sheet = wb.active
Modify the cells in the work sheet
sheet["A1"] = "hello" sheet["B1"] = "geek!"
Save the workbook
wb.save(filename="hello_geek.xlsx")
`
Each work book is created with at least one work sheet that we can get using the **Workbook.active property. Here, we are modifying the value in the A1 and B1 cell. Lastly saving the file to get the excel file named "hello_geek.xlsx".
**Output
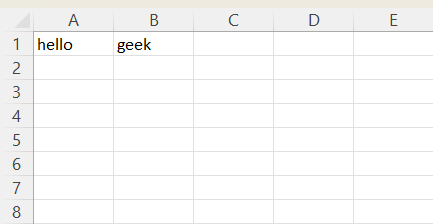
Create a work book using openpyxl
Renaming the sheet
Python `
...
Rename the worksheet
sheet.title = "Geek Sheet"
...
`
**Output
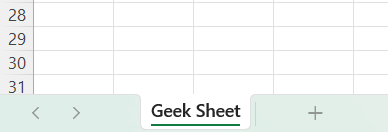
Rename the sheet using openpyxl
Font Formatting
To format the font, we need to import Font class from openpyxl.styles. The Font class provides all the functionality to format cell. Let us customize the font style, size, color, and more to enhance text appearance.
Python `
...
from openpyxl.styles import Font
...
Example: Tomato-colored, bold, and italic text
sheet['A1'].font = Font( name='Calibri', bold=True, italic=True, size=14, color="FF6347" )
...
`
**Output
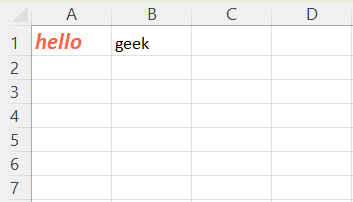
Format cell using openpyxl
How to Fill Color in Cell
We can fill color using the PatternFill class from the openpyxl.styles. Here, we are changing the background color of cells to Yellow.
Python `
...
from openpyxl.styles import PatternFill
...
Example: Solid yellow fill
sheet['B1'].fill = PatternFill(start_color="FFFF00", end_color="FFFF00", fill_type="solid")
...
`
**Output
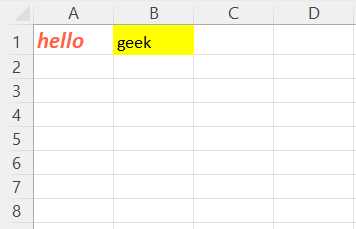
Fill color in cell using openpyxl
How to Adjust Cell Alignment
We can adjust the alignment of the text within cells using the **Alignment class from openpyxl.styles
Python `
...
from openpyxl.styles import Alignment
...
Center text horizontally and vertically
sheet['A3'] = "I'm vertically and Horizontally Centered" sheet['A3'].alignment = Alignment(horizontal='center', vertical='center')
...
`
**Output
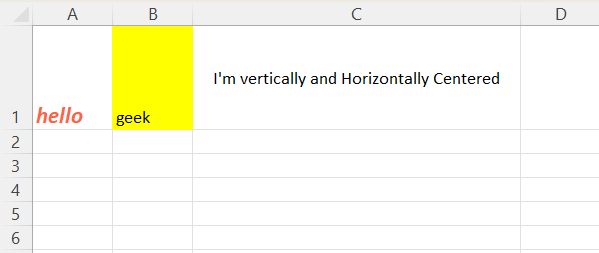
Change alignment of text in a cell using openpyxl
How to change Border Styles of a cell
We can modify borders of cells to define areas clearly by using the Border and Side classes from the openpyxl.styles.
Python `
...
from openpyxl.styles import Border, Side
...
border_thick = Side(style='thick') border_thin = Side(style='thin') borded_dashed = Side(style='dashed') border_dotted = Side(style='dotted')
Apply different border styles
sheet['C1'].border = Border(top=border_thick, left=border_thin, right=borded_dashed, bottom=border_dotted)
...
`
**Output
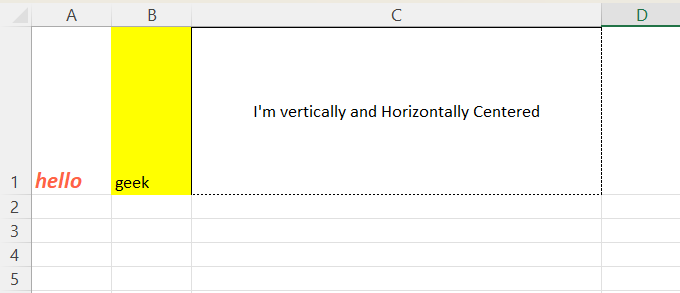
Border formatting using openpyxl
Step 8: Number Formatting
Apply number formats for displaying financial figures, dates, or other formatted numbers.
Python `
...
sheet['A3'] = 4312345.6789 sheet['A3'].number_format = '#,##0.00'
sheet['B3'] = "2024-01-01" sheet['B3'].number_format = 'yyyy-mm-dd'
...
`
**Output
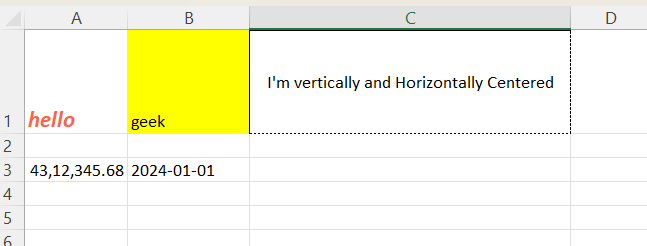
Number formatting using Openpyxl
How to save the Workbook
We can use the Workbook.save() method to save the workbook with a custom name.
Python `
...
wb.save("hello_geek.xlsx")
`
Complete Code:
The code demonstrates how to use **openpyxl to create and format an Excel sheet. We can enhance this by adding more complex data analysis, charts, or additional formatting to meet specific business needs. This example serves as a foundational guide to creating professional, formatted reports with Python.
Python `
from openpyxl import Workbook from openpyxl.styles import Font, PatternFill, Alignment, Border, Side
Create a workbook
workbook = Workbook()
Get the active sheet
sheet = workbook.active
Change content in cell
sheet['A1'] = "hello" sheet['B1'] = "geek"
sheet.title = "Geek Sheet"
Example: Tomato-colored, bold, and italic text
sheet['A1'].font = Font( name='Calibri', bold=True, italic=True, size=14, color="FF6347" )
Example: Solid yellow fill
sheet['B1'].fill = PatternFill(start_color="FFFF00", end_color="FFFF00", fill_type="solid")
Change the allignment
sheet['C1'] = "I'm vertically and Horizontally Centered" sheet['C1'].alignment = Alignment(horizontal='center', vertical='center')
Set border properties
border_thick = Side(style='thick') border_thin = Side(style='thin') borded_dashed = Side(style='dashed') border_dotted = Side(style='dotted')
Apply different border styles
sheet['C1'].border = Border(top=border_thick, left=border_thin, right=borded_dashed, bottom=border_dotted)
Format number to 2 decimal places
sheet['A3'] = 4312345.6789 sheet['A3'].number_format = '#,##0.00'
Format date
sheet['B3'] = "2024-01-01" sheet['B3'].number_format = 'yyyy-mm-dd'
Save the work book
workbook.save("hello_geek.xlsx")
`
**Output
Modify Excel Sheet using Openpyxl
Conclusion
By following these steps, we can fully customize our Excel files using Python. This process not only enhances the presentation of the data but also allows for better readability and professional-quality reports. **openpyxl is a powerful tool for anyone looking to automate or enhance their Excel-related tasks programmatically.