Staging in Git (original) (raw)
Last Updated : 7 May, 2026
In git the staging area (also called the index) is an intermediate space where changes are gathered before they are committed. Think of it as a draft board: you can organize and review what changes you want to include in the next commit. The staging area allows you to:
- Selectively choose changes to commit.
- Break down large changes into smaller, logical commits.
- Review your work before finalizing it in the repository.
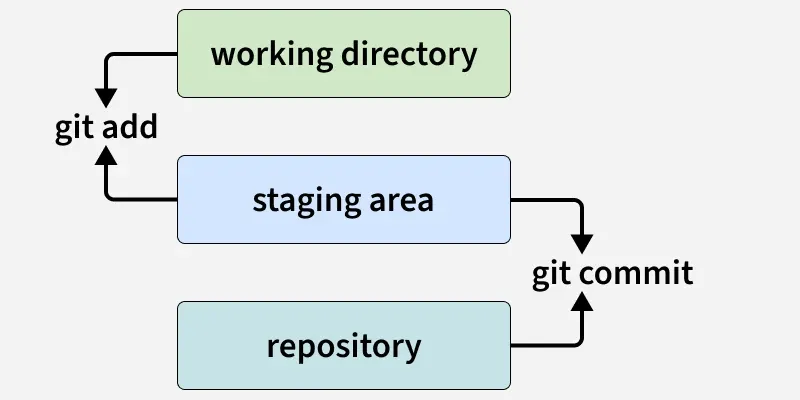
Git Staging Workflow
- **Working Directory: Contains your local files and changes (untracked or modified).
- **git add: Moves selected changes from Working Directory to Staging Area for preparation.
- **Staging Area: Holds files ready to be committed (also called index).
- **git commit: Saves the staged changes as a snapshot to the Repository.
- **Repository: Stores the full history of committed changes (local Git repo).
Workflow
Basic Staging Commands
**1. Staging All Changes
To stage all modified files in your working directory, use:
git add .
Alternatively, you can use:
git add -A
This adds all changes, including new, modified, and deleted files.
2. Staging Changes in a File
Let’s say we edit a.txt and run:
git status
- Changes appearing in green indicate the file is staged but not yet committed.
- Changes appearing in red are not staged yet.
Example:
- You write
"hello"ina.txtand stage it usinggit add .. - Then you add
"bhailogs"but don’t stage it. Runninggit statusshows"bhailogs"in red, indicating unstaged changes.
3. Unstage a File
To remove a file from the staging area, use:
git reset file_name
Example:
- You staged
b.txtbut now want to unstage it:
git reset b.txt
The file remains in your working directory but is removed from staging.
4. Staging Changes by Hunk
Sometimes you want to stage only parts of a file. Git allows hunk-level staging:
git add -p
This opens an interactive prompt for each hunk (block of changes) in the file:
| Stages of Hunk | Action Performed |
|---|---|
| y | Stage this hunk for the next commit |
| n | do not stage this hunk for the next commit |
| q | quit; do not stage this hunk or any of the commits |
| a | stage this hunk and all later hunks in the file |
| d | do not stage this hunk or any of the later hunks in the file |
| e | manually edit the current hunk |
| ? | print hunk help |
This is useful when you want to commit only specific changes while leaving other changes unstaged.
5. Interactive Add
Git also provides an interactive staging interface:
git add -i
This interface breaks down the output into staged and unstaged changes. You can perform various actions:
- **status: Shows the current state of files.
- **update: Stage modified files.
- **revert: Revert changes back to HEAD.
- **add untracked: Stage untracked files.
- **patch: Stage individual hunks interactively.
- **diff: Shows changes to be committed.
- **quit: Exit the interactive interface.
- **help: Displays help for interactive commands.
Staging Specific Cases
1. Stage a Single File
git add file_name
**Example:
git add b.txt
2. Stage Deleted Files
- To remove a file permanently from Git:
git rm -f file_name
- To remove a file from Git without deleting it from disk:
git rm --cached file_name
**Example:
- You create
r.txt, stage it, and then remove it using--cached. The file is removed from staging but remains in your working directory as untracked. You can stage it again using:
git add r.txt