How to Add Headers in Google Docs [Full Guide] (original) (raw)
Last Updated : 23 Jul, 2025
How to Make Header in Google Docs - Quick Steps
- Open Google Docs>> Go to Insert Option
- Select Headers and Footers>> Choose Header
- Type you header>> Format the Header
- Close the Header
Adding **headers in Google Docs is an essential way to organize and structure your documents, whether you're writing a report, research paper, or a professional proposal. Headers give your document a polished, organized look, improving navigation for readers. This guide will show you the easiest ways to **add and edit headers across various devices, including desktop, Mac, and mobile devices like **Android and **iPhone.
We’ll also cover advanced features such as customizing headers. Follow along to make your Google Docs documents more organized and professional.

How to Add Headers in Google Docs
Table of Content
- How to Add and Edit Headers in Google Docs (Desktop/Mac)
- How to Insert a Header in Google Docs on Mobile (Android & iPhone)
- How to Customize headers in Google Docs
- How to Add Headings in Google Docs [H1/H2/H3/H4]
- Complete List of Keyboard Shortcut Keys for Headings in Google Docs
How to Add and Edit Headers in Google Docs (Desktop/Mac)
This is the most straightforward method for adding headers in Google Docs on the web. It allows you to place headers at the top of every page in your document.
**Step 1: Open Google Docs
To begin, open Google Docs in your preferred web browser. You can either create a new document or open an existing one that you need to add headers or footers to.
Next, navigate to the **Insert tab located at the top of the screen. The **Insert menu contains all the tools you need to add elements like **images, **tables, **headers, **footers, and more. Click on the **Insert tab to expand the dropdown.

Use the Insert Menu
Under the **Insert menu, hover over the **Headers& Footers option. Click and select **Header. This action will insert a header at the top of your document. Your cursor will automatically be placed in the header section, allowing you to begin typing.

Select Header or Footer
Once you’ve inserted the header, you can start typing the text you want to appear across your document. This could be a title, page numbers, or any other information that you want to be consistent across all pages.
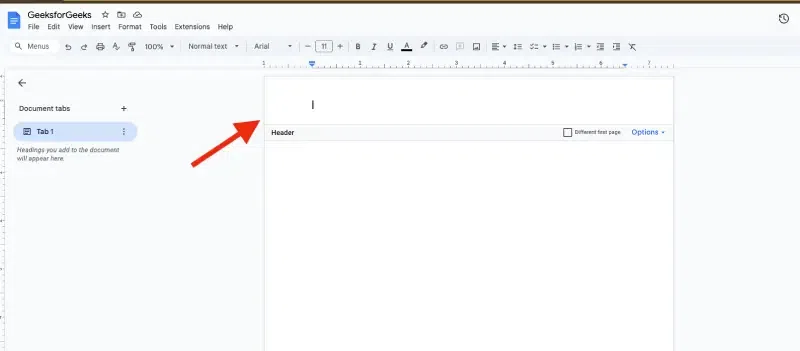
Start Typing in the Header or Footer
**Note: This method is simple and guarantees that the header or footer will appear consistently on every page, making it perfect for documents that require uniformity.Once added, you can begin typing the content directly in the header or footer section. By default, the header and footer will appear the same across all pages.
Keyborad Shortcut Keys to Insert Header in a Page
On Windows/ChromeOS:
- Hold **Ctrl and **Alt keys together.
- While holding them, press **O first, then press **H.
On Mac:
- Hold **Cmd and **Control keys together.
- While holding them, press **O first, then press **H.
By using these shortcuts, you can quickly add a header to your Google Docs document!
How to Insert a Header in Google Docs on Mobile (Android & iPhone)
While Google Docs on mobile devices isn't as feature-rich as the desktop version, it still provides the ability to add headers to your document on both iOS and Android. Follow these simple steps to insert a header on your mobile device:
Step 1: Open the Google Docs App
Launch the **Google Docs app on your **mobile device (iOS or Android). **Open the document in which you want to add a header. If you haven't already started editing, tap on the **pencil icon to begin making changes to your document.

Open the Google Docs App
Tap the **three-dot menu icon located at the **top-right corner of the screen.

Tap three-dot Menu
Step 3: Enable Print Layout
In order to **view and **edit headers, you must first enable the **Print Layout. **From the menu options, toggle the **Print Layout switch to the **On position. This will enable the layout where headers and footers can be added.

Enable Print Layout
Once Print Layout is enabled, follow these steps to add a header:
- Tap at the very **top of the document page where the header section is located.
- Start typing the text you want to appear in the header. This could be the title of your **document, author name, or any other information that should appear consistently across all pages.
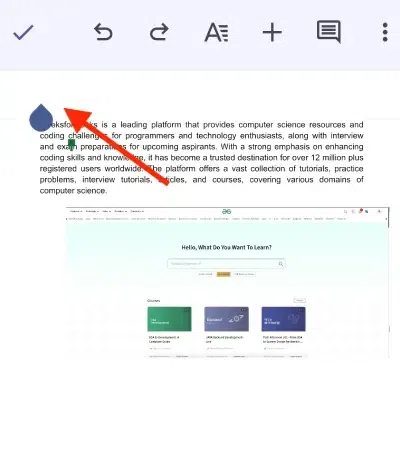
Add the Header
You can format the header text using the standard text formatting options available in Google Docs, such as adjusting the **font, **size, **color, and **alignment.
Once you're done adding content to the header, tap anywhere in the main body of the document to exit the header section. Your header will now appear on every page of the document.
Sometimes, you may need different headers or footers on different pages of your document, especially in **reports or academic papers. Google Docs allows you to customize headers or footers for specific sections of the document.
**Step 1: Open the Document
**Open your Google Docs document where you want to make customizations to the header or footer. Make sure you have a clear idea of where you need to change the header or footer.
**Step 2: Insert a Section Break
To create different headers or footers in different sections, you need to insert a **Section Break. Place your cursor before the page where the change should occur. Then, go to the **Insert menu, select **Break, and click **Section Break (Next Page). This will create a new section that can have a different header or footer.

Insert a Section Break
After adding the section break, **click into the header or **footer area of the new section. You will see a checkbox called **Link to Previous. Uncheck this box to unlink the header/footer from the previous section. This allows you to edit the header or footer in this section without affecting the earlier parts of the document.
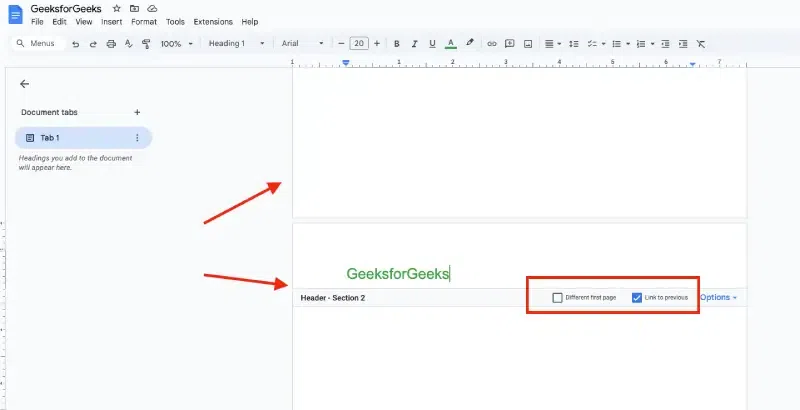
Modify the Header/Footer
**Step 4: Customize the Content
Now you can customize the header with different information for this section of the document. For example, you may want a different title, author, or page numbering system.
Follow the below steps to add header in Google docs using Menu Bar:
Step 1: Go to Google Docs and Open a Document
In the very first step, we need to **visit the Google Docs official website, from which we are allowed to create and edit the documents. Navigate to the **Google Docs website. Use the following link to visit the official Google Docs website and open the document in which we need to add Headings.

Go to Google Docs and Open a Document
Step 2: Click on the Style Drop-down Box
After opening the document, **navigate to the Menu Bar, in the menu bar you will see various options, so from these options, we need to look for the Style drop-down which has the sub-options as ****"Normal text, Title, Headings**" in the Format menu etc. So we need to click on this drop-down to select the appropriate option.
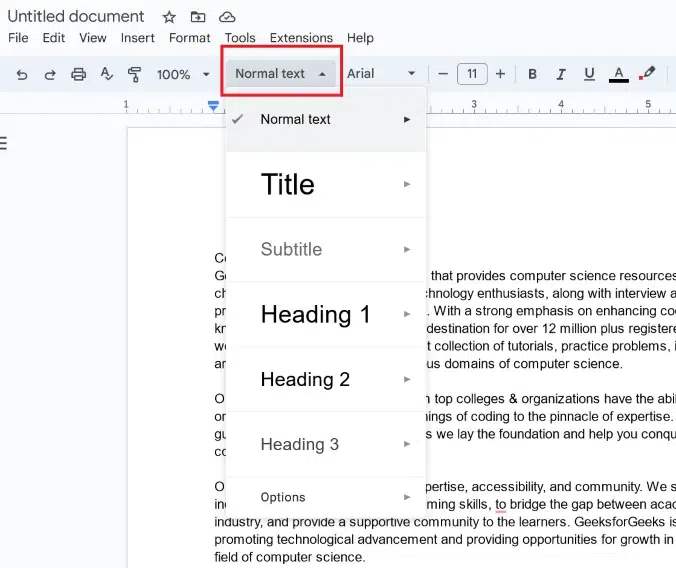
Click on Style drop-down menu
Step 3: Select Heading Form
From the **sub-options, we need to select the option of the Heading. We need to choose any of the Heading Forms as **Heading 1, **Heading 2, etc. as per our requirement.

Select your Heading Form
Step 4: Click on Apply
After selecting the required Heading, click on the **Apply option, so that it will get added to our text.

Click on "Apply Heading"
Step 5: Preview Heading in the Document
The heading that we have selected will be added to our document successfully.

Heading Added successfully
Complete List of Keyboard Shortcut Keys for Headings in Google Docs
In this section, we will see some of the shortcuts through which we can add the Headings to our documents rather than following lengthy steps. Below we have added the shortcuts that will help us to add the Headings using Keyboard keys for windows, Linux and Mac
| **Heading Style | **Windows/Linux Shortcut | **Mac Shortcut |
|---|---|---|
| **Heading 1 | Ctrl + Alt + 1 | Command + Option + 1 |
| **Heading 2 | Ctrl + Alt + 2 | Command + Option + 2 |
| **Heading 3 | Ctrl + Alt + 3 | Command + Option + 3 |
| **Heading 4 | Ctrl + Alt + 4 | Command + Option + 4 |
| **Heading 5 | Ctrl + Alt + 5 | Command + Option + 5 |
| **Heading 6 | Ctrl + Alt + 6 | Command + Option + 6 |
Conclusion
Understanding how to **add headers in Google Docs is key to improving both the organization and presentation of your documents. Whether you're using a desktop, Mac, or mobile device, the simple steps outlined in this guide will help you customize headers as needed. By using proper headings such as **H1, H2, H3, and organizing your document with a clear header structure, you ensure that your content is easily readable and professional.
Start optimizing your **Google Docs today by using headers to enhance document flow and improve navigation.
Read More: