How to Install WordPress on Your Website ? (original) (raw)
Last Updated : 24 Jul, 2025
WordPress is a content management system that allows you to host and build websites. WordPress contains plugin architecture and a template system, so you can customize any website to fit your business, blog, portfolio, or online store. WordPress is well-known for its ease of installation.
Installing WordPress is a very simple process and takes very little time to complete. WordPress powers over 40% of all websites on the internet, showcasing its widespread adoption and reliability. Now, let's proceed with the two primary installation methods. In this article, we will learn, how to we can use to install WordPress on your website.
Table of Content
- Steps to Install WordPress on your website
- Method 1: Install WordPress using auto-installers.
- Method 2: Install WordPress manually
2 Most Common Ways to Install WordPress on Your Website
Installing WordPress is a straightforward process, and there are a couple of methods you can use. Let’s explore the two most common ways to install WordPress on your website:
- **Auto-Installers (Method 1): Many hosting providers offer one-click auto-installers like Softaculous, Fantastico, or Installatron. These tools simplify the process by handling most of the setup for you. You just need to provide a few details, and WordPress will be installed automatically.
- **Manual Installation (Method 2): If your hosting provider doesn’t offer auto-installers or if you prefer more control, you can install WordPress manually. This involves downloading the WordPress package, creating a database, configuring the wp-config.php file, and uploading the files to your server.
**Choose the method that suits you best, and soon you’ll have WordPress up and running on your website!
**People Also View:
Steps to install WordPress on your website
WordPress provides an excellent platform for creating diverse websites, from blogs to e-commerce stores. The installation process is remarkably straightforward, and in this guide, we'll explore two methods to install WordPress on your website.
Method 1: Install WordPress using auto-installers.
Certainly! Let’s break down the process of installing WordPress using the auto-installer in cPanel. I’ll provide step-by-step instructions along with relevant images.
Install WordPress via cPanel Auto-Installer
**Step 1: Log in to Your cPanel:
- First, log in to your hosting control panel (cPanel). You can usually access it by going to https://yourdomain.bedpage.com/ and entering your credentials.
**Step 2: Find the WordPress Auto-Installer:
- Once you’re in cPanel, look for the section related to website management or software tools.
- Click on the WordPress or Softaculous option. These are popular auto-installers that simplify the installation process.
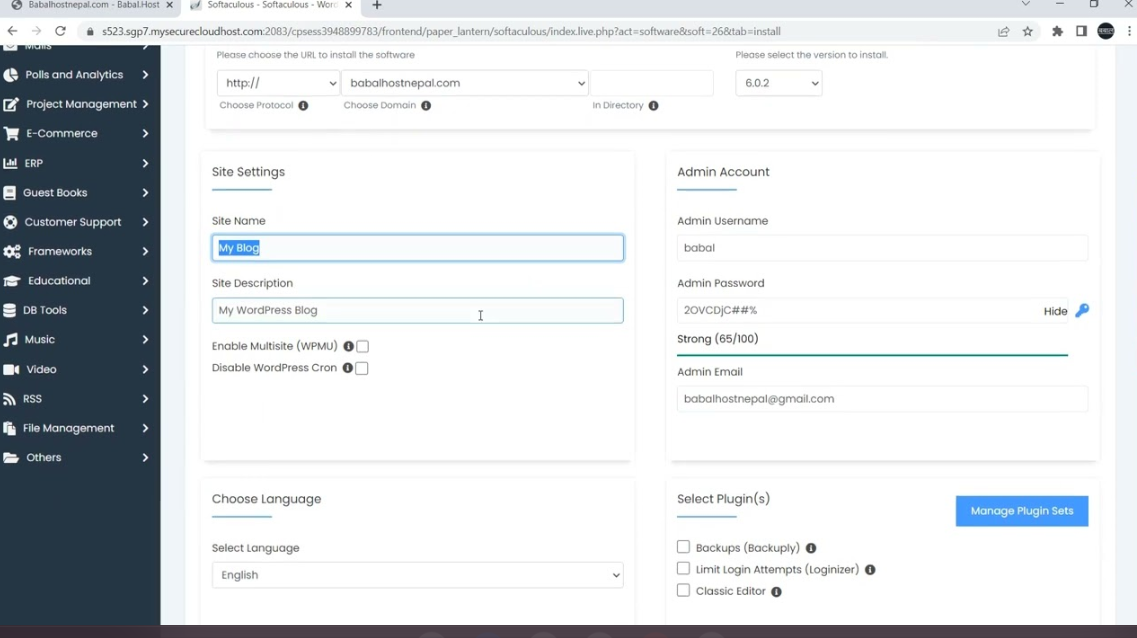
**Step 3: Configure WordPress Installation:
In the auto-installer, you’ll need to provide some basic information:
- Site Title: Enter a name for your WordPress site.
- Admin Email: Provide an email address for the site administrator.
- Username and Password: Set login credentials for your WordPress admin account.
- Click Next to proceed.
**Step 4: Choose Application Settings:
- Select your preferred application version (usually the latest stable version).
- Choose the language for your WordPress site.
- Decide on the update schedule (we recommend automatic updates for security reasons).
**Step 5: Install WordPress:
- Click the Install button to start the installation process.
- The auto-installer will create the necessary database, configure files, and install WordPress for you.
**Step 6: Access Your New WordPress Site:
- Once the installation is complete, you’ll receive a success message.
- You can now access your WordPress site by going to https://yourdomain.bedpage.com/
That’s it! You’ve successfully installed WordPress using the cPanel auto-installer. Now you can start customizing your site, adding themes, and creating content.
Remember that this method is convenient, especially for beginners, as it automates most of the installation process. Enjoy building your website!
Method 2: Install WordPress manually
In this method, we will know how we can install WordPress manually on your website. This method can be used everywhere. Let’s know the step-by-step guide to install WordPress manually on your website.
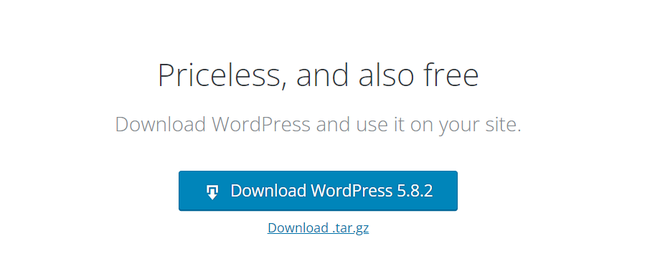
**Step 1: Download WordPress
Download WordPress to your computer from WordPress.org and then unzip the downloaded file.
**Step 2: Upload WordPress to your hosting
There are multiple options for uploading WordPress to your hosting account. When you unzipped the WordPress file, you were left with a folder named WordPress, upload the contents of that file to your hosting file manager.
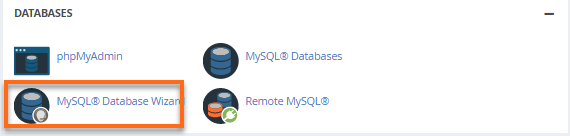
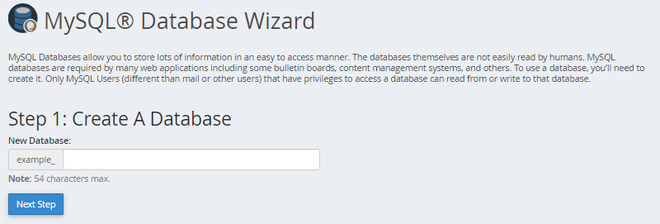
**Step 3: Create a MySQL Database and a User
WordPress stores its information in a database. Therefore, a database will need to be created. A database can be thought of as a storage house for all the content a visitor views on your website. It stores the text files, WordPress Themes, plugins, etc.
- Log in to your cPanel.
- Click on MySQL Database Wizard under the DATABASES section.
- Create a Database and enter the database name. Click **Next Step.
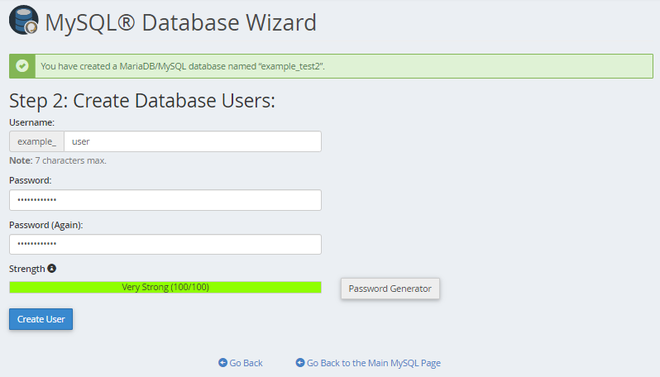
- **Create Database Users and enter the username and password. Click **Create User.
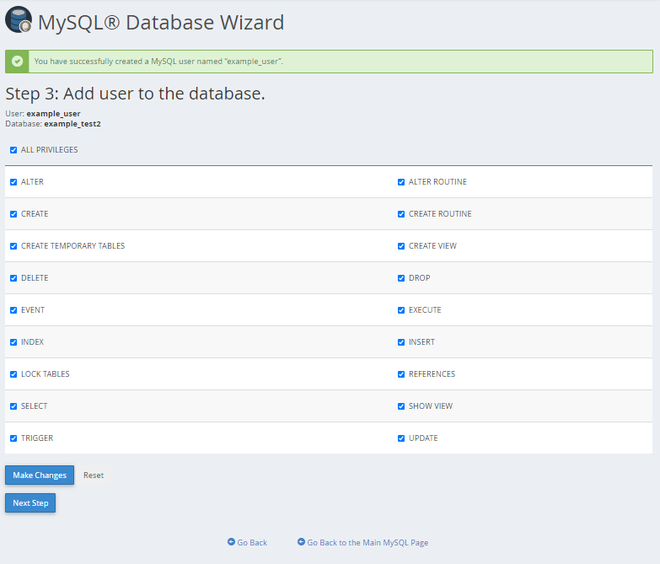
- **Add user to the database, click the **ALL PRIVILEGES checkbox and click **Next Step.
- Note down the details mentioned above including the database name, username, and password in a separate text file and save it for future use.
People Also View:
**Step 4: Run the Installation
Once the previous steps are completed, it’s time to run the script that will complete your WordPress installation. To begin, navigate to "_yourdomain.com/wp-admin/install.php", replacing the placeholder domain with that of your website. You should see a prompt asking you to choose a language for your WordPress installation, which you should do before clicking on the **Continue button.

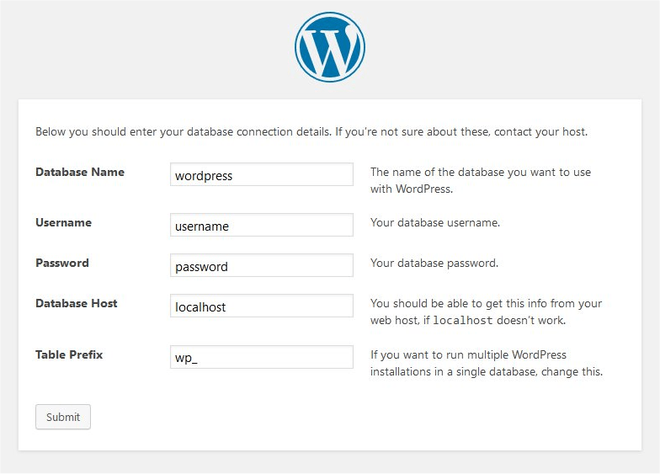
**Step 5: Connect your Database with WordPress
As soon as you click on the Continue button in **Step 4, it will ask for the necessary details for connecting up the database. Enter the **Database Name which you had created earlier. Fill in all details correctly and submit it.
**Step 6: Complete the installation
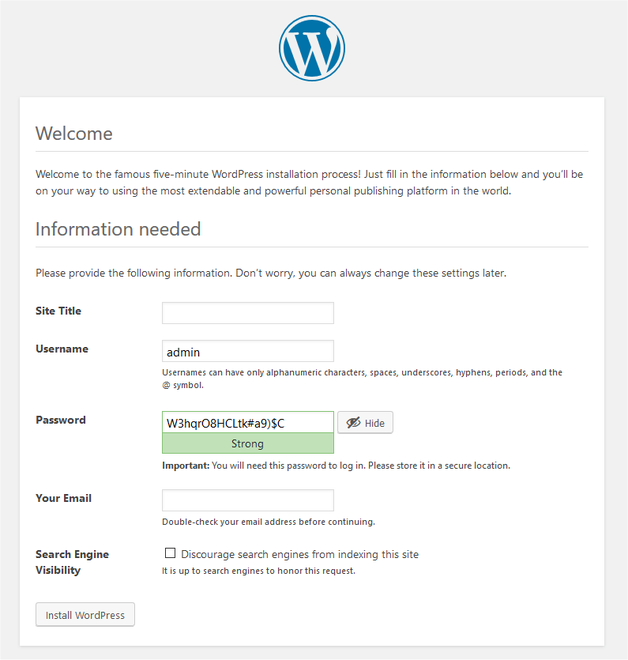
You should now see a welcome page that says, "_Welcome to the famous five-minute WordPress installation process!" Under the **Information needed section, you need to fill out the following fields: your **Site Title, **Username, Password, **Your Email, and **Search Engine Visibility. Fill these and click on install WordPress. The final screen, which says, "WordPress has been installed. Thank you, and enjoy!" will appear. It will display the username you choose and your password.
If you successfully install WordPress, a login prompt will be displayed. Login to your website and start building it.
**Conclusion
Congratulations, you've successfully navigated through the installation process of WordPress on your website! Whether you opted for the convenient auto-installers provided by your hosting provider or chose the manual method for more control, WordPress is now ready for you to unleash your creativity and build a stunning online presence. As you log in to your newly established WordPress site, the possibilities for customization and content creation are at your fingertips. Embrace the power of this versatile content management system and enjoy the journey of shaping your website to meet your unique needs.
People Also View: How to Install any Plugin on WordPress Website ?
Related Articles: