Next.js Installation (original) (raw)
Last Updated : 23 Jan, 2026
Next.js installation sets up a React framework with built-in routing, server-side rendering, and performance optimizations, allowing you to quickly create fast, production-ready web applications.
Here are the steps for installation:
Step 1: Install Node in your system
Select the appropriate Node.js installer based on your operating system:
Step 2: Initialize the Next.js Project
Create a folder for your project on the desktop, navigate to the folder through your code editor, and run the following command on the terminal.
npx create-next-app@latest
#OR
yarn create next-app
#OR
pnpm create next-app
**Note: This article uses the Pages Router (pages/ directory). While installing Next.js using create-next-app@latest, select “No” for App Router to ensure compatibility with the examples.
Step 3: Configure your Next.js app
Write the project name (default my-app) and choose other configuration options.
√ What is your project named? my-app
√ Would you like to use TypeScript? No / Yes
√ Would you like to use ESLint? No / Yes
√ Would you like to use Tailwind CSS? No / Yes
√ Would you like to use src/ directory? No / Yes
√ Would you like to use App Router? (recommended) No / Yes
√ Would you like to customize the default import alias (@/)? No / Yes
√ What import alias would you like configured? @/
Step 4: Switch to Project Directory
Move to the project folder to install any other dependencies. Use the command given below
cd my-app
**Project Structure:
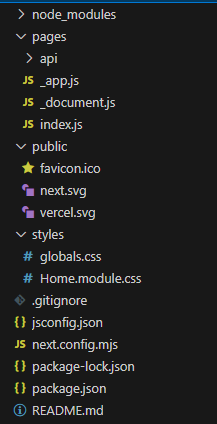
Next.js Project Structure
Step 5: Run the Application
Write the command below to run the Next.js Application, and then open the URL in the browser.
npm run dev
After the successful run, the default page of next.js will be shown in the browser.

Example 1: Hello Program in Next.js
The application displays Hello, GeeksforGeeks Learner!! by rendering the default component from index.js.
JavaScript `
// pages/index.js
export default function Home() { return (
`
**Output:
Example 2: Routing in Next.js
In the Pages-based approach, Next.js automatically creates routes based on files placed in the pages directory, rendering components when their corresponding URLs are visited.
**Project Structure:
We are going to create three components here, this will be the folder structure.

Define the Pages:
Inside the functional component, there is a div in starting which contains some text and bold text inside the b tag.
JavaScript `
// pages/page1.js
function Page1() { return (
export default Page1;
JavaScript
// pages/page2.js
function Page2() { return (
export default Page2;
`
Define Routes:
Creating [id].js inside the dynamicpage folder enables dynamic routing for URLs like /dynamicpage/123.
- [id] acts as a placeholder for dynamic route values.
- useRouter().asPath gives the current URL path being accessed. JavaScript `
// pages/dynamicpage/[id].js
import { useRouter } from "next/router";
function DynamicPage() { const router = useRouter(); return (
export default DynamicPage;
`
Update the Home Page:
Here we have combined all three pages inside the entry point of the next.js app.
JavaScript `
// pages/index.js
export default function Home() { return
Click on this Link to Go /page1 Route
    <p>
        Click on this <a href='/page2'><u>Link</u></a> to Go
        <b>/page2</b> Route
    </p>

</div>
}
`
**Output: