Query String and Query Parameter in Spring MVC (original) (raw)
Last Updated : 11 Jun, 2026
In Spring MVC, a query string and query parameters are used to pass data from the client to the server through the URL. They appear after the ? symbol in a URL and help in sending key-value pairs without modifying the main request structure. This is commonly used in form submissions, filtering data, and navigating dynamic web pages.
- Query string is the part of the URL after ? that contains data.
- Query consists key-value pairs like name=value.
- Query parameters help the server process user input or filter results dynamically.
Query String
A Query String is the part of a URL that comes after the ? symbol and is used to pass data to the server in the form of key-value pairs. It is commonly used to send small amounts of data without changing the main URL structure.
- Used to pass data from client to server in GET requests.
- Helps in filtering, searching, and sorting data on web pages.
- Data is visible in the URL, so it is not suitable for sensitive information.
Syntax
http://localhost:8080/springmvcapp/search?key1=value1&key2=value2
- ****? :** Indicates the start of the query string.
- **key1=value1&key2=value2 : Query parameters (key-value pairs) sent to the server for processing.
Query Parameter
A Query Parameter is the individual key-value pair that is passed in the URL query string to send data to the server. It allows the server to receive specific input values from the client for processing.
- Each query parameter consists of a key and a value separated by =.
- Multiple parameters are separated using &.
- Used to send user input like search text, filters, or form data to the server.
- Easily accessed in Spring MVC using @RequestParam annotation.
Syntax
- ****? :** Marks the start of query string.
- **key1=value1 : first input data
- **key2=value2 : second input data
- ****& :** separates multiple parameters
Step-by-Step Flow Query String in Spring MVC
Follow these steps to understand how Query String works in Spring MVC.
Step 1: Create Maven Project
- Open STS IDE.
- Click File - New - Maven Project.
- Select Create a simple project (Select archetype ) and click Next.

Then Enter the following details:
- **Group Id: com.gfg
- **Artifact Id: SimpleCalculator.geeksForgeeks
- **Packaging: war
Click Finish.
Step 2: Add Dependencies (pom.xml)
These dependencies provide Spring MVC framework and servlet support for web application.
Below is the complete code for the pom.xml file after adding these dependencies.
XML `
4.0.0 com.geeksforgeeks simple-calculator war 0.0.1-SNAPSHOT simple-calculator Maven Webapp http://maven.apache.org junit junit 3.8.1 test org.springframework spring-webmvc 5.3.18 javax.servlet javax.servlet-api 4.0.1 provided simple-calculator org.apache.maven.plugins maven-war-plugin 2.6 false
`
Step 3: Dispatcher Servlet Configuration
This class initializes DispatcherServlet and routes all requests to Spring MVC.
Java `
package com.geeksforgeeks.calculator.config;
import org.springframework.web.servlet.support.AbstractAnnotationConfigDispatcherServletInitializer;
public class CalculatorAppIntilizer extends AbstractAnnotationConfigDispatcherServletInitializer {
@Override
protected Class<?>[] getRootConfigClasses() {
    return null;
}

@Override
protected Class<?>[] getServletConfigClasses() {
    return new Class[]{CalculatorAppConfig.class};
}

@Override
protected String[] getServletMappings() {
    return new String[]{"/geeksforgeeks.org/*"};
}
}
`
Step 4: Spring Configuration + ViewResolver
This step enables Spring MVC and configures JSP view resolver to map logical view names to JSP pages.
Java `
package com.geeksforgeeks.calculator.config;
import org.springframework.context.annotation.*; import org.springframework.web.servlet.view.InternalResourceViewResolver; import org.springframework.web.servlet.config.annotation.EnableWebMvc;
@EnableWebMvc @Configuration @ComponentScan("com.geeksforgeeks.calculator.controllers") public class CalculatorAppConfig {
@Bean
public InternalResourceViewResolver viewResolver() {
    InternalResourceViewResolver vr = new InternalResourceViewResolver();
    vr.setPrefix("/WEB-INF/view/");
    vr.setSuffix(".jsp");
    return vr;
}
}
`
Step 5: Create Controller
Controller handles request mapping, reads query parameters using @RequestParam, and processes business logic.
Java `
package com.geeksforgeeks.calculator.controllers;
import org.springframework.stereotype.Controller; import org.springframework.web.bind.annotation.RequestMapping; import org.springframework.web.bind.annotation.RequestParam;
@Controller public class AppController {
// Step 1: Show Home Page (Form Page)
@RequestMapping("/home")
public String showHomePage() {
    return "welcome-page";
}

// Step 2: Process Query Parameters from URL
@RequestMapping("/process-homepage")
public String process(@RequestParam("number1") int num1,
                      @RequestParam("number2") int num2) {

    // Business Logic (Addition)
    int result = num1 + num2;

    // Print result on console
    System.out.println("Result: " + result);

    // Return result view page
    return "result-page";
}
}
`
Step 6: Create JSP View (Form Page)
This JSP collects user input and sends data using GET method, which generates query string in URL.
C++ `
CalculatorSimple Calculator Application
<div align="center">

    <p>
        <label>Enter First Number:</label>
        <input type="text" name="number1"/>
    </p>

    <p>
        <label>Enter Second Number:</label>
        <input type="text" name="number2"/>
    </p>

    <input type="submit" value="Calculate"/>

</div>
`
Step 7: Result Page
It should show output on JSP OR console depending on implementation.
HTML `
Result Page
Calculation completed successfully. Check server console for result.
`
Step 8: Run the Application
- Right-click on project in STS
- Click: Run As - Run on Server
- Select Tomcat Server and finish setup
Open browser and hit:
http://localhost:8080/simple-calculator/geeksforgeeks.org/home
**Output:
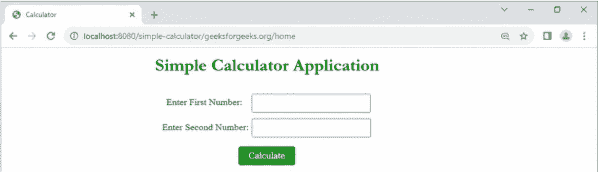
When the user enters values (23 and 45) and clicks the Calculate button.

Spring MVC submits the form and automatically generates a URL containing these values as request parameters.

The result page displays the final calculated output after processing the query string values sent through the URL. In this step, Spring MVC reads the parameters, performs the calculation, and shows the result on the JSP
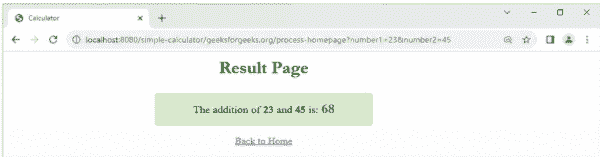
**Explanation : After submitting the form, Spring MVC reads the values from the URL using query parameters and performs the required calculation in the controller. The processed result is then displayed on the result JSP page. This entire flow is triggered through a GET request where data is passed in the URL.
http://localhost:8080/simple-calculator/geeksforgeeks.org/process-homepage?number1=23&number2=
| Element | Meaning |
|---|---|
| http | Protocol |
| localhost | Server |
| 8080 | Port Number |
| /simple-calculator/geeksforgeeks.org/process-homepage | Address to the resource |
| number1=23&number2=45 | Query String |
| ? | Identifier |
| number1=23, number2=45 | Query Parameter |
| & | Connector |