Servlet Web Application (original) (raw)
Last Updated : 31 Jul, 2025
In Java, Servlets are programs that run on the Java-enabled web server or application server. They are used to handle the request obtained from the web server, process the request, produce the response and then send the response back to the web server.
Working of Servlets
- **Client Request: A client (e.g., browser) sends an HTTP request to the web server.
- **Request Forwarded to Servlet: The web server passes the request to the Servlet container (like Tomcat).
- **Servlet Processing: Container calls the servlet's service() method. Based on the request type (GET, POST), it invokes doGet() or doPost().
- **Business Logic Execution: Servlet processes the request (e.g., reading form data, querying a database).
- **Response Generation: Servlet creates a response (usually HTML) using HttpServletResponse.
- **Response Sent to Client: The Web server sends the generated response back to the client.
**What is a Web Application?
A Web application (Web app) is software accessed via a web browser over a network like the Internet or Intranet. While many web apps are built using languages like PHP or Perl, Java is widely used, especially for enterprise-level applications.
Java EE (Jakarta EE) offers components for building such apps, including:
- Servlets
- JSP (JavaServer Pages)
- JSF (JavaServer Faces)
- JDBC
- Enterprise JavaBeans (EJB)
- Web Services
Web Application Structure
A web application is organized into a hierarchy of directories and files. There are two ways to structure and deploy these files
- **Unpacked Form: Where each directory and file exists in the file system separately.
- **Packed Form (WAR file): All directories and files are compressed into a single archive (WAR file) for distribution and installation.
Key Components of a Web Application
**1. Document Root: Top-level folder holding static content like HTML, JSP, CSS, JS and images.
**2. WEB-INF: Secure folder not accessible via browser; stores server-side resources.
- **web.xml: Deployment descriptor for servlet configuration.
- **classes/: Contains compiled Java classes (e.g., servlets, beans).
- **lib/ (optional): Stores external JAR libraries.
**Web Application Deployment Descriptor (web.xml)
From Servlet API 3.0 onwards, the web.xml file can override any servlet annotations in your code. A special setting called metadata-complete in the tag controls this:
- **If set to true: The server skips all annotations and only reads configuration from web.xml.
- **If set to false or not set at all: The server will also look for annotations in your Java classes during startup.
This gives developers more control over how their web app is set up and how fast it starts.
**Context Path
When a web application is deployed on a server, it’s assigned a context path, a unique name used in the URL.
For example, if the context path is /bookshop, accessing /bookshop/index.html retrieves the index.html file from the application's document root.
**Creating A Web Application Using NetBeans
Let’s create a simple HTML form that takes a user's name and submits it to a Servlet. The Servlet will respond with a personalized welcome message.
**Step 1. Create the Project in NetBeans
- Open NetBeans IDE.
- Go to File-> New Project.
- In the New Project dialog
- Select Java Web under Categories.
- Select Web Application under Projects.
- After selecting Web Application, click Next.

Fig.1: New Project dialog box
**In the Name and Location dialog:
- Set the project name to MyFirstServlet.
- Click Next.

Fig.2: Entering the name of the Web application
**In the Server and Settings step:
- Keep default values:
- Server: GlassFish Server 4.1
- Java EE Version: Java EE 7 Web
- Context Path: /MyFirstServlet
- Click Next to proceed.

Fig.3: Selecting the server, Java EE version, and the context path
**Click Finish to create the MyFirstServlet application

Step 2. Create Form (index.jsp)
Let’s create a simple form to collect the user's name:
- In the Projects window, right-click the Web Pages directory.
- Choose New -> JSP from the context menu.
- In the dialog box, enter the filename as index.jsp and click Finish.


Fig. 6: Entering the file name
**index.jsp:
HTML `
1 <%@page contentType="text/htrnl" pageEncoding="UTF-8"%> 2 3
Smeta http-equiv="Content-Tyne" content="text/html; charset=UTF-8"> title>Welcome to MyFirstServlet example pageA Welcome Web Application
Name:| input type="submit" value="Submit"/>
`
Step 3: Create the Servlet (WelcomeServlet.java)
Now that the HTML form submits the user's name to WelcomeServlet, let’s create this servlet to handle the request and respond with a personalized message.
**To create the servlet:
- In the Projects window, right-click the Source Packages directory.
- Select New -> Servlet.
- In the dialog box:
- Set the Class Name to WelcomeServlet.
- Choose a package name (e.g., com.example.servlet).
- Click Finish.

Fig.7 : Creating Servlet

Fig.8: Entering the class name and the package

Fig.9: Configuring the Servlet deployment
And After Creating the Servlet We Will Compiling And Building Using NetBeans And Runs the Web Application
**Running The Web Application
- Right-click on the MyFirstServlet project in the Projects window.
- Select Build to compile the project.
- After a successful build, right-click the project again and select Run.

Fig.10 : Build
Once Run menu item is clicked, GlassFish Server 4.1 is started by the NetBeans IDE

Fig.11 : Running the project
**What Happens Next?
- The index.jsp page appears in the browser.
- Enter your name in the Name text field.
- Click the Submit button.
- The form sends the data to the WelcomeServlet.
- The servlet processes the request and displays a personalized welcome message like below images:
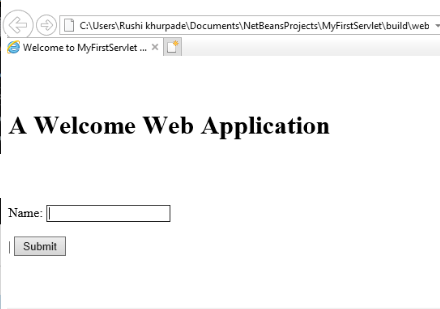
Fig.12: The application run in the web browser
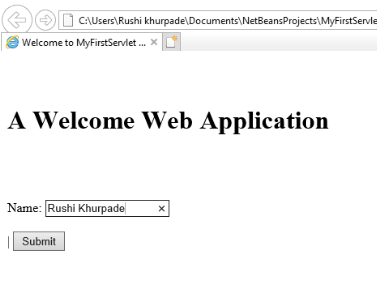
Fig.13: Entering the name
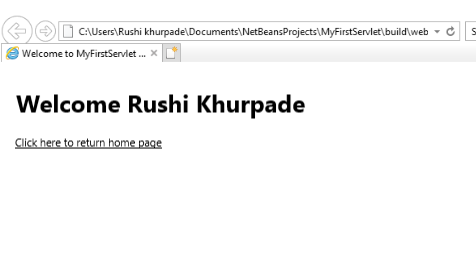
Fig.14: Welcome message displayed