Spring MVC Capture and Display the Data from Registration Form (original) (raw)
Last Updated : 11 Jun, 2026
Spring MVC provides automatic data binding using the @ModelAttribute annotation. It allows form data entered by the user to be mapped directly to a Java Bean object and displayed on another page without manually retrieving request parameters.
- Captures form data using Spring MVC form tags.
- Automatically binds submitted values to a Java Bean object.
- Displays user-entered information on a result page using Expression Language (EL).
Prerequisites
- Java JDK 8 or later installed.
- Spring Tool Suite (STS) / Eclipse IDE installed.
- Apache Tomcat Server configured in the IDE.
Step 1: Create a Maven Project
- Open STS IDE.
- Click File - New - Maven Project.
- Select Create a simple project (Select archetype ) and click Next.

Then Enter the following details:
- **Group Id: com.gfg
- **Artifact Id: SpringMVCApplication
- **Packaging: war
Click Finish.
Step 2: Add Required Dependencies
Add the following maven dependencies and plugin to your pom.xml file.
XML `
<!-- Spring MVC -->
<dependency>
    <groupId>org.springframework</groupId>
    <artifactId>spring-webmvc</artifactId>
    <version>5.3.18</version>
</dependency>

<!-- Servlet API -->
<dependency>
    <groupId>javax.servlet</groupId>
    <artifactId>javax.servlet-api</artifactId>
    <version>4.0.1</version>
    <scope>provided</scope>
</dependency>
`
Step 3: Update registration-page.jsp
Add the action, method, and modelAttribute attributes to the <form:form> tag.
HTML `
<%@ taglib prefix="form" uri="" title="undefined" rel="noopener noreferrer">http://www.springframework.org/tags/form"%>
<h1 align="center">Create Registration Form using Form Tag in Spring MVC</h1>

  <!-- Changes in this line -->
<form:form action="registration-complete" method="get" modelAttribute="userRegInfo">

<div align="center">

<!-- A Simple Input Field -->
<label>Name : </label>
<form:input path="name"/>

<br/>

<label>User Name : </label>
<form:input path="userName"/>

<br/>

<label>Password : </label>
<form:password path="password"/>

<br/>

<!-- DropDown Field -->
<label>Branch : </label>
<form:select path="branch">
    <form:option value="CSE" label="Computer Science"></form:option>
    <form:option value="CSA" label="Computer Science and Application"></form:option>
    <form:option value="EE" label="Electrical Engineering"></form:option>
    <form:option value="ME" label="Mechanical Engineering"></form:option>
</form:select>

<br/>

<!-- CheckBox Field -->
<label>Skills : </label>
Java : <form:checkbox path="skills" value="java"/>
Python : <form:checkbox path="skills" value="python"/>
C++ : <form:checkbox path="skills" value="cpp"/>
DSA : <form:checkbox path="skills" value="dsa"/>
Spring : <form:checkbox path="skills" value="spring"/>

<br/>

<!-- RadioButton Field -->
<label>Gender : </label>
Male<form:radiobutton path="gender" value="male"/>
Female<form:radiobutton path="gender" value="female"/>

<br/>

<!-- Button Field -->
<input type="submit" value="Register">

</div>

</form:form>
`
Step 4: Update RegistrationController.java
Now again come to the RegistrationController.java file and create another method something like this with the "registration-complete" endpoint because we have mentioned the same inside the form:form tag as an action.
**File: Updated RegistrationController.java
Java `
package com.geeksforgeeks.calculator.controllers;
import org.springframework.stereotype.Controller; import org.springframework.web.bind.annotation.ModelAttribute; import org.springframework.web.bind.annotation.RequestMapping;
import com.geeksforgeeks.calculator.dto.UserRegistrationDTO;
@Controller public class RegistrationController {
@RequestMapping("/register")
public String showRegistrationPage(@ModelAttribute("userRegInfo") UserRegistrationDTO userRegistrationDTO) {
    return "registration-page";
}

@RequestMapping("/registration-complete")
public String processUserReg(@ModelAttribute("userRegInfo") UserRegistrationDTO userRegistrationDTO) {
    return "registration-complete";
}
}
`
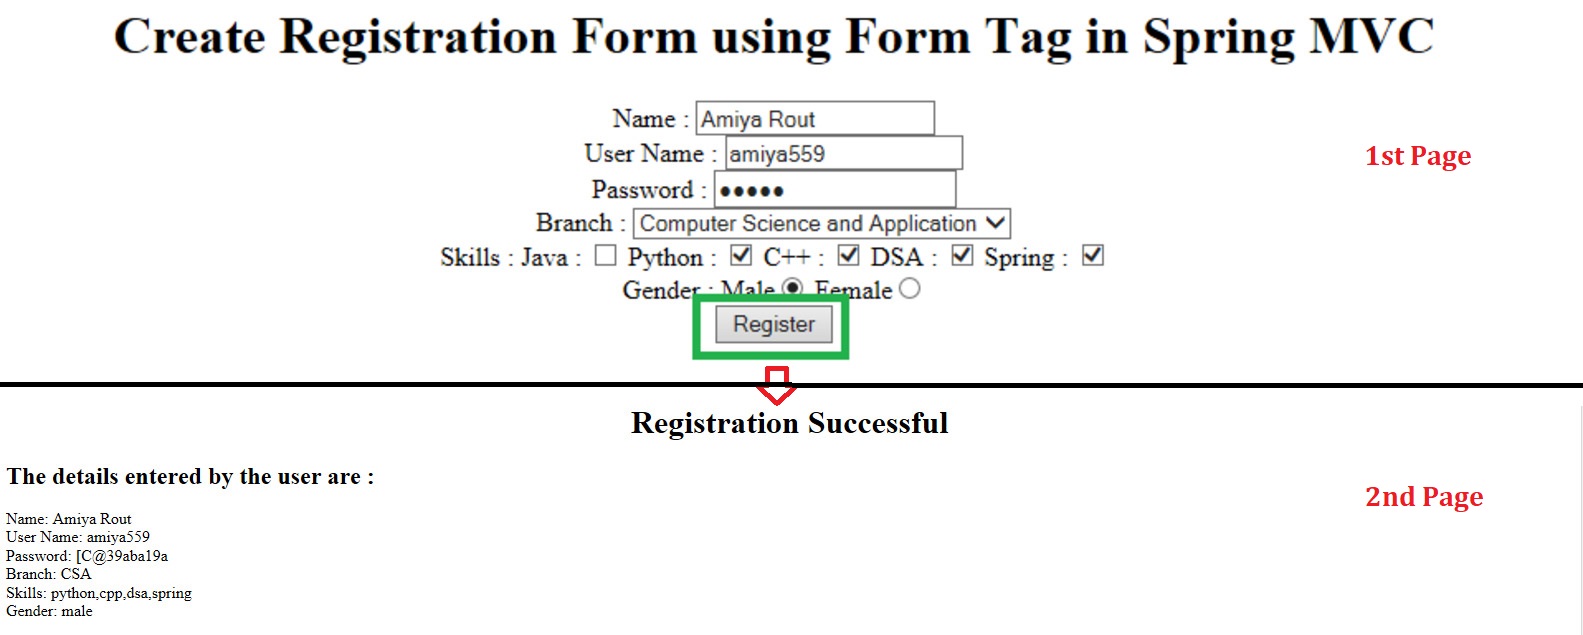
Step 5: Create Result Page (registration-complete.jsp)
Create a JSP page to display the information entered by the user.
HTML `
<h1 align="center">Registration Successful</h1>
<h2>The details entered by the user are :</h2>

    Name:         ${userRegInfo.name}     <br/>
    User Name:  ${userRegInfo.userName} <br/>
    Password:   ${userRegInfo.password} <br/>
    Branch:     ${userRegInfo.branch}   <br/>
    Skills:     ${userRegInfo.skills}   <br/>
    Gender:     ${userRegInfo.gender}   <br/>
`
Step 6: Run the Application
- Right-click the project.
- Select Run As -> Run on Server.
- Choose Apache Tomcat Server.
- Click Finish.
Open the following URL in the browser:
http://localhost:8080/simple-calculator/geeksforgeeks.org/register
**Output:

Let's fill the form,

Then click on the "Register" button and you can see all the details that are entered by the user have been displayed successfully.

**Explanation: When the user submits the registration form, Spring MVC automatically binds the entered values to the UserRegistrationDTO object using @ModelAttribute. The controller processes the request and returns the registration-complete.jsp page, where all submitted details are displayed to the user.