Spring MVC Password (original) (raw)
Last Updated : 15 Jun, 2026
Spring MVC provides the form:password tag to create password input fields in web forms. It is used to accept sensitive information like passwords where the entered characters are automatically masked in the UI.
- Used for secure input like passwords or PINs.
- Masks characters to hide sensitive data from users.
- Automatically binds value to model properties.
Syntax
<form:password path="password"/>
- **path: Binds password field value to a model property.
- **value (optional): Sets default password value (rarely used).
**To use Spring Form Tags in a JSP page, import the Spring Form Tag Library using the following directive:
<%@ taglib prefix="form" uri="http://www.springframework.org/tags/form" %>
- **prefix="form": Specifies the prefix used for Spring Form Tags.
- **uri: Identifies the Spring Form Tag Library provided by Spring MVC.
Attributes in form:password Tag
The <form:password> tag supports attributes to control binding, appearance, security behavior, and input restrictions.
| Attribute Name | Description |
|---|---|
| path | Binds field to model property. |
| value | Sets default value (rarely used for security reasons). |
| id | Defines unique identifier for element. |
| title | Provides tooltip text. |
| cssClass | Applies CSS class for styling. |
| cssStyle | Applies inline CSS styles. |
| cssErrorClass | Applied when validation error occurs. |
| disabled | Disables input field. |
| readonly | Makes field non-editable. |
| maxlength | Limits number of characters. |
| size | Sets visible width of input field. |
| autocomplete | Enables/disables browser suggestions. |
| showPassword | Shows password instead of masking (not recommended). |
| htmlEscape | Enables/disables HTML escaping. |
Step to Implement Password Field in Spring MVC Application
Follow these steps to create a Spring MVC application using form:password tag to collect and process user input securely.
Step 1: Create a Maven Project
- Open STS IDE.
- Click File - New - Maven Project.
- Select Create a simple project (Select archetype ) and click Next.

Then Enter the following details:
- **Group Id: com.gfg
- **Artifact Id: SpringMVCFormExample
- **Packaging: war
Click Finish.
Step 2: Add Required Dependencies
Add the following maven dependencies and plugin to your pom.xml file.
XML `
<modelVersion>4.0.0</modelVersion>

<groupId>com.gfg</groupId>
<artifactId>SpringMVCFormExample</artifactId>
<version>1.0</version>
<packaging>war</packaging>

<dependencies>

    <dependency>
        <groupId>org.springframework</groupId>
        <artifactId>spring-webmvc</artifactId>
        <version>5.3.18</version>
    </dependency>

    <dependency>
        <groupId>javax.servlet</groupId>
        <artifactId>javax.servlet-api</artifactId>
        <version>4.0.1</version>
        <scope>provided</scope>
    </dependency>

    <dependency>
        <groupId>javax.servlet</groupId>
        <artifactId>jstl</artifactId>
        <version>1.2</version>
    </dependency>

</dependencies>
`
Below is the final project structure of the Spring MVC project after creating *.java and *.jsp files also.
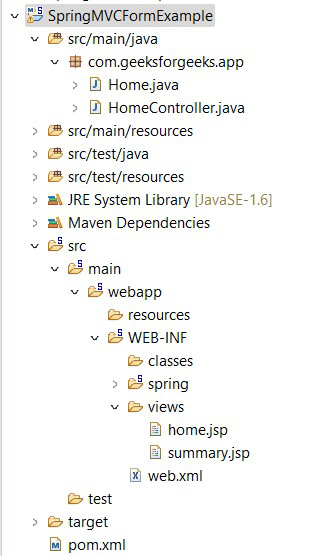
Project structure
Step 3: Model Class (Home.java)
This class stores user input such as name, password, and email. Spring automatically binds form values to this model object.
Java `
package com.geeksforgeeks.app;
public class Home {
private String name;
private String password;
private String email;

public String getName() {
    return name;
}
public void setName(String name) {
    this.name = name;
}
public String getPassword() {
    return password;
}
public void setPassword(String password) {
    this.password = password;
}
public String getEmail() {
    return email;
}
public void setEmail(String email) {
    this.email = email;
}
}
`
Step 4: Controller Class (HomeController.java)
Controller handles request mapping and processes form submission. It sends data to JSP pages using model attributes.
Java `
package com.geeksforgeeks.app;
import org.springframework.stereotype.Controller; import org.springframework.ui.Model; import org.springframework.web.bind.annotation.ModelAttribute; import org.springframework.web.bind.annotation.RequestMapping; import org.springframework.web.bind.annotation.RequestMethod;
@Controller public class HomeController {
@RequestMapping("/") public String viewHome(Model model)
{

    Home home = new Home();

    model.addAttribute("home", home);

    return "home";
}

@RequestMapping(value = "/submit",
                method = RequestMethod.POST)
public String
submit(@ModelAttribute("home") Home home)
{

    return "summary";
}
}
`
Step 5: Configure DispatcherServlet (web.xml)
This file registers the Spring MVC DispatcherServlet and maps all incoming requests to Spring for processing.
XML `
<servlet>
    <servlet-name>spring</servlet-name>

    <servlet-class>
        org.springframework.web.servlet.DispatcherServlet
    </servlet-class>

    <load-on-startup>1</load-on-startup>
</servlet>

<servlet-mapping>
    <servlet-name>spring</servlet-name>
    <url-pattern>/</url-pattern>
</servlet-mapping>
`
Step 6: Configure Spring MVC (spring-servlet.xml)
This file enables component scanning, configures Spring MVC features, and defines the view resolver for JSP pages
XML `
<beans xmlns="http://www.springframework.org/schema/beans" xmlns:context="http://www.springframework.org/schema/context" xmlns:mvc="http://www.springframework.org/schema/mvc" xmlns:xsi="http://www.w3.org/2001/XMLSchema-instance"
   xsi:schemaLocation="
   http://www.springframework.org/schema/beans
   https://www.springframework.org/schema/beans/spring-beans.xsd

   http://www.springframework.org/schema/context
   https://www.springframework.org/schema/context/spring-context.xsd

   http://www.springframework.org/schema/mvc
   https://www.springframework.org/schema/mvc/spring-mvc.xsd">

<context:component-scan
        base-package="com.geeksforgeeks.app"/>

<mvc:annotation-driven/>

<bean
  class="org.springframework.web.servlet.view.InternalResourceViewResolver">

    <property name="prefix"
              value="/WEB-INF/views/"/>

    <property name="suffix"
              value=".jsp"/>

</bean>
`
Step 7: Input Page (home.jsp)
This JSP page collects user input using Spring form tags. Password field uses form:password to hide entered characters.
HTML `
<%@ page language="java" contentType="text/html; charset=ISO-8859-1" pageEncoding="ISO-8859-1"%> <%@taglib uri="http://www.springframework.org/tags/form" prefix="form"%>
Home PageWelcome to GeeksforGeeks!!
<form:form action="submit" method="post" modelAttribute="home">
    <table>
        <tr>
            <td><form:label path="name">Full Name: </form:label></td>
            <td><form:input path="name" /></td>
        </tr>
        <tr>
            <td><form:label path="password">Password: </form:label></td>
            <td><form:password path="password" maxlength="6" size="8"/></td>
        </tr>
        <tr>
            <td><form:label path="email">E-Mail Address: </form:label></td>
            <td><form:input path="email" /></td>
        </tr>
        <tr>
            <td><form:button>Submit</form:button></td>
        </tr>
    </table>
</form:form>
`
Step 8: Output Page (summary.jsp)
This page displays submitted user data after processing. Model values are accessed using Expression Language (EL).
HTML `
<%@ page language="java" contentType="text/html; charset=ISO-8859-1" pageEncoding="ISO-8859-1"%>
Summary pageDetails Submitted!!
| Full Name: | ${home.name} |
| Password: | ${home.password} |
| E-Mail Address: | ${home.email} |
`
Step 9: Run Your Application
- Right-click the project.
- Select Run As - Run on Server.
- Choose Apache Tomcat Server.
- Click Finish.
Open the following URL in the browser:
**Output:
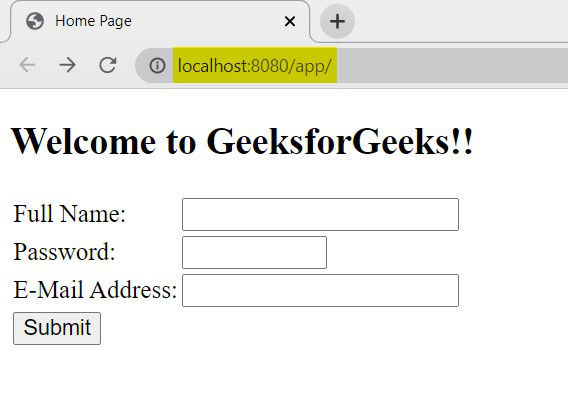
Home Page
Enter the details to fill the form.
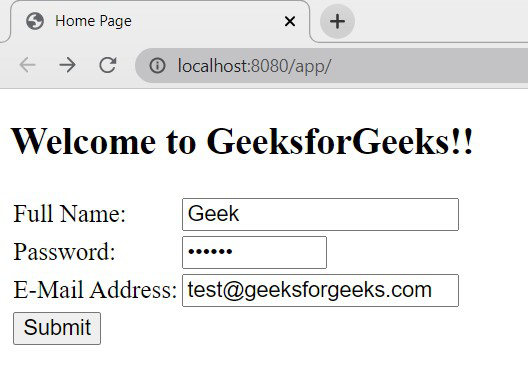
Input
As we specified the maxlength of the password field to 6 characters, we can enter 6 characters only. If we want to change the direction of the text entered in the field based on the language used, we can use the dir attribute like below on the JSP page.
<form:password path="password" maxlength="6" size="8" dir="rtl"/>
Now, the input value direction will change like below,

Input Direction of Password field
Once we submit the form, the entered details will be displayed on the screen
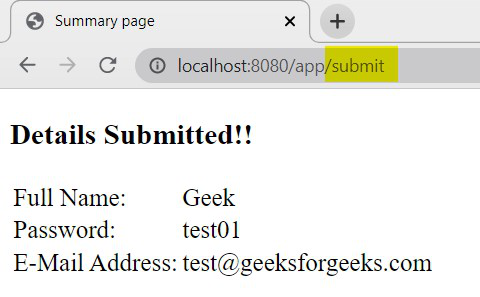
Output
**Explanation: In this Spring MVC application, the user submits data through a form where the password field is masked using form:password for security purposes. The controller receives the request, binds the form data to the model object, and processes it using @ModelAttribute. After processing, the controller forwards the request to the summary JSP page, where the submitted details are displayed using model attributes.
Advantages
- Provides security by masking entered characters from the user interface.
- Automatically binds password value to the model object in Spring MVC.
- Simplifies form handling without manually extracting request parameters.
Limitations
- Does not encrypt data; password is still visible in backend if not secured properly.
- Value may be exposed in browser developer tools or page source (if showPassword is enabled).
- Not suitable for storing or handling highly sensitive data without additional security measures.