TwoWay Data Binding in Spring MVC with Example (original) (raw)
Last Updated : 5 Jun, 2026
Two-way data binding in Spring MVC is a mechanism that automatically synchronizes data between the model (backend) and the view (frontend). It allows user input from the UI to be directly stored in backend objects and also reflects backend data back into the UI when needed.
- Automatically binds form input fields to Java model/bean properties.
- Updates both frontend view and backend model without manual data handling.
- Commonly used in form handling for seamless data transfer between UI and server.
Binding Techniques in Spring MVC
In Spring MVC, there are different binding techniques that is used to transfer data between the frontend (view) and the backend (controller/model).
1. @ModelAttribute Binding
- Used for binding form data to Java objects.
- Supports both data display (GET) and form submission (POST).
- Most commonly used for two-way data binding.
**Syntax:
@PostMapping("/save")
public String save(@ModelAttribute("user") User user) {
return "result";}
2. @RequestParam Binding
- Used to extract individual query parameters from the request URL.
- Suitable for simple values like String, int, etc.
**Syntax:
@GetMapping("/data")
public String getData(@RequestParam String name) {
return "view";
}
3. @PathVariable Binding
- Used to extract values from the URI path.
- Commonly used in RESTful APIs.
**Syntax:
@GetMapping("/user/{id}")
public String getUser(@PathVariable int id) {
return "view";
}
4. Form Tag Library Binding (JSP)
- Used in JSP pages with Spring Form tags.
- Directly binds HTML form fields with model attributes.
**Syntax:
<form:form modelAttribute="user">
<form:input path="name"/>
5. Thymeleaf Binding (Spring Boot)
- Modern approach used in Spring Boot applications.
- Uses th:field for automatic binding.
**Syntax:
6. @RequestBody Binding
- Used to bind JSON data from request body to Java objects.
- Commonly used in REST APIs.
**Syntax:
@PostMapping("/api/user")
public String save(@RequestBody User user) {
return "saved";
}
Steps To Implements Two-Way Data Binding in Spring MVC
Follow these steps to create two way Data binding in spring MVC.
Step 1: Create a Maven Project
- Open STS IDE.
- Click File -> New -> Maven Project.
- Select Create a simple project (Select archetype ) and click Next.

Then Enter the following details:
- **Group Id: com.gfg
- **Artifact Id: simple-calculator.geeksforgeeks.org
- **Packaging: war
Click Finish.
Step 2: Add Required Dependencies
Add the following maven dependencies and plugin to your pom.xml file.
XML `
<!-- Spring MVC -->
<dependency>
    <groupId>org.springframework</groupId>
    <artifactId>spring-webmvc</artifactId>
    <version>5.3.18</version>
</dependency>

<!-- Servlet API -->
<dependency>
    <groupId>javax.servlet</groupId>
    <artifactId>javax.servlet-api</artifactId>
    <version>4.0.1</version>
    <scope>provided</scope>
</dependency>
`
Step 3: Create DTO (NameInfoDTO)
DTO class holds the data (model). Spring uses this object to bind form data automatically using property names..
Java `
package com.geeksforgeeks.calculator.dto;
public class NameInfoDTO {
private String firstName = "Anshul";
private String lastName = "Aggarwal";

public String getFirstName() {
    return firstName;
}

public void setFirstName(String firstName) {
    this.firstName = firstName;
}

public String getLastName() {
    return lastName;
}

public void setLastName(String lastName) {
    this.lastName = lastName;
}
}
`
Step 4: Spring Configuration (WebConfig)
This class enables Spring MVC and configures view resolver which helps to map JSP pages without writing full path every time.
Java `
@Configuration @EnableWebMvc @ComponentScan(basePackages = "com.geeksforgeeks.calculator.controllers") public class CalculatorAppConfig {
@Bean
public InternalResourceViewResolver viewResolver() {
    InternalResourceViewResolver vr = new InternalResourceViewResolver();
    vr.setPrefix("/WEB-INF/view/");
    vr.setSuffix(".jsp");
    return vr;
}
}
`
Step 5: Dispatcher Servlet Initialization
This class replaces web.xml. It initializes Spring container and maps all incoming requests to DispatcherServlet.
Java `
public class CalculatorAppIntilizer extends AbstractAnnotationConfigDispatcherServletInitializer {
@Override
protected Class<?>[] getServletConfigClasses() {
    return new Class[]{CalculatorAppConfig.class};
}

@Override
protected String[] getServletMappings() {
    return new String[]{"/geeksforgeeks.org/*"};
}

@Override
protected Class<?>[] getRootConfigClasses() {
    return null;
}
}
`
Step 6: Controller (Two-Way Binding Logic)
Controller handles HTTP requests. It sends model object to view (GET) and receives updated form data back from view (POST).
Java `
@Controller public class AppController {
// STEP 1: Load form (Backend → Frontend)
@RequestMapping("/home")
public String showHomePage(Model model) {

    NameInfoDTO nameInfoDTO = new NameInfoDTO();
    model.addAttribute("nameInfo", nameInfoDTO);

    return "welcome-page";
}

// STEP 2: Process form (Frontend → Backend)
@PostMapping("/process-homepage")
public String process(@ModelAttribute("nameInfo") NameInfoDTO dto) {

    System.out.println(dto.getFirstName());
    System.out.println(dto.getLastName());

    return "result-page";
}
}
`
Step 7: JSP View (Form Page)
JSP uses Spring Form Tag Library to bind form fields directly with Java object properties.
HTML `
<%@ taglib prefix="form" uri="" title="undefined" rel="noopener noreferrer">http://www.springframework.org/tags/form"%>
Two-Way Data Binding Form
<form:form action="process-homepage" method="post" modelAttribute="nameInfo">
First Name:
<form:input path="firstName"/> <br><br>

Last Name:
<form:input path="lastName"/> <br><br>

<input type="submit" value="Submit"/>
`
Step 8: Result Page
This page displays updated data after form submission. It confirms successful two-way binding.
HTML `
Data Submitted Successfully
First Name: ${nameInfo.firstName}
Last Name: ${nameInfo.lastName}
`
Step 9: Run Your Application
- Right-click the project.
- Select Run As -> Run on Server.
- Choose Apache Tomcat Server.
- Click Finish.
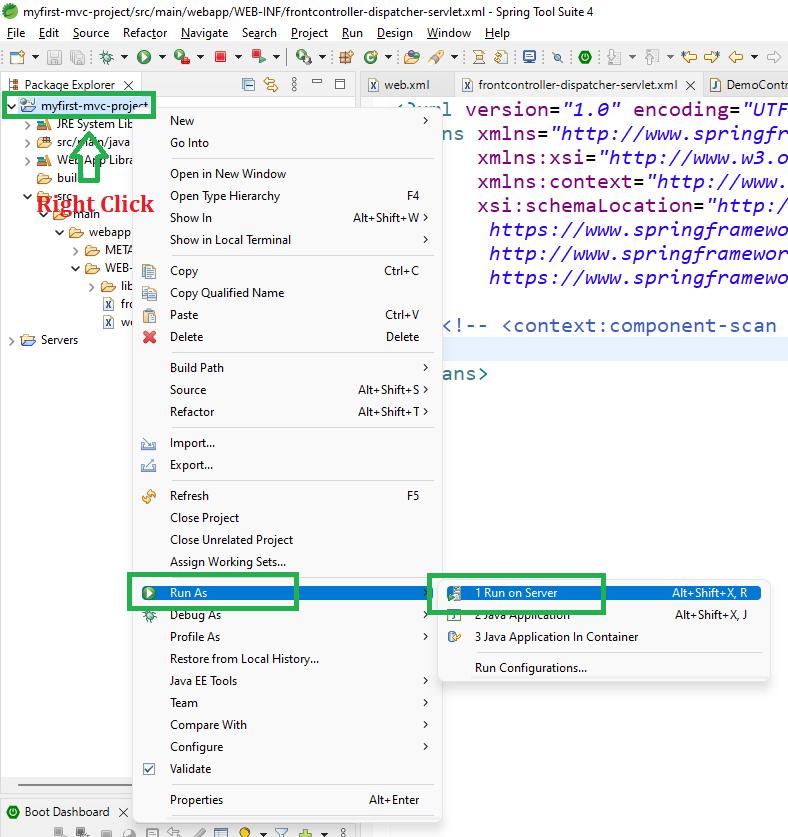
After that use the following URL to run your controller
http://localhost:8080/simple-calculator/geeksforgeeks.org/home
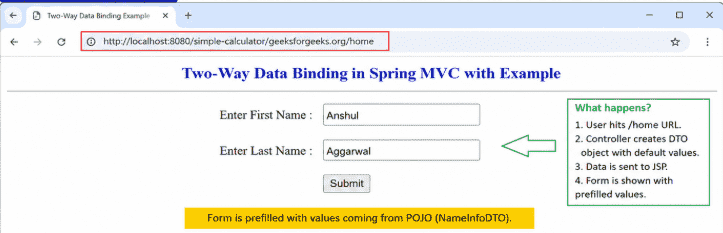
Output
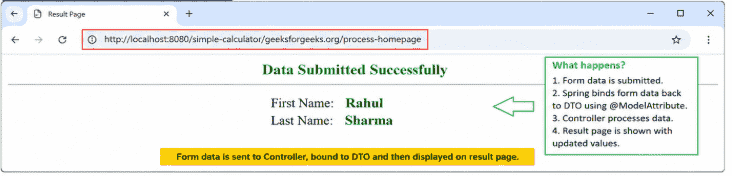
When user hits /process-homepage (POST), Spring automatically binds form data to the DTO using @ModelAttribute. Controller processes the data and returns the result page with updated values.
http://localhost:8080/simple-calculator/geeksforgeeks.org/process-homepage
Output
Explanation: When user hits /home (GET), Spring creates a DTO object with default values and sends it to the JSP form for display (prefilled data). When user submits form on /process-homepage (POST), Spring binds form data to DTO using @ModelAttribute, processes it in controller, and returns result page with updated values.