Implement Convolutional Autoencoder in PyTorch with CUDA (original) (raw)
Last Updated : 5 Aug, 2025
A Convolutional Autoencoder (CAE) is a type of neural network that learns to compress and reconstruct images using convolutional layers. It consists of an encoder that reduces the image to a compact feature representation and a decoder that restores the image from this compressed form. CAEs are widely used for image denoising, compression and feature extraction due to their ability to preserve key visual patterns while reducing dimensionality.
Let's see the step-by-step implementation of a Convolutional Autoencoder (CAE) using PyTorch with CUDA/GPU support.
Step 1: Import Required Libraries
Import pytorch and matplotlib.
Python `
import torch import torch.nn as nn import torch.optim as optim import torchvision.datasets as datasets import torchvision.transforms as transforms import matplotlib.pyplot as plt
`
Step 2: Define the Convolutional Autoencoder Architecture
- Encoder downsamples and learns spatial features.
- Decoder upsamples (reconstructs) to the original image shape.
- Sigmoid() ensures the output pixel values are between 0 and 1. Python `
class Autoencoder(nn.Module): def init(self): super(Autoencoder, self).init() self.encoder = nn.Sequential( nn.Conv2d(3, 16, 3, stride=1, padding=1), nn.ReLU(), nn.MaxPool2d(2, stride=2), nn.Conv2d(16, 8, 3, stride=1, padding=1), nn.ReLU(), nn.MaxPool2d(2, stride=2) ) self.decoder = nn.Sequential( nn.ConvTranspose2d(8, 16, 3, stride=2, padding=1, output_padding=1), nn.ReLU(), nn.ConvTranspose2d(16, 3, 3, stride=2, padding=1, output_padding=1), nn.Sigmoid() )
def forward(self, x):
    x = self.encoder(x)
    x = self.decoder(x)
    return x
`
Step 3: Data Preparation: Transformers and Dataloader
- Images are resized and converted to tensors.
- DataLoader batches data and shuffles during training. Python `
transform = transforms.Compose([ transforms.Resize((64, 64)), transforms.ToTensor(), ])
train_dataset = datasets.Flowers102( root='flowers', split='train', transform=transform, download=True) test_dataset = datasets.Flowers102( root='flowers', split='test', transform=transform)
train_loader = torch.utils.data.DataLoader( train_dataset, batch_size=128, shuffle=True) test_loader = torch.utils.data.DataLoader(test_dataset, batch_size=128)
`
Step 4: Set Device to Cuda(GPU)
Uses GPU acceleration if available, speeding up training.
Python `
device = torch.device('cuda' if torch.cuda.is_available() else 'cpu') print(f"Device being used: {device}")
`
Step 5: Initialize Model, Loss Function and Optimizer
- Model and optimizer are set up.
- MSELoss computes pixel-wise reconstruction error. Python `
model = Autoencoder().to(device) criterion = nn.MSELoss() optimizer = optim.Adam(model.parameters(), lr=0.001)
`
Step 6: Training Loop
- For each batch: moves images to device, computes forward pass and loss, updates weights.
- Tracks loss for monitoring; prints progress every 5 epochs. Python `
num_epochs = 50
for epoch in range(num_epochs): model.train() running_loss = 0.0 for images, _ in train_loader: images = images.to(device)
    outputs = model(images)
    loss = criterion(outputs, images)

    optimizer.zero_grad()
    loss.backward()
    optimizer.step()

    running_loss += loss.item() * images.size(0)

epoch_loss = running_loss / len(train_loader.dataset)

if (epoch + 1) % 5 == 0:
    print(f"Epoch [{epoch + 1}/{num_epochs}], Loss: {epoch_loss:.4f}")
`
**Output:
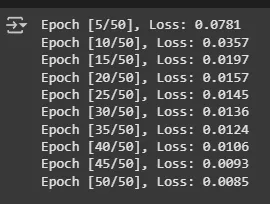
Training
Step 7: Save the Model and Visualize
Python `
torch.save(model.state_dict(), 'conv_autoencoder.pth')
model.eval() with torch.no_grad(): for data, _ in test_loader: data = data.to(device) recon = model(data) break
plt.figure(dpi=250) fig, ax = plt.subplots(2, 7, figsize=(15, 4)) for i in range(7): ax[0, i].imshow(data[i].cpu().numpy().transpose((1, 2, 0))) ax[0, i].axis('off') ax[1, i].imshow(recon[i].cpu().numpy().transpose((1, 2, 0))) ax[1, i].axis('off') ax[0, 0].set_title('Original') ax[1, 0].set_title('Reconstructed') plt.show()
`
**Output:

Output
Here we can see that our Convolutional Autoencoder model is working fine.
You cann download source code from here.