How To Build a Basic CRUD App With Node and React ? (original) (raw)
Last Updated : 23 Jul, 2025
In this article, we will explore how to build a simple CRUD (Create, Read, Update, Delete) application using Node.js for the backend and React for the frontend. Additionally, we will integrate MongoDB as the database to store our data.
**Preview of final output:

App functionality
- Create a new student (**CREATE)
- Update an existing student (**UPDATE)
- Show all students list (**READ)
- Delete a student (**DELETE)
**Prerequisites
- **Node.js and npm: You need Node.js installed. You can check if you have it installed by running
node -vandnpm -vin the terminal. - **MongoDB: A MongoDB instance is required for the backend. You can either use a local MongoDB instance or use MongoDB Atlas (a cloud database service).
- **React: You’ll need basic knowledge of React and how to set up React applications.
REST API in this project
| **REST API Request | **URL |
|---|---|
| **GET | http://localhost:4000/students |
| **GET | /students/students/id |
| **POST | /students/students |
| **PUT | /students/students/id |
| **DELETE | /students/students/id |
Building a basic CRUD app with Node and React is a perfect way to learn full-stack development.
Now, first of all, we will work on the frontend part of our application using React.js.
Steps to Create React Application and Installing modules
Step 1: Initialize React App for Front End
Let’s start building the Front-end part with React. To create a new React App, enter the following code into terminal and hit enter.
npx create-react-app mern-stack-crud
Step 2: Switch to Project Directory
Move into the React project folder.
cd mern-stack-crud
Step 3: Run The Frontend
To run the React App, run the following command:
npm start
This command opens the React App to the browser on the following URL: http://localhost:3000/
Step 4: Install Required Modules
To build the React App we need to install some external modules.
| **NPM | **Detail |
|---|---|
| **React-Bootstrap | React-Bootstrap has evolved and grown alongside React, making it an excellent choice for your UI. |
| **React-Router-Dom | React Router DOM enables you to implement routing in a React App. |
| **Axios | It is a promise base HTTP Client and use for network request. |
| **Formik | A great library to build form in React. |
| **Yup | Yup is a JavaScript schema builder for form validation. |
To install, run the following code on the terminal.
npm install react-bootstrap bootstrap react-router-dom axios formik yup
Step 5: Creating Simple React Components
In this step we will create some React Components to manage student data.
Head over to **src folder, make a folder and name it **Components and within that directory create the following components.
- **StudentForm.js - Reusable Student form
- **create-student.component.js - Responsible for create new student
- **edit-student.component.js - Responsible for update student data
- **student-list.component.js - Responsible for display all student
- **StudentTableRow.js - Responsible for display a single student
Frontend Project Structure:
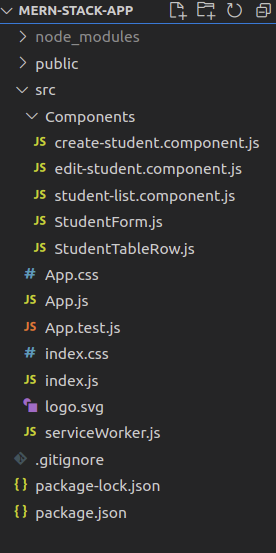
front-end project structure
Dependencies
"dependencies": {
"@testing-library/dom": "^10.4.0",
"@testing-library/jest-dom": "^6.6.3",
"@testing-library/react": "^16.3.0",
"@testing-library/user-event": "^13.5.0",
"axios": "^1.2.1",
"bootstrap": "^5.2.0",
"formik": "^2.2.9",
"react": "^19.1.0",
"react-bootstrap": "^2.7.0",
"react-dom": "^19.1.0",
"react-router-dom": "^6.6.1",
"react-scripts": "5.0.1",
"web-vitals": "^2.1.4",
"yup": "^0.32.11"
},
Approach
For the Frontend of this Student database App
- We will build a reusable student form with Formik and React-Bootstrap. This form has all the necessary fields to enter student details. We have also made client-side form validation with Yup. In the future, we will use this component for creating and update a student. Go to **src/Components/StudentForm.js.
- We will create a component to add a new student. We have already created a **StudentForm component to enter student details. Now, it's time to use this component. Go to **src/Components/create-student.component.js.
- We will create a component to update details. We have reusable **StudentForm component, let's use it again. We will fetch student details to reinitialise form. Go to **src/Components/edit-student.component.js.
- We will build a component to display the student details in a table. We will fetch student's data and iterate over it to create table row for every student. Go to **src/Components/student-list.component.js.
- We will return table row which is responsible to display student data. Go to **src/Components/StudentTableRow.js.
- Finally, include the menu to make routing in our MERN Stack CRUD app. Go to **src/App.js and write the following code.
**Example: This example creates frontend for Student database app including a student form and table to display data.
CSS `
/* App.css */
.wrapper { padding-top: 30px; }
body h3 { margin-bottom: 25px; }
.navbar-brand a { color: #ffffff; }
.form-wrapper, .table-wrapper { max-width: 500px; margin: 0 auto; }
.table-wrapper { max-width: 700px; }
.edit-link { padding: 7px 10px; font-size: 0.875rem; line-height: normal; border-radius: 0.2rem; color: #fff; background-color: #28a745; border-color: #28a745; margin-right: 10px; position: relative; top: 1px; }
.edit-link:hover { text-decoration: none; color: #ffffff; }
/* Chrome, Safari, Edge, Opera */ input::-webkit-outer-spin-button, input::-webkit-inner-spin-button { -webkit-appearance: none; margin: 0; }
/* Firefox */ input[type=number] { -moz-appearance: textfield; }
JavaScript
// Import React import React from "react";
// Import Bootstrap import { Nav, Navbar, Container, Row, Col } from "react-bootstrap"; import "bootstrap/dist/css/bootstrap.css";
// Import Custom CSS import "./App.css";
// Import from react-router-dom import { BrowserRouter as Router, Routes, Route, Link } from "react-router-dom";
// Import other React Components import CreateStudent from "./Components/create-student.component"; import EditStudent from "./Components/edit-student.component"; import StudentList from "./Components/student-list.component";
// App Component const App = () => { return (
                        <Nav className="justify-content-end">
                            <Nav>
                                <Link to={"/create-student"}
                                    className="nav-link">
                                    Create Student
                                </Link>
                            </Nav>

                            <Nav>
                                <Link to={"/student-list"}
                                    className="nav-link">
                                    Student List
                                </Link>
                            </Nav>
                        </Nav>
                    </Container>
                </Navbar>
            </header>

            <Container>
                <Row>
                    <Col md={12}>
                        <div className="wrapper">
                            <Routes>
                                <Route path="/" element={<CreateStudent />} />
                                <Route path="/create-student" element={<CreateStudent />} />
                                <Route path="/edit-student/:id" element={<EditStudent />} />
                                <Route path="/student-list" element={<StudentList />} />
                            </Routes>
                        </div>
                    </Col>
                </Row>
            </Container>
        </div>
    </Router>
);
};
export default App;
` JavaScript ``
// src/Components/StudentForm.js
import React from "react"; import * as Yup from "yup"; import { Formik, Form, Field, ErrorMessage } from "formik"; import { FormGroup, FormControl, Button } from "react-bootstrap";
const StudentForm = (props) => {
const validationSchema =
Yup.object().shape({
name: Yup.string().required("Required"),
email: Yup.string()
.email(
You have enter an invalid email address
)
.required("Required"),
rollno: Yup.number()
.positive("Invalid roll number")
.integer("Invalid roll number")
.required("Required"),
});
console.log(props);
return (
export default StudentForm;
`` JavaScript `
// src/Components/create-student.component.js
// CreateStudent Component for add new student // Import Modules import React, { useState, useEffect } from "react"; import axios from 'axios'; import StudentForm from "./StudentForm";
// CreateStudent Component const CreateStudent = () => { const [formValues, setFormValues] = useState( { name: '', email: '', rollno: '' }) // onSubmit handler const onSubmit = studentObject => { axios.post( 'http://localhost:4000/students/students', studentObject) .then(res => { if (res.status === 200) alert('Student successfully created') else Promise.reject() }) .catch(err => alert('Something went wrong')) }
// Return student form
return (
    <StudentForm initialValues={formValues}
        onSubmit={onSubmit}
        enableReinitialize>
        Create Student
    </StudentForm>
)
}
// Export CreateStudent Component export default CreateStudent
JavaScript
//src/Components/edit-student.component.js
// EditStudent Component for update student data // Import Modules import React, { useState, useEffect } from "react"; import axios from "axios"; import StudentForm from "./StudentForm";
// EditStudent Component const EditStudent = (props) => { const [formValues, setFormValues] = useState( { name: "", email: "", rollno: "", } );
//onSubmit handler
const onSubmit = (studentObject) => {
    axios
.put("http://localhost:4000/students/students/" + props.match.params.id, studentObject ) .then((res) => { if (res.status === 200) { alert("Student successfully updated"); props.history.push("/student-list"); } else Promise.reject(); }) .catch( (err) => alert("Something went wrong") ); };
// Load data from server and reinitialize student form
useEffect(() => {
    axios
.get("http://localhost:4000/students/update-student/" + props.match.params.id ) .then((res) => { const { name, email, rollno } = res.data; setFormValues( { name, email, rollno }); }) .catch( (err) => console.log(err) ); }, []);
// Return student form
return (
    <StudentForm
        initialValues={formValues}
        onSubmit={onSubmit}
        enableReinitialize>
        Update Student
    </StudentForm>
);
};
// Export EditStudent Component export default EditStudent;
JavaScript
//src/Components/student-list.component.js
import React, { useState, useEffect } from "react"; import axios from "axios"; import { Table } from "react-bootstrap"; import StudentTableRow from "./StudentTableRow";
const StudentList = () => { const [students, setStudents] = useState([]);
useEffect(() => {
    axios
        .get("http://localhost:4000/students/")
        .then(({ data }) => {
            setStudents(data);
        })
        .catch((error) => {
            console.log(error);
        });
}, []);

const DataTable = () => {
    return students.map((res, i) => {
        return <StudentTableRow
            obj={res} key={i} />;
    });
};

return (
    <div className="table-wrapper">
        <Table striped bordered hover>
            <thead>
                <tr>
                    <th>Name</th>
                    <th>Email</th>
                    <th>Roll No</th>
                    <th>Action</th>
                </tr>
            </thead>
            <tbody>{DataTable()}</tbody>
        </Table>
    </div>
);
};
export default StudentList;
JavaScript
//src/Components/StudentTableRow.js
import React from "react"; import { Button } from "react-bootstrap"; import { Link } from "react-router-dom"; import axios from "axios";
const StudentTableRow = (props) => { const { _id, name, email, rollno } = props.obj;
    const deleteStudent = () => {
        axios
.delete("http://localhost:4000/students/students/" + _id) .then((res) => { if (res.status === 200) { alert("Student successfully deleted"); window.location.reload(); } else Promise.reject(); }) .catch( (err) => alert("Something went wrong")); };
    return (
        <tr>
            <td>{name}</td>
            <td>{email}</td>
            <td>{rollno}</td>
            <td>
                <Link className="edit-link"
                    to={"/edit-student/" + _id}>
                    Edit
                </Link>
                <Button
                    onClick={deleteStudent}
                    size="sm" variant="danger">
                    Delete
                </Button>
            </td>
        </tr>
    );
};
export default StudentTableRow;
`
Now, we have successfully created the frontend for our **mern-stack-app. Let's build the backend part. Before, jumping to next section take a look how the frontend part working without backend.
**Step to Run the application: Open the terminal and type the following command.
npm start
**Output
Steps to Setup the Backend
**Step 1: Create Backend Directory
Run command to create **backend folder for server and get inside of it.
mkdir backend
cd backend
**Step 2: Initialize Backend Project
**Create package.json - Next, we need to create a separate **package.json file for managing the server of our **mern-stack-crud app.
npm init -y
**Step 3: Install Node Dependencies
Install the following Node dependencies.
| Package | Description |
|---|---|
| express | Web framework to handle routing and server logic. |
| cors | Middleware to handle Cross-Origin Resource Sharing. |
| mongoose | ODM (Object Data Modeling) library for MongoDB. |
| dotenv | Loads environment variables from a .env file. |
To install the above dependencies, run the following code on the terminal.
npm install express cors mongoose dotenv
npm install --save-dev nodemon
**Backend Project Structure:
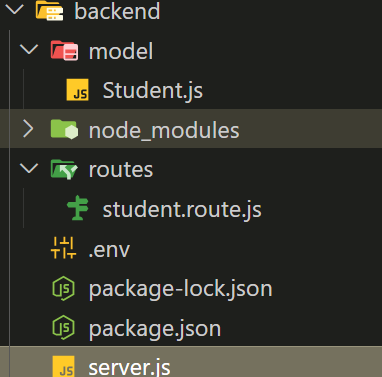
folder structure
Dependencies
"dependencies": {
"express": "^4.18.2",
"mongoose": "^7.2.2",
"cors": "^2.8.5",
"dotenv": "^10.0.0"
},
"devDependencies": {
"nodemon": "^2.0.22"
}
Approach
For backend of Student database app
- We will set up a MongoDB database for our app. Before, starting make sure you have latest version of MongoDB is installed on your system. Create folder inside the **backend folder and name it **database. Create a file by the name of **db.js inside the **database folder. Go to **backend/database/db.js. We have declared the MongoDB database and name it **reactdb.
- Now, create MongoDB schema for interacting with MongoDB database. Create a folder called **models inside **backend folder to keep schema related files and create a file **Student.js inside of it to define MongoDB schema. Go to **backend/models/Student.js.
- We are set up some routes (REST APIs) for CREATE, READ, UPDATE and DELETE using Express and Node.js. These routes will help us to manage the data in our **mern-stack-crud app.
- We have almost created everything for our **mern-stack-crud app. Now, create the **server.js file in the root of the **backend folder. Go to **backend/server.js and write the following code.
**Example: This example uses mongo and node, express to setup the backend.
JavaScript ``
// server.js
const express = require('express'); const mongoose = require('mongoose'); const cors = require('cors'); require('dotenv').config();
const studentRoute = require('./routes/student.route'); const app = express();
// Middleware app.use(cors()); app.use(express.json()); app.use(express.urlencoded({ extended: true }));
// MongoDB Connection mongoose.connect(process.env.MONGODB_URI, { useNewUrlParser: true, useUnifiedTopology: true }).then(() => { console.log('Database connected!'); }).catch((err) => { console.error('MongoDB connection error:', err); });
// Routes app.use('/students', studentRoute);
// 404 Error app.use((req, res) => { res.status(404).send('Error 404: Not Found!'); });
// Global Error Handler app.use((err, req, res, next) => { console.error(err.stack); res.status(err.statusCode || 500).send(err.message); });
// Server Start
const PORT = process.env.PORT || 4000;
app.listen(PORT, () => {
console.log(Server is running on port ${PORT});
});
});
`` JavaScript `
// models/Student.js
const mongoose = require('mongoose'); const Schema = mongoose.Schema;
const studentSchema = new Schema({ name: { type: String, required: true }, email: { type: String, required: true }, rollno: { type: Number, required: true } }, { timestamps: true, collection: 'students' });
module.exports = mongoose.model('Student', studentSchema);
JavaScript
// backend/routes/student.route.js
const express = require('express'); const router = express.Router(); const Student = require('../models/Student');
// CREATE router.post('/', async (req, res, next) => { try { const data = await Student.create(req.body); res.status(201).json(data); } catch (error) { next(error); } });
// READ All router.get('/', async (req, res, next) => { try { const data = await Student.find(); res.json(data); } catch (error) { next(error); } });
// READ One router.get('/:id', async (req, res, next) => { try { const data = await Student.findById(req.params.id); res.json(data); } catch (error) { next(error); } });
// UPDATE router.put('/:id', async (req, res, next) => { try { const data = await Student.findByIdAndUpdate(req.params.id, req.body, { new: true }); res.json(data); } catch (error) { next(error); } });
// DELETE router.delete('/:id', async (req, res, next) => { try { const data = await Student.findByIdAndDelete(req.params.id); res.json({ message: "Student deleted", data }); } catch (error) { next(error); } });
module.exports = router;
module.exports = router;
`
Now, we have successfully created the backend for our **mern-stack-app.
Open a terminal and run the following command to start the Nodemon server by staying in the **backend folder.
nodemon server.js
**Output:
Summary
This article creates a Student database application using MERN (Mongo, Express, React, Node) to show the Basic CRUD Operations in a MERN App. It uses the api endpoints for HTTP requests like GET, POST, PUT, DELETE to create, read, update and detele the student data in the mongo database.