Python Compound Interest GUI Calculator using Tkinter (original) (raw)
Last Updated : 09 Jul, 2024
Python offers multiple options for developing a GUI (Graphical User Interface). Out of all the Python GUI Libraries, Tkinter is the most commonly used method. In this article, we will learn how to create a Compound Interest GUI Calculator application using Tkinter.
Let’s create a GUI-based Compound Interest Calculator application.
- Importing the module – Tkinter
- Create the main window (container)
- Add any number of widgets to the main window.
- Apply the event Trigger on the widgets.
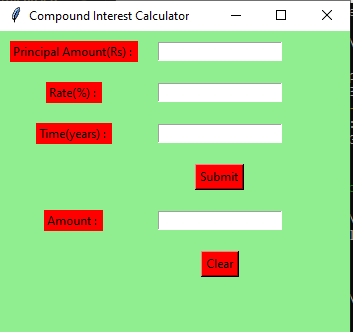
Below is what the GUI will look like:
Steps to Create Compound Interest GUI Calculator using Tkinter
**Importing the tkinter Library:
from tkinter import *
This imports all classes and functions from the tkinter library, which is used to create the GUI.
**Function to Clear All Entry Fields
This function clears the content of all entry fields and sets the focus back to the principal_field.
Python `
def clear_all(): principal_field.delete(0, END) rate_field.delete(0, END) time_field.delete(0, END) compound_field.delete(0, END) principal_field.focus_set()
`
**Function to Calculate Compound Interest:
This function retrieves values from the entry fields, calculates the compound interest, and inserts the result into the compound_field.
Python `
def calculate_ci(): principal = int(principal_field.get()) rate = float(rate_field.get()) time = int(time_field.get()) CI = principal * (pow((1 + rate / 100), time)) compound_field.insert(10, CI)
`
**Main Program:
This part initializes the main window of the GUI, sets the background color, window size, and title.
Python `
if name == "main": root = Tk() root.configure(background = 'light green') root.geometry("400x250") root.title("Compound Interest Calculator")
`
**Creating and Positioning Labels:
These lines create labels for the GUI and position them using the grid method.
Python `
label1 = Label(root, text = "Principal Amount(Rs) : ", fg = 'black', bg = 'red') label2 = Label(root, text = "Rate(%) : ", fg = 'black', bg = 'red') label3 = Label(root, text = "Time(years) : ", fg = 'black', bg = 'red') label4 = Label(root, text = "Amount : ", fg = 'black', bg = 'red')
label1.grid(row = 1, column = 0, padx = 10, pady = 10) label2.grid(row = 2, column = 0, padx = 10, pady = 10) label3.grid(row = 3, column = 0, padx = 10, pady = 10) label4.grid(row = 5, column = 0, padx = 10, pady = 10)
`
**Creating and Positioning Entry Fields:
These lines create entry fields for user input and position them using the grid method.
Python `
principal_field = Entry(root) rate_field = Entry(root) time_field = Entry(root) compound_field = Entry(root)
principal_field.grid(row = 1, column = 1, padx = 10, pady = 10) rate_field.grid(row = 2, column = 1, padx = 10, pady = 10) time_field.grid(row = 3, column = 1, padx = 10, pady = 10) compound_field.grid(row = 5, column = 1, padx = 10, pady = 10)
`
**Creating and Positioning Buttons:
These lines create buttons for submitting the form and clearing the fields, and position them using the grid method.
Python `
button1 = Button(root, text = "Submit", bg = "red", fg = "black", command = calculate_ci) button2 = Button(root, text = "Clear", bg = "red", fg = "black", command = clear_all)
button1.grid(row = 4, column = 1, pady = 10) button2.grid(row = 6, column = 1, pady = 10)
`
**Starting the GUI Event Loop:
root.mainloop()
Complete Code
Python `
import all classes / functions from the tkinter
from tkinter import *
Function for clearing the
contents of all entry boxes
def clear_all() :
# whole content of entry boxes is deleted
principal_field.delete(0, END)
rate_field.delete(0, END)
time_field.delete(0, END)
compound_field.delete(0, END)

# set focus on the principal_field entry box
principal_field.focus_set()
Function to find compound interest
def calculate_ci():
# get a content from entry box
principal = int(principal_field.get())

rate = float(rate_field.get())

time = int(time_field.get())

# Calculates compound interest
CI = principal * (pow((1 + rate / 100), time))

# insert method inserting the
# value in the text entry box.
compound_field.insert(10, CI)
Driver code
if name == "main" :
# Create a GUI window
root = Tk()

# Set the background colour of GUI window
root.configure(background = 'light green')

# Set the configuration of GUI window
root.geometry("400x250")

# set the name of tkinter GUI window
root.title("Compound Interest Calculator")

# Create a Principal Amount : label
label1 = Label(root, text = "Principal Amount(Rs) : ",
               fg = 'black', bg = 'red')

# Create a Rate : label
label2 = Label(root, text = "Rate(%) : ",
               fg = 'black', bg = 'red')

# Create a Time : label
label3 = Label(root, text = "Time(years) : ",
               fg = 'black', bg = 'red')

# Create a Compound Interest : label
label4 = Label(root, text = "Amount : ",
               fg = 'black', bg = 'red')

# grid method is used for placing
# the widgets at respective positions
# in table like structure .

# padx keyword argument used to set padding along x-axis .
# pady keyword argument used to set padding along y-axis .
label1.grid(row = 1, column = 0, padx = 10, pady = 10)
label2.grid(row = 2, column = 0, padx = 10, pady = 10)
label3.grid(row = 3, column = 0, padx = 10, pady = 10)
label4.grid(row = 5, column = 0, padx = 10, pady = 10)

# Create a entry box
# for filling or typing the information.
principal_field = Entry(root)
rate_field = Entry(root)
time_field = Entry(root)
compound_field = Entry(root)

# grid method is used for placing
# the widgets at respective positions
# in table like structure .

# padx keyword argument used to set padding along x-axis .
# pady keyword argument used to set padding along y-axis .
principal_field.grid(row = 1, column = 1, padx = 10, pady = 10)
rate_field.grid(row = 2, column = 1, padx = 10, pady = 10)
time_field.grid(row = 3, column = 1, padx = 10, pady = 10)
compound_field.grid(row = 5, column = 1, padx = 10, pady = 10)

# Create a Submit Button and attached
# to calculate_ci function
button1 = Button(root, text = "Submit", bg = "red",
                 fg = "black", command = calculate_ci)

# Create a Clear Button and attached
# to clear_all function
button2 = Button(root, text = "Clear", bg = "red",
                 fg = "black", command = clear_all)

button1.grid(row = 4, column = 1, pady = 10)
button2.grid(row = 6, column = 1, pady = 10)

# Start the GUI
root.mainloop()
`
**Output