ToDo webapp using Django (original) (raw)
Last Updated : 20 May, 2025
Our task is to create a simple ToDo app using Django that allows users to add, view, and delete notes. We will build this by setting up a Django project, creating a Todo model, designing forms and views to handle user input, and creating templates to display the tasks. Step-by-step, we'll implement the core functionality to manage todo items efficiently.
**Basic setup
Create a virtual environment, and install the packages:
pip install django-crispy-forms
pip install Django
Step 1: Create a Django Project
Start a new Django project named **todo_site: This sets up the base project directory and files (settings, URLs, etc.) to start building your Django application.
django-admin startproject todo_site
Step 2: Navigate to the Project Directory
cd todo_site
Step 3: Create a Django App
Create an app named todo where the core logic of your ToDo app (models, views, forms, etc.) will reside.
python manage.py startapp todo
The directory structure should look like this:
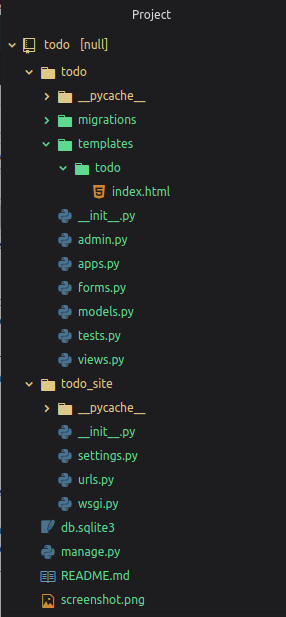
Project Directory
Step 4: Add the todo App to Settings
Open **todo_site/settings.py and add ****'todo'** to the **INSTALLED_APPS list: Register the todo app so Django includes it in migrations, admin panel, and more.
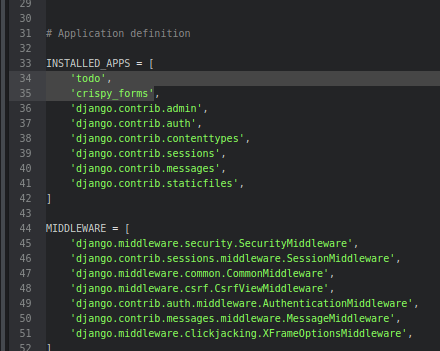
settings.py
Step 5: Configure URLs
Edit **todo_site/urls.py to include the todo app views: This connects your app’s views to specific URLs—/ for the list and /del/ to delete items.
Python `
from django.contrib import admin from django.urls import path from todo import views
urlpatterns = [ path('', views.index, name="todo"), path('del/str:item_id', views.remove, name="del"), path('admin/', admin.site.urls), ]
`
Step 6: Define the ToDo Model
Edit **todo/models.py to define the Todo model. The model represents each to-do item with a title, description, and creation time.
Python `
from django.db import models from django.utils import timezone
class Todo(models.Model): title = models.CharField(max_length=100) details = models.TextField() date = models.DateTimeField(default=timezone.now)
def __str__(self):
    return self.title
`
Step 7: Create Views
Edit **todo/views.py:
- **index() shows the task list and handles new submissions.
- **remove() deletes a task by ID.
These views interact with the model and render templates with context data.
Python `
from django.shortcuts import render, redirect from django.contrib import messages
from .forms import TodoForm from .models import Todo
def index(request):
item_list = Todo.objects.order_by("-date")
if request.method == "POST":
    form = TodoForm(request.POST)
    if form.is_valid():
        form.save()
        return redirect('todo')
form = TodoForm()

page = {
    "forms": form,
    "list": item_list,
    "title": "TODO LIST",
}
return render(request, 'todo/index.html', page)
def remove(request, item_id): item = Todo.objects.get(id=item_id) item.delete() messages.info(request, "item removed !!!") return redirect('todo')
`
Step 8: Create a Form
Create todo/forms.py and add the following:
Python `
from django import forms from .models import Todo
class TodoForm(forms.ModelForm): class Meta: model = Todo fields = "all"
`
This form handles user input using Django’s **ModelForm, automatically generating fields from the model.
Step 9: Register the Model with Admin
Edit todo/admin.py to register the Todo model:
Python `
from django.contrib import admin from .models import Todo
admin.site.register(Todo)
`
Registering the model allows you to manage to-do items via Django’s built-in admin interface.
Step 10: Create the Template
Create the folder **todo/templates/todo/ and add index.html:
HTML `
{{title}}{% if messages %} {% for message in messages %}
__TODO LIST__
<div class="col-md-8">
{% for i in list %}
<div class="card">
<center><b>{{i.title}}</b></center>
<hr/>
{{i.date}}
<hr/>
{{i.details}}
<br />
<br />
<form action="/del/{{i.id}}" method="POST" style=" padding-right: 4%; padding-bottom: 3%;">
{% csrf_token %}
<button value="remove" type="submit" class="btn btn-primary" style="float: right;"><span class="glyphicon glyphicon-trash"></span> remove</button>
</form>
</div>
{% endfor%}
</div>
<div class="col-md-1"> </div>
<div class="col-md-3" >
<div class="submit_form">
<form method="POST">
{% csrf_token %}
{{forms}}
<center>
<input type="submit" class="btn btn-default" value="submit" />
</center>
</form>
</div>`
This HTML file:
- Displays all tasks with their details.
- Shows a form for adding new tasks.
- Includes delete buttons using POST for CSRF protection.
- Uses Bootstrap for styling.
Step 11: Apply Migrations
Create and apply migrations to set up the database schema:
python manage.py makemigrations
python manage.py migrate
Step 12: Run the Development Server
Start the Django development server:
python manage.py runserver
Open your web browser and go to http://127.0.0.1:8000/ to see your ToDo app in action!
**Output:

To Do webApp