Image Processing with SciPy and NumPy in Python (original) (raw)
Image processing is used in areas like computer vision and medical imaging, focusing on enhancing and analyzing digital images. In Python, NumPy treats images as arrays for efficient pixel-level operations, while SciPy’s ndimage module provides tools for filtering and transformations, enabling fast and lightweight processing.
Installation
Ensure you have the required libraries installed:
pip install numpy scipy matplotlib imageio scikit-image
- **NumPy: Handles arrays and numerical computations.
- **SciPy: Adds advanced scientific and mathematical functions.
- **Matplotlib: Creates plots and visualizations.
- **ImageIO: Reads and writes image files.
- **scikit-image: Provides tools for image processing and analysis.
To download the image used in this article, click here
Opening and Displaying Image
To begin any image processing task, the first step is to load and visualize the image. We'll use imageio.v3 to read an image and matplotlib to display it.
Python `
import imageio.v3 as iio import matplotlib.pyplot as plt
img = iio.imread("raccoon.png") plt.imshow(img) plt.axis('off') plt.show()
`
**Output
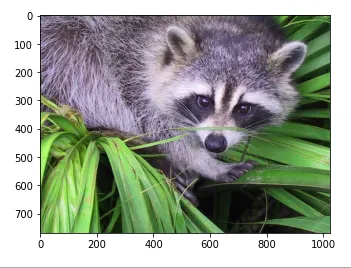
loaded image
**Note: The image must be in the same folder as the Python script otherwise, provide a relative or full path.
**Explanation:
- iio.imread(): loads the image into a NumPy array.
- plt.imshow(): visualizes it.
- **plt.axis('off'): hides axes for a cleaner look.
Creating NumPy array from Image
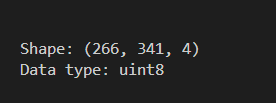
An image is essentially a multi-dimensional NumPy array. Knowing its shape and data type is important for applying filters and transformations.
Python `
import imageio.v3 as iio import numpy as np
img = iio.imread("raccoon.png") print("Shape:", img.shape) print("Data type:", img.dtype)
`
**Output
Pixel data type
**Explanation: Shape helps understand the image layout (e.g., 266x341x3 for RGB). Data type (usually uint8) shows pixel value range (0-255).
Creating RAW file
A .raw file stores raw binary data from an image sensor or matrix. It's useful when dealing with uncompressed data in image pipelines.
Python `
import imageio.v3 as iio import numpy as np img = iio.imread("raccoon.png") img.tofile("raccoon.raw")
`
**Output

RAW saved
**Explanation: tofile() saves the image pixel data as a binary file, useful for low-level image processing.
Opening RAW File
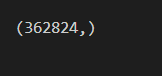
To work with .raw files, we use np.fromfile() to reconstruct the image data into a usable NumPy array.
Python `
import imageio.v3 as iio import numpy as np
orig = iio.imread("raccoon.png") h, w, c = orig.shape
flat = np.fromfile('raccoon.raw', dtype=np.uint8) img=flat.reshape((h,w,c)) print(img.shape)
`
**Output
Binary loaded
**Explanation: fromfile() reads binary data and the array must be reshaped manually if you want to visualize it (e.g., reshape to original height × width × channels).
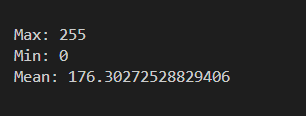
Getting Statistical Information
Understanding the min, max and average pixel intensity gives insight into brightness, contrast and histogram distribution of the image.
Python `
import imageio.v3 as iio import numpy as np img = iio.imread("raccoon.png")
print("Max:", img.max()) print("Min:", img.min()) print("Mean:", img.mean())
`
**Output
Pixel stats
**Explanation: Max and min values indicate contrast and Mean gives an overall idea of brightness.
Cropping the Image
Cropping helps focus on a particular region of interest (ROI) in an image by slicing the NumPy array.
Python `
import imageio.v3 as iio import matplotlib.pyplot as plt
img = iio.imread("raccoon.png") x, y, _ = img.shape
Crop center region
crop = img[h//4 : 3h//4, w//4 : 3w//4]
plt.imshow(crop) plt.axis('off') plt.title("Cropped Raccoon") plt.show()
`
**Output
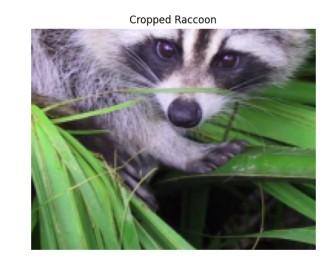
**Explanation:
- img.shape: gives image dimensions (height x, width y, channels _).
- **img[h//4 : 3*h//4, w//4 : 3*w//4]: selects a central region using slicing.
- **plt.imshow(): visualizes the cropped section.
Flipping Image (Vertical)
Flipping an image (up-down or left-right) is a common data augmentation technique in image preprocessing.
Python `
import imageio.v3 as iio import matplotlib.pyplot as plt import numpy as np
img = iio.imread("raccoon.png") flipped = np.flipud(img)
plt.imshow(flipped) plt.axis('off') plt.title("Flipped Image (Up-Down)") plt.show()
`
**Output
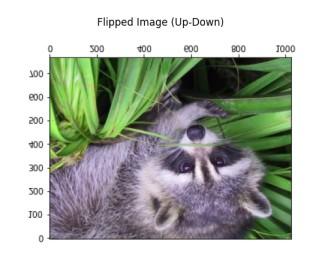
**Explanation: np.flipud() flips the image along the vertical axis.
Filtering images
Filtering is a fundamental technique in image processing used to enhance or suppress certain features. It helps in tasks like smoothing, sharpening and edge detection.
1. Gaussian Blur
Blurring helps reduce image noise and details using a Gaussian kernel. It’s useful in preprocessing steps like edge detection or thresholding.
Python `
from scipy.ndimage import gaussian_filter import imageio.v3 as iio import matplotlib.pyplot as plt import numpy as np
img = iio.imread("raccoon.png") blurred = gaussian_filter(img, sigma=5)
plt.imshow(blurred.astype(np.uint8)) plt.axis('off') plt.title("Gaussian Blurred") plt.show()
`
**Output
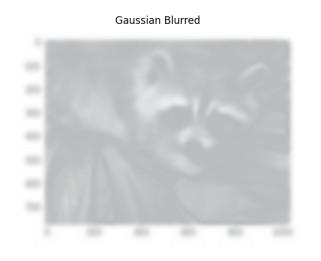
**Explanation: gaussian_filter(img, sigma=5) smooths the image using a Gaussian kernel. sigma controls the intensity of blur and converts to uint8 before display to ensure proper color rendering.
2. Sharpening Image (Unsharp Masking)
Sharpening increases contrast between edges to enhance details and clarity. Unsharp masking subtracts a blurred version from the original.
Python `
from skimage.color import rgb2gray, rgba2rgb from scipy.ndimage import gaussian_filter import imageio.v3 as iio import matplotlib.pyplot as plt import numpy as np
img = iio.imread("raccoon.png") if img.shape[-1] == 4: img = rgba2rgb(img)
gray = rgb2gray(img).astype(float) blur = gaussian_filter(gray, 5) alpha = 30 sharp = gray + alpha * (gray - gaussian_filter(blur, 1))
plt.imshow(sharp, cmap='gray') plt.axis('off') plt.title("Sharpened Image") plt.show()
`
**Output

**Explanation:
- Converts image to grayscale using rgb2gray.
- **gray - gaussian_filter(blur, 1) extracts edge details and adds edge details back using alpha scaling Unsharp Masking.
Denoising Images
Image denoising removes random noise to enhance image quality, particularly useful in low-light photography or scanned documents.
1. Add noise
Artificial noise is added to simulate a noisy environment, commonly seen in real-world low-light or sensor-imperfect images.
Python `
import numpy as np import imageio.v3 as iio import matplotlib.pyplot as plt from skimage.color import rgb2gray, rgba2rgb
img = iio.imread("raccoon.png") if img.shape[-1] == 4: img = rgba2rgb(img)
gray = rgb2gray(img).astype(float) noise_img = gray + 0.9 * gray.std() * np.random.random(gray.shape)
plt.imshow(noise_img, cmap='gray') plt.axis('off') plt.title("Noisy Image") plt.show()
`
**Output
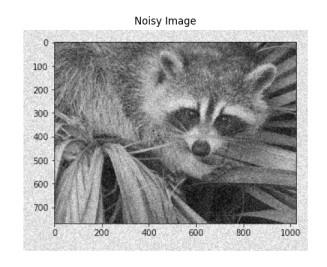
**Explanation: Adds random values scaled by image standard deviation to simulate real-world noise (e.g., from low-light sensors).
2. Gaussian Denoising
Gaussian filtering smooths the image by averaging pixel values with its neighbors using a Gaussian kernel, effectively reducing high-frequency noise.
Python `
from scipy.ndimage import gaussian_filter import matplotlib.pyplot as plt
denoised = gaussian_filter(noise_img, sigma=2.2) plt.imshow(denoised, cmap='gray') plt.axis('off') plt.title("Denoised (Gaussian)") plt.show()
`
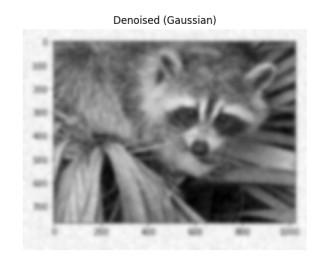
**Explanation: Smooths the image using a Gaussian kernel to reduce high-frequency noise while preserving structure.
Edge Detection using Sobel Filter
Sobel edge detection identifies image edges by computing intensity gradients using 3×3 kernels. It highlights boundaries by combining horizontal and vertical changes, aiding in tasks like segmentation and object detection.
Python `
import numpy as np import matplotlib.pyplot as plt from scipy.ndimage import rotate, gaussian_filter, sobel
im = np.zeros((300, 300)) im[64:-64, 64:-64] = 1
im = rotate(im, 30, mode='constant') im = gaussian_filter(im, sigma=7)
plt.imshow(im, cmap='gray') plt.axis('off') plt.title("Original Synthetic Image") plt.show()
dx = sobel(im, axis=0, mode='constant') dy = sobel(im, axis=1, mode='constant') sobel_edges = np.hypot(dx, dy)
plt.imshow(sobel_edges, cmap='gray') plt.axis('off') plt.title("Sobel Edge Detection") plt.show()
`