matplotlib.pyplot.imshow() in Python (original) (raw)
**matplotlib.pyplot.imshow() function in Python is used to display images in a plot. It is part of the matplotlib library and allows you to visualize images as 2D data. This function is widely used for displaying images, matrices, or heatmaps where each value in the array corresponds to a color. **Example:
Python `
import numpy as np import matplotlib.pyplot as plt
a = np.random.random((10, 10))
Display the array as an image
plt.imshow(a, cmap='viridis', interpolation='nearest')
plt.colorbar()
plt.show()
`
**Output
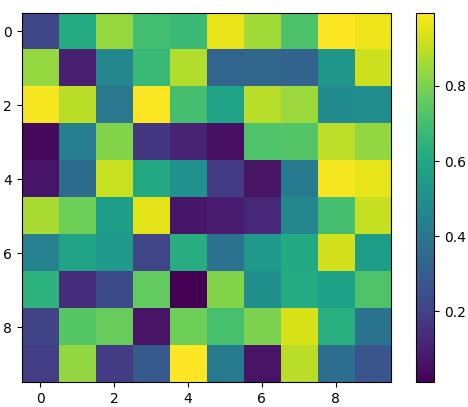
array as an image
**Explanation:
- **np.random.random((10, 10)) creates a 10x10 array of random numbers between 0 and 1.
- **imshow() visualizes the array as an image, using the 'viridis' colormap and 'nearest' interpolation.
- **plt.colorbar() adds a colorbar to the side of the image, showing the value-to-color mapping.
Syntax
matplotlib.pyplot.imshow(X, cmap=None, norm=None, *, aspect=None, interpolation=None, alpha=None, vmin=None, vmax=None, colorizer=None, origin=None, extent=None, interpolation_stage=None, filternorm=True, filterrad=4.0, resample=None, url=None, data=None, **kwargs)
**Parameters:
- **X: The input data (2D array or image) to be displayed. This is typically a numpy array or an image.
- **cmap: The colormap to be used for displaying the data. This maps the data values to colors. If not provided, a default colormap is used.
- **norm: A normalization object that scales the data values before mapping them to colors (e.g., Normalize, LogNorm, etc.). It controls how data values are transformed into colors.
- **vmin, vmax: These parameters control the color scaling. Values in the image below vmin are mapped to the lowest color, and values above vmax are mapped to the highest color.
- **alpha: Sets the transparency level of the image, where 0 is fully transparent and 1 is fully opaque.
- **aspect: This parameter is used to controls the aspect ratio of the axes.
- **interpolation: This parameter is the interpolation method which used to display an image.
- **origin: This parameter is used to place the [0, 0] index of the array in the upper left or lower left corner of the axes.
- **resample: This parameter is the method which is used for resembling.
- **extent: This parameter is the bounding box in data coordinates.
- **filternorm: This parameter is used for the antigrain image resize filter.
- **filterrad: This parameter is the filter radius for filters that have a radius parameter.
- **url: This parameter sets the url of the created AxesImage.
- **data: Data source for the image. This is an optional parameter that can be used to specify an object from which the image data should be fetched
- ****kwargs: Other keyword arguments for further customization (e.g., setting axis labels, figure size, etc.).
**Reurn Value: imshow() function returns an AxesImage object, which is an instance of the matplotlib.image.AxesImage class. This object represents the image displayed on the axes and can be used to further customize or interact with the image after it has been plotted.
Examples of matplotlib.pyplot.imshow()
**1. Displaying 2D Data with imshow() and Custom Color Range
This code demonstrates how to display a 2D data array using imshow() with a custom color range. It sets specific vmin and vmax values to control the color intensity.
Python `
import matplotlib.pyplot as plt import numpy as np from matplotlib.colors import LogNorm
dx, dy = 0.015, 0.05 y, x = np.mgrid[slice(-4, 4 + dy, dy), slice(-4, 4 + dx, dx)] z = (1 - x / 3. + x ** 5 + y ** 5) * np.exp(-x ** 2 - y ** 2) z = z[:-1, :-1] z_min, z_max = -np.abs(z).max(), np.abs(z).max()
c = plt.imshow(z, cmap ='Greens', vmin = z_min, vmax = z_max, extent =[x.min(), x.max(), y.min(), y.max()], interpolation ='nearest', origin ='lower') plt.colorbar(c)
plt.title('matplotlib.pyplot.imshow() function Example', fontweight ="bold") plt.show()
`
**Output
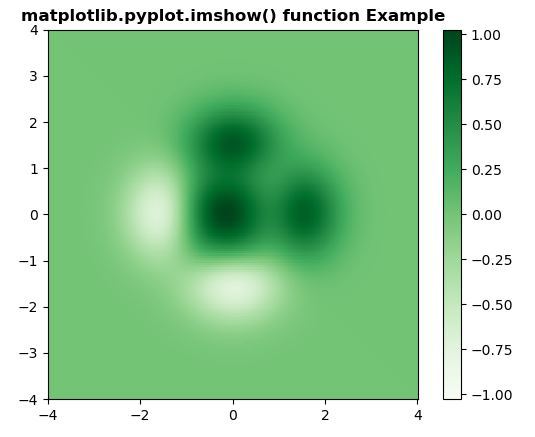
**Explanation: We first create a 2D grid of values using **numpy.mgrid and compute a function over the grid. Then, we use **imshow() to display this 2D array. The **vmin and **vmax parameters are set to the minimum and maximum of the data, ensuring the color map is scaled accordingly. The colormap '**Greens' is used, and the **extent parameter specifies the limits of the x and y axes. We also use **origin='lower' to set the origin of the image at the bottom-left, and a colorbar is added to indicate the values associated with the colors.
**2. Overlaying Two Images Using imshow()
This example shows how to overlay two images with different colormaps and transparency using imshow().
Python `
import matplotlib.pyplot as plt import numpy as np from matplotlib.colors import LogNorm
dx, dy = 0.015, 0.05 x = np.arange(-4.0, 4.0, dx) y = np.arange(-4.0, 4.0, dy) X, Y = np.meshgrid(x, y)
extent = np.min(x), np.max(x), np.min(y), np.max(y)
Z1 = np.add.outer(range(8), range(8)) % 2 plt.imshow(Z1, cmap ="binary_r", interpolation ='nearest', extent = extent, alpha = 1)
def geeks(x, y): return (1 - x / 2 + x5 + y6) * np.exp(-(x2 + y2))
Z2 = geeks(X, Y)
plt.imshow(Z2, cmap ="Greens", alpha = 0.7, interpolation ='bilinear', extent = extent)
plt.title('matplotlib.pyplot.imshow() function Example', fontweight ="bold") plt.show()
`
**Output
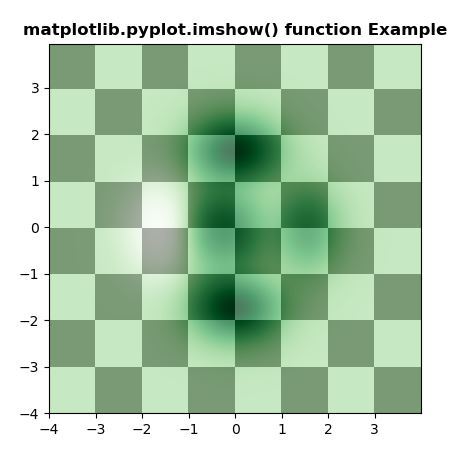
**Explanation: This code generates two 2D datasets: one using a simple mathematical function (Z1) and another using a custom **function (geeks(x, y)). The first dataset (Z1) is displayed with a binary colormap, and the second dataset (Z2) is displayed on top with a Greens colormap and some transparency.