Python | Animation in Kivy using .kv file (original) (raw)
Last Updated : 19 Oct, 2021
Kivy is a platform independent GUI tool in Python. As it can be run on Android, IOS, Linux, and Windows, etc. It is basically used to develop the Android application, but it does not mean that it can not be used on Desktops applications.
Animation:
Animation and AnimationTransition are used to animate Widget properties. You must specify at least a property name and target value. To use Animation, follow these steps:
- Setup an Animation object
- Use the Animation object on a Widget
To use animation you must have to import:
from kivy.animation import Animation
Basic Approaches:
- import runTouchApp
- import Builder
- import Widget
- import Animation
- import Clock
- import Window
- import random
- import listproperty
- Build the .kv file
- Create root class
- Create the clock and anim react class used to animate the boxes
- Run the App
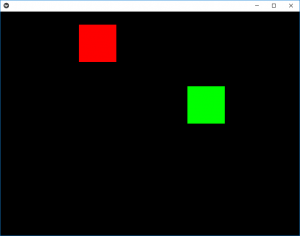
In the below example we are creating the two boxes (red and green) in which we are giving animations to the red box i.e when the App starts the red box is in its animated view but to clear the concepts i am providing the green box which on click provide random animations i.e it goes anywhere at random.
The program consists of two main classes first is clock class which is for the red box as we are declaring it animated and the green box animation is in anim class.
To provide the motion you must have to play with velocity.
Implementation of the Approach:
Python3 `
work same as kivy.App used to run the App
from kivy.base import runTouchApp
to use .kv file as a string we have to import it
from kivy.lang import Builder
A Widget is the base building block of GUI interfaces in Kivy
from kivy.uix.widget import Widget
The Clock object allows you to schedule a
function call in the future
from kivy.clock import Clock
Animation and AnimationTransition are
used to animate Widget properties
from kivy.animation import Animation
The Properties classes are used when
you create an EventDispatcher.
from kivy.properties import ListProperty
Core class for creating the default Kivy window.
from kivy.core.window import Window
As name suggest used when random things required
from random import random
load the kv file as string
Builder.load_string(''' :
Setting the position (initial) of boxes
ClockRect:
    pos: 300, 300
AnimRect:
    pos: 500, 300
creation and animation of red box
: canvas: Color: rgba: 1, 0, 0, 1 Rectangle: pos: self.pos size: self.size
creation and animation of red box
: canvas: Color: rgba: 0, 1, 0, 1 Rectangle: pos: self.pos size: self.size ''')
Create the root class
class Root(Widget): pass
Create the clock class Then is when clicked
how much time to animate
the red colour block animation is created by it
class ClockRect(Widget): velocity = ListProperty([10, 15])
def __init__(self, **kwargs):
    super(ClockRect, self).__init__(**kwargs)
    Clock.schedule_interval(self.update, 1 / 60.)

def update(self, *args):
    self.x += self.velocity[0]
    self.y += self.velocity[1]

    if self.x < 0 or (self.x + self.width) > Window.width:
        self.velocity[0] *= -1
    if self.y < 0 or (self.y + self.height) > Window.height:
        self.velocity[1] *= -1
Create the Animation class
And add animation
green colour box is animated through this class
class AnimRect(Widget):
def anim_to_random_pos(self):
    Animation.cancel_all(self)
    random_x = random() * (Window.width - self.width)
    random_y = random() * (Window.height - self.height)

    anim = Animation(x = random_x, y = random_y,
                     duration = 4,
                     t ='out_elastic')
    anim.start(self)

def on_touch_down(self, touch):
    if self.collide_point(*touch.pos):
        self.anim_to_random_pos()
run the App
runTouchApp(Root())
`
Output:
Animated Output video: