Python | Ellipse (different polygons) in Kivy (original) (raw)
Last Updated : 12 Jul, 2025
Kivy is a platform independent GUI tool in Python. As it can be run on Android, IOS, linux and Windows, etc. It is basically used to develop the Android application, but it does not mean that it can not be used on Desktops applications.
Ellipse:
Ellipse is a vertex canvas instruction. It allows drawing of a regular polygon, or an arc based on them. In this article, we will see different polygons have different number of sides and also many vertices on circle.
As in Kivy, we can make polygons based on an ellipse. Note, the angles in Kivy, are different than those in math. In Kivy, the 0-degree point, corresponds to the 90 degree-point, in math.
Note:
These are the formulas for x and y. These math formulas assume the center is 0, 0. Thus, after calculations are done, there has to be a translation by x of a and y of b. The width is 2a, and height is 2b.N segments = N vertices
- angle[i]= i*360/n ; i=0 to n
- x[i]=a cos(angle[i])
- y[i]=b sin(angle[i])
- In kivy 12'o clock is 0 degree and increases clockwise but in math 3'o clock is 0 degree increases counter clockwise.
Program to show how we can make different polygon in kivy by Ellipse.
main.py file:
Python3 `
Code to create different polygons using Ellipse
import kivy module
import kivy
this restrict the kivy version i.e
below this kivy version you cannot
use the app or software
kivy.require("1.9.1")
base Class of your App inherits from the App class.
app:always refers to the instance of your application
from kivy.app import App
The GridLayout arranges children in a matrix.
It takes the available space and
divides it into columns and rows,
then adds widgets to the resulting “cells”.
from kivy.uix.gridlayout import GridLayout
creating the Layout class
class Ellipsekv(GridLayout): pass
creating the App class
class EllipseApp(App): def build(self): return Ellipsekv()
run the App
if name=='main': EllipseApp().run()
`
Ellipse.kv file
Python3 `
Ellipse.kv file of the code
###################################################
For the arcs, we have to give the start,
and the end angle. We use default number of segments,
180, and 5, for the two ellipse arcs.
The rest of the kv file, corresponds, to the other,
6 ellipse arcs, following the same pattern.
#:set angle_start_row2 240 #:set angle_end_row2 480 #:set angle_start_row3 120 #:set angle_end_row3 240
#################################################
:
# Setting column to 4
cols:4
##################################################
Row 1
# Creating Canvas
canvas:
    Color:
        rgb: 0, 0, 1
    Rectangle:
        pos: self.pos
        size: self.size

# This will create the circle
# as no segment is fixed in Ellipse
# so by default it creates the circle
RelativeLayout:
    canvas:
        Color:
            rgb: 1, .8, .5
        Ellipse:
            pos: 0, 0
            size: self.size

# This will create pentagon as
# segment = 5
RelativeLayout:
    canvas:
        Ellipse:
            segments: 5
            pos: 0, 0
            size: self.size

# This will create square shape as
# segment = 4
RelativeLayout:
    canvas:
        Ellipse:
            segments: 4
            pos: 0, 0
            size: self.size

# This will create triangle as
# segment = 3
RelativeLayout:
    canvas:
        Ellipse:
            segments: 3
            pos: 0, 0
            size: self.size
#################################################
Row 2
RelativeLayout:
    canvas:
        # Assigning colour to all in row 2
        Color:
            rgb: 1, .59, .86

        # Creating the arc as assigned above
        Ellipse:
            angle_start: angle_start_row2
            angle_end: angle_end_row2
            pos: 0, 0
            size: self.size


# Creating the arc as assigned above
# segment 5
RelativeLayout:
    canvas:
        Ellipse:
            angle_start: angle_start_row2
            angle_end: angle_end_row2
            segments: 5
            pos: 0, 0
            size: self.size

# Creating the arc as assigned above
# segment 4
RelativeLayout:
    canvas:
        Ellipse:
            angle_start: angle_start_row2
            angle_end: angle_end_row2
            segments: 4
            pos: 0, 0
            size: self.size

# Creating the arc as assigned above
# segment 5
RelativeLayout:
    canvas:
        Ellipse:
            angle_start: angle_start_row2
            angle_end: angle_end_row2
            segments: 3
            pos: 0, 0
            size: self.size
#################################################
Row 3
RelativeLayout:
    canvas:
        Color:
            rgb: .5, .5, .5
        Ellipse:
            angle_start: angle_start_row3
            angle_end: angle_end_row3
            pos: 0, 0
            size: self.size

RelativeLayout:
    canvas:
        Ellipse:
            angle_start: angle_start_row3
            angle_end: angle_end_row3
            segments: 5
            pos: 0, 0
            size: self.size

RelativeLayout:
    canvas:
        Ellipse:
            angle_start: angle_start_row3
            angle_end: angle_end_row3
            segments: 4
            pos: 0, 0
            size: self.size

RelativeLayout:
    canvas:
        Ellipse:
            angle_start: angle_start_row3
            angle_end: angle_end_row3
            segments: 3
            pos: 0, 0
            size: self.size
`
Output:
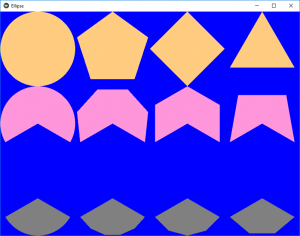
This is the result. We have 3 rows and 4 columns. Rows 2 and 3 are arc shapes, while Row1 has the default angles, 0 and 360 to form a complete circle. By changing the size of the window manually, we can get ovals, and shapes based on them. For the arc, the number of segments, corresponds to the number of lines that approximate the circular portion.