Python | Grid Layout in Kivy without .kv file (original) (raw)
Last Updated : 11 Jul, 2025
Kivy is a platform independent as it can be run on Android, IOS, linux and Windows etc. Kivy provides you the functionality to write the code for once and run it on different platforms. It is basically used to develop the Android application, but it Does not mean that it can not be used on Desktops applications.
???????? Kivy Tutorial - Learn Kivy with Examples.
GridLayout:
- The widget must be placed in a specific column/row. Each child is automatically assigned a position determined by the layout configuration and the child’s index in the children list.
- Grid Layout must always contain any one of the below input constraints:
GridLayout.cols or GridLayout.rows. If you do not specify cols or rows, the Layout will throw an exception. - The GridLayout arranges children in a matrix. It takes the available space and divides it into columns and rows, then adds widgets to the resulting “cells”.
- The row and columns are just like the same as we observe in a matrix, here we can adjust the size of each grid.
- Initial the size is given by the col_default_width and row_default_height properties. We can force the default size by setting the col_force_default or row_force_default property. This will force the layout to ignore the width and size_hint properties of children and use the default size.
The first thing we need to do to use a GridLayout is to import it.
from kivy.uix.gridlayout import GridLayout
Basic Approach to create GridLayout:
- import kivy
- import kivyApp
- import button
- import Gridlayout
- Set minimum version(optional)
- create App class: - define build function : add widget (Buttons)
- return Layout/widget/Class(according to requirement)
- Run an instance of the class
Implementation of the approach -
Code #1:
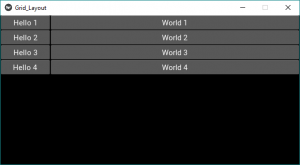
In the example below, all widgets will have an equal size. By default, the size_hint is (1, 1), so a Widget will take the full size of the parent:
Python3 `
Sample Python application demonstrating
How to create GridLayout in Kivy
import kivy module
import kivy
base Class of your App inherits from the App class.
app:always refers to the instance of your application
from kivy.app import App
creates the button in kivy
if not imported shows the error
from kivy.uix.button import Button
The GridLayout arranges children in a matrix.
It takes the available space and
divides it into columns and rows,
then adds widgets to the resulting “cells”.
from kivy.uix.gridlayout import GridLayout
creating the App class
class Grid_LayoutApp(App):
# to build the application we have to
# return a widget on the build() function.
def build(self):

    # adding GridLayouts in App
    # Defining number of column
    # You can use row as well depends on need
    layout = GridLayout(cols = 2)

    # 1st row
    layout.add_widget(Button(text ='Hello 1'))
    layout.add_widget(Button(text ='World 1'))

    # 2nd row
    layout.add_widget(Button(text ='Hello 2'))
    layout.add_widget(Button(text ='World 2'))

    # 3rd row
    layout.add_widget(Button(text ='Hello 3'))
    layout.add_widget(Button(text ='World 3'))

    # 4th row
    layout.add_widget(Button(text ='Hello 4'))
    layout.add_widget(Button(text ='World 4'))

    # returning the layout
    return layout
creating object of the App class
root = Grid_LayoutApp()
run the App
root.run()
`
Output:
Now just change the class code in the above code with the code #2 and code#3 other than that all will be same as code#1 and run the code after changes you will get the below results.
Code #2:
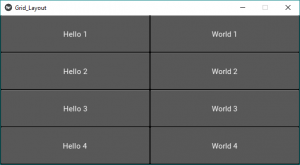
Now, let’s fix the size of Hello buttons to 100px instead of using size_hint_x=1:
Python3 `
creating the App class
class Grid_LayoutApp(App):
# to build the application we have to
# return a widget on the build() function.
def build(self):

    # adding GridLayouts in App
    # Defining number of column
    # You can use row as well depends on need
    layout = GridLayout(cols = 2)

    # 1st row
    layout.add_widget(Button(text ='Hello 1', size_hint_x = None, width = 100))
    layout.add_widget(Button(text ='World 1'))

    # 2nd row
    layout.add_widget(Button(text ='Hello 2', size_hint_x = None, width = 100))
    layout.add_widget(Button(text ='World 2'))

    # 3rd row
    layout.add_widget(Button(text ='Hello 3', size_hint_x = None, width = 100))
    layout.add_widget(Button(text ='World 3'))

    # 4th row
    layout.add_widget(Button(text ='Hello 4', size_hint_x = None, width = 100))
    layout.add_widget(Button(text ='World 4'))

    # returning the layout
    return layout
`
Output:
Code #3:
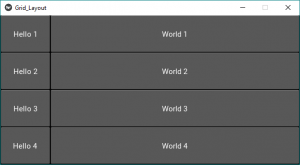
Now, let’s fix the row height to a specific size:
Python3 `
creating the App class
class Grid_LayoutApp(App):
# to build the application we have to
# return a widget on the build() function.
def build(self):

    # adding GridLayouts in App
    # Defining number of column and size of the buttons i.e height
    layout = GridLayout(cols = 2, row_force_default = True,
                        row_default_height = 30)

    # 1st row
    layout.add_widget(Button(text ='Hello 1', size_hint_x = None, width = 100))
    layout.add_widget(Button(text ='World 1'))

    # 2nd row
    layout.add_widget(Button(text ='Hello 2', size_hint_x = None, width = 100))
    layout.add_widget(Button(text ='World 2'))

    # 3rd row
    layout.add_widget(Button(text ='Hello 3', size_hint_x = None, width = 100))
    layout.add_widget(Button(text ='World 3'))

    # 4th row
    layout.add_widget(Button(text ='Hello 4', size_hint_x = None, width = 100))
    layout.add_widget(Button(text ='World 4'))

    # returning the layout
    return layout
`
Output: