Shiny Package in R Programming (original) (raw)
Last Updated : 15 Jul, 2025
The package is an appropriate way to organize the work and share it with others. Packages in the R Programming language are a collection of R functions, compiled code, and sample data. They are stored under a directory called **“library” in the R environment. By default, R installs a set of packages during installation. One of the most important packages in R is the **Shiny package. **Shiny is an R package that makes it easy to build interactive web apps straight from R.
Shiny package Install in R language
To use a package in R programming one must have to install the package first. This task can be done using the command **install.packages(“packagename”). To install the whole **Shiny package type this.
R `
install.packages("shiny")
`
To install the latest development builds directly from GitHub, run this instead.
R `
if (!require("remotes")) install.packages("remotes") remotes::install_github("rstudio/shiny")
`
**Important Verb Functions in Shiny Package R Language
**fluidPage(): It creates a page with a fluid layout. A fluid page layout consists of rows which in turn include columns. Rows exist for the purpose of making sure their elements appear on the same line and columns exist for the purpose of defining how much horizontal space within a 12-unit wide grid. Fluid pages scale their components in real-time to fill all available browser width.
**Syntax:
fluidPage(..., title = NULL, theme = NULL)
| **Parameter | **Description |
|---|---|
| ... | Elements to include within the page. |
| title | The browser window title. |
| theme | Alternative Bootstrap stylesheet. |
**Example:
This is a basic shiny app template.
R `
import shiny package
library(shiny)
define a page with fluid layout
ui <- fluidPage(h1("GeeksforGeeks article on shiny package in R"), p(style = "font-family:Impact", "My first shiny app") ) server <- function(input, output) {}
shinyApp(ui = ui, server = server)
`
**Output:

**shinyApp(): It creates Shiny app objects from either an explicit UI/server pair or bypassing the path of a directory that contains a Shiny app.
**Syntax:
shinyApp(ui, server, onStart = NULL, options = list(), uiPattern = "/", enableBookmarking = NULL)
shinyAppDir(appDir, options = list())
shinyAppFile(appFile, options = list())</p
| **Parameter | **Description |
|---|---|
| ui | The UI definition of the app. |
| server | It has three parameters: input, output, and session. It is called once for each session to ensure that each app is independent. |
| onStart | A function that will be called before the app is actually run. |
| options | Options that should be passed to the runApp. |
| uipattern | A regular expression that will be applied to each GET request to determine whether the ui should be used to handle the request. |
| enableBookmarking | Can be "url", "server", or "disable".The default value is NULL. |
| appDir | Path to directory that contains a Shiny app. |
| appFile | Path to a .R file containing a Shiny application. |
R `
import shiny package
library(shiny)
define fluid page layout
ui <- fluidPage( sliderInput(inputId = "num", label = "Choose a number", value = 10, min = 1, max = 1000), plotOutput("hist") )
server <- function(input, output) { output$hist <- renderPlot({ hist(rnorm(input$num)) }) }
create shiny app object
using shinyApp
shinyApp(ui = ui, server = server)
`
**Output:
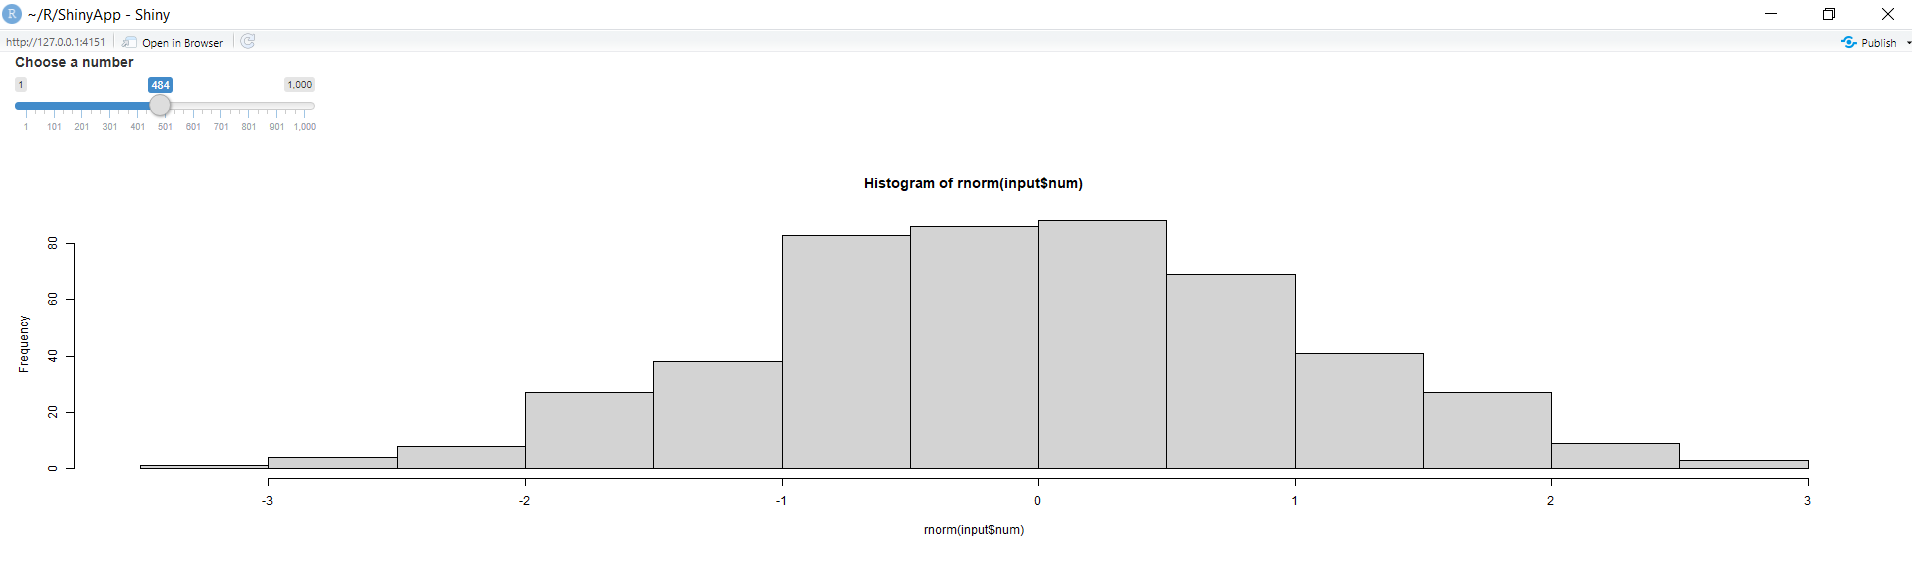
- **Library Import: The code begins by importing the
shinypackage using thelibrary(shiny)function. Shiny is an R package for creating interactive web applications. - **UI Definition: The
uivariable is defined to create a Shiny app's user interface (UI). It includes a slider input (sliderInput) allowing the user to choose a number between 1 and 1000 and a placeholder for a plot (plotOutput("hist")). - **Server Logic: The
serverfunction is defined to specify the server-side logic. It includes a reactive expression (renderPlot) that generates a histogram usinghist()based on a random normal distribution with a sample size determined by the user's slider input (input$num). - **App Initialization: The Shiny app object is created using
shinyApp(ui = ui, server = server), combining the UI and server components. - **App Execution: The Shiny app is executed, and the interactive web application is launched. Users can interact with the slider to choose a number, and the corresponding histogram is dynamically updated based on the selected sample size.
**reactive(): It creates a reactive expression. A reactive expression is an expression whose result will change over time.reactive() wraps a normal expression to create a reactive expression.
**Syntax: reactive(x, env = parent.frame(), quoted = FALSE, label = NULL)
| **Parameter | **Description |
|---|---|
| x | An expression. |
| env | The parent environment for reactive expression. |
| quoted | Is the expression quoted? By default, this is FALSE. This is useful when you want to use an expression that is stored in a variable |
| label | A label for reactive expression. |
R `
import shiny package
library(shiny)
define fluid page layout
ui <- fluidPage( textInput(inputId = "num", label = "Choose a number", value = "", width = 100, placeholder = NULL), plotOutput("hist"), verbatimTextOutput("stats") ) server <- function(input, output) {
use reactive to create
a reactive expression
data <- reactive({rnorm(input$num)})
output$hist <- renderPlot({hist(data())}) output$stats <- renderPrint({summary(data())}) }
create shiny app object
using shinyApp
shinyApp(ui = ui, server = server)
`
**Output:
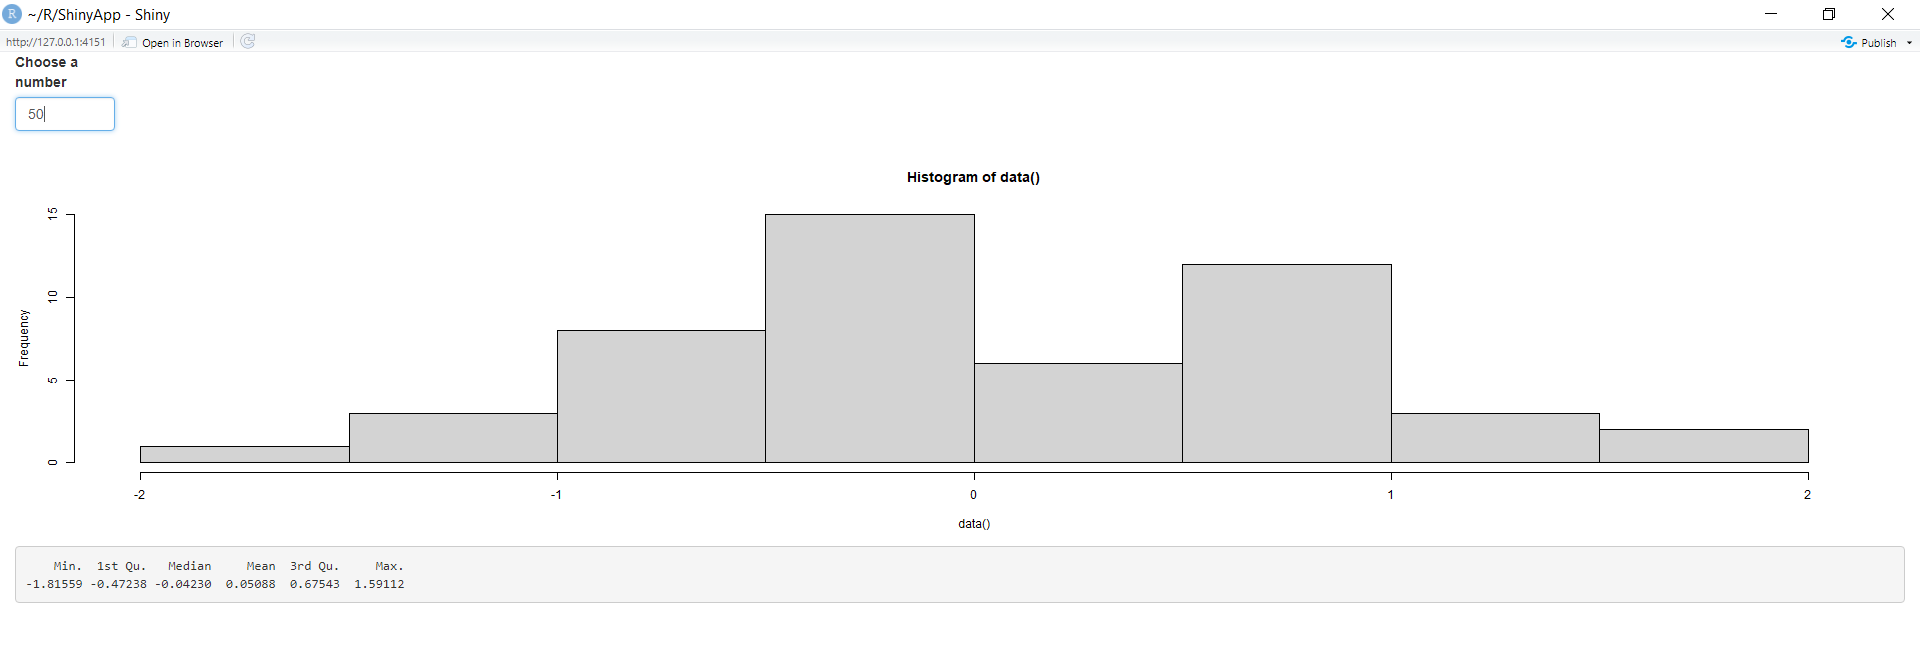
**Now, change the input value from 50 to 100 to see what happens.
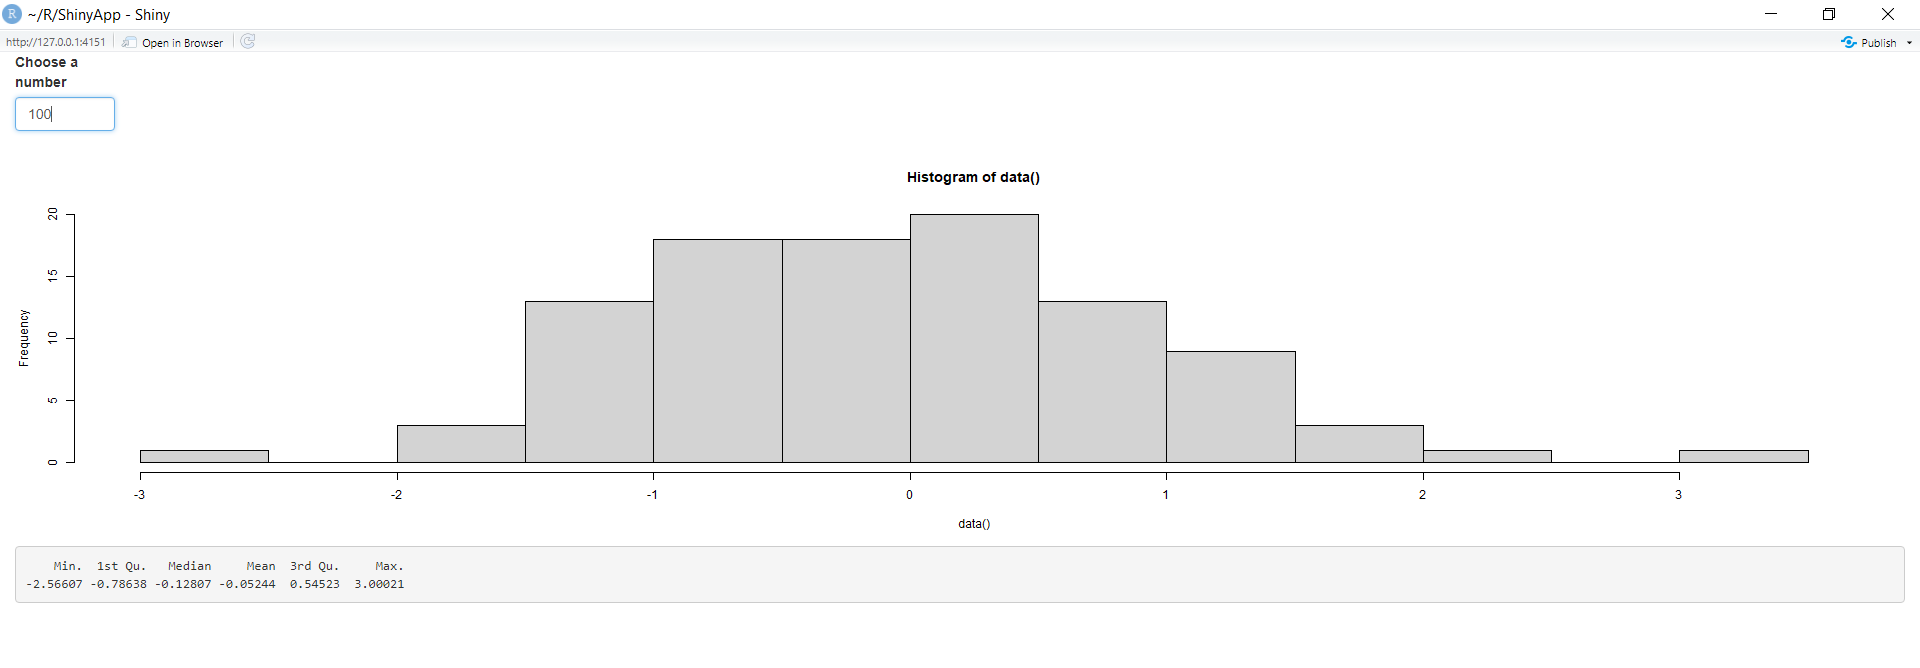
The output values(histogram and summary) also change with the alternation in the input values, i.e the app has reactivity.
**observeEvent(): It triggers code to run on servers. Respond to "event-like" reactive inputs, values, and expressions.
**Syntax:
observeEvent(eventExpr, handlerExpr, event.env = parent.frame(), event.quoted = FALSE, handler.env = parent.frame(), handler.quoted = FALSE, label = NULL, suspended = FALSE, priority = 0, domain = getDefaultReactiveDomain(), autoDestroy = TRUE, ignoreNULL = TRUE, ignoreInit = FALSE, once = FALSE)
| **Parameter | **Description |
|---|---|
| eventExpr | A expression that represents the event.It can be a simple or a complex reactive expression. |
| handler.Expr | The expression to call whenever eventExpr is invalidated. |
| event.env | The parent environment for eventExpr. By default, this is the calling environment. |
| event.quoted | Returns whether the eventExpr expression is quoted or not. By default, this is FALSE. |
| handler.env | The parent environment for handlerExpr. By default, this is the calling environment. |
| handler.quoted | Returns whether the handlerExpr expression is quoted or not. By default, this is FALSE. |
| label | A label for the observer or reactive |
| suspended | If TRUE, start the observer in a suspended state. |
| priority | An integer or numeric that controls the priority with which this observer should be executed.Positive,Negative and Zero values are allowed. |
| autodestroy | If TRUE (the default), the observer will be automatically destroyed when its domain (if any) ends. |
| ignoreNULL | Whether the action should be triggered when the input is NULL. |
| ignoreInit | If TRUE, then, when this observeEvent is first created/initialized, ignore the handlerExpr (the second argument), whether it is otherwise supposed to run or not. The default is FALSE. |
| once | Whether this observeEvent should be immediately destroyed after the first time that the code in handlerExpr is run. |
R `
import shiny package
library(shiny)
define fluid page layout
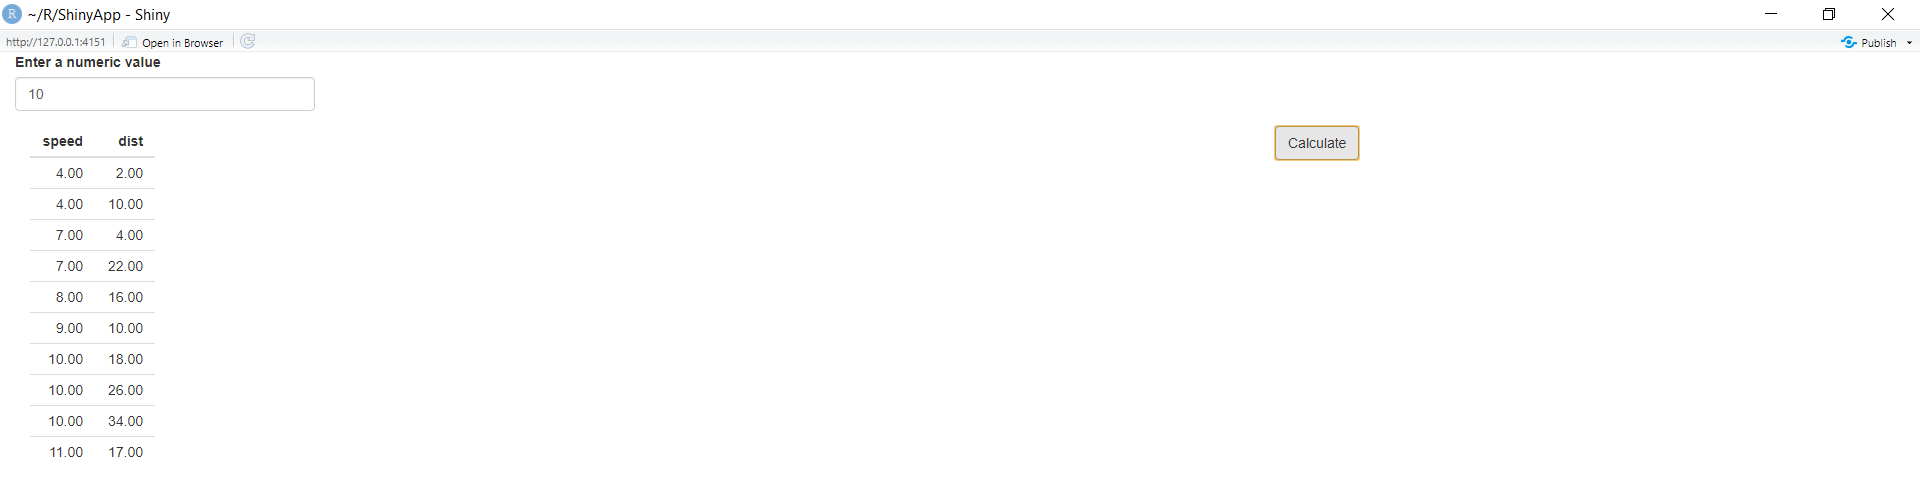
ui = fluidPage( textInput(inputId = "num", label = "Enter a numeric value", value = "10"), actionButton("button", "Calculate"), column(8, tableOutput("table")) )
server = function(input, output) {
Take an action every time button is pressed
observeEvent(input$button, { # Convert input$num to numeric num <- as.numeric(input$num)
# Check if the conversion was successful
if (is.na(num)) {
  cat("Invalid numeric value entered.\n")
  return(NULL)
}

cat("Showing", num, "rows\n")
})
Take a reactive dependency
on input$num, but not on any
of the stuff inside the function
df <- eventReactive(input$button, { # Convert input$num to numeric num <- as.numeric(input$num)
# Check if the conversion was successful
if (is.na(num)) {
  cat("Invalid numeric value entered.\n")
  return(NULL)
}

head(cars, num)
})
output$table <- renderTable({ df() }) }
create shiny app object
using shinyApp
shinyApp(ui, server)
`
**Output:

**eventReactive(): A reactive expression that only responds to specific values. Respond to "event-like" reactive inputs, values, and expressions.
**Syntax:
eventReactive(eventExpr,
valueExpr,
event.env = parent.frame(),
event.quoted = FALSE,
value.env = parent.frame(),
value.quoted = FALSE,
label = NULL,
domain = getDefaultReactiveDomain(),
ignoreNULL = TRUE,
ignoreInit = FALSE)
| **Parameter | **Description |
|---|---|
| eventExpr | An expression that represents the event.It can be a simple or a complex reactive expression. |
| valueExpr | It produces the return value of the eventReactive. It will be executed within an isolate() scope. |
| event.env | The parent environment for eventExpr. By default, this is the calling environment. |
| event.quoted | Returns whether the eventExpr expression is quoted or not. By default, this is FALSE. |
| value.env | The parent environment for valueExpr. By default, this is the calling environment. |
| value.quoted | Returns whether the valueExpr expression is quoted or not. By default, this is FALSE. |
| ignoreNULL | Whether the action should be triggered when the input is NULL. |
| ignoreInit | If TRUE, then, when this observeEvent is first created/initialized, ignore the handlerExpr (the second argument), whether it is otherwise supposed to run or not. The default is FALSE. |
R `
import shiny package
library(shiny)
define fluid page layout
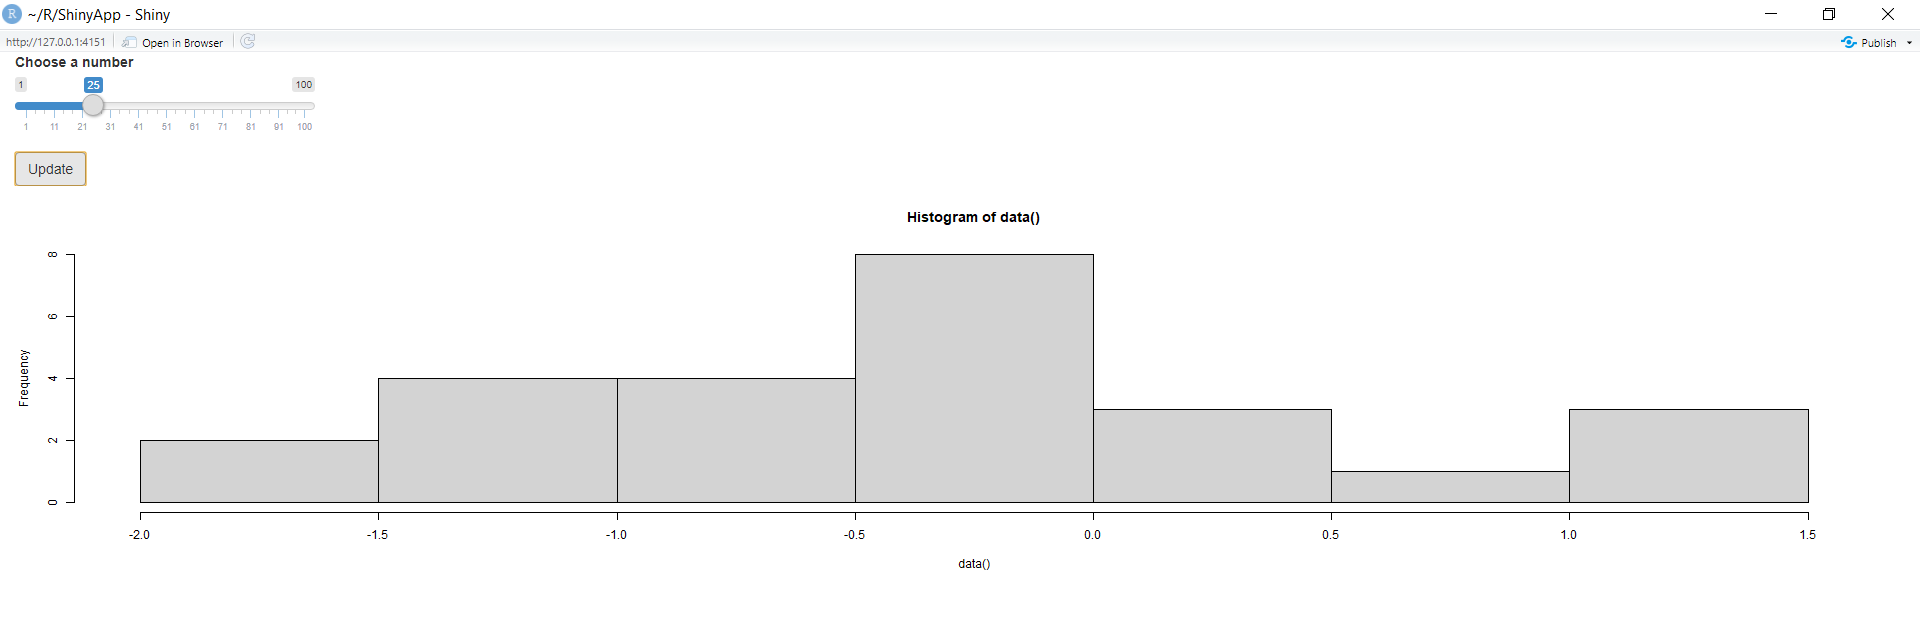
ui <- fluidPage( sliderInput(inputId = "num", label = "Choose a number", value = 25, min = 1, max = 100), actionButton(inputId = "go", label = "Update"), plotOutput("hist") )
server <- function(input, output) { data <- eventReactive(input$go, { rnorm(input$num) })
output$hist <- renderPlot({ hist(data()) }) }
create shiny app object
using shinyApp
shinyApp(ui = ui, server = server)
`
**Output:

Here, the output does not change with the input values until and unless the update button is triggered
**actionButton(): It creates an action button or a link. Their initial value is zero, and increments by one each time it is pressed.
**Syntax:
actionButton(inputId, label, icon = NULL, width = NULL, ...)
actionLink(inputId, label, icon = NULL, ...)
| **Parameter | **Description |
|---|---|
| inputId | The input slot that will be used to access the value. |
| label | The contents of the button or link. |
| icon | An optional icon() to appear on the button. |
| width | The width of the input(ex-'200px',or'100%'). |
| .... | Named attributes to be applied to the button or link. |
R `
import shiny package
library(shiny)
define fluid page layout
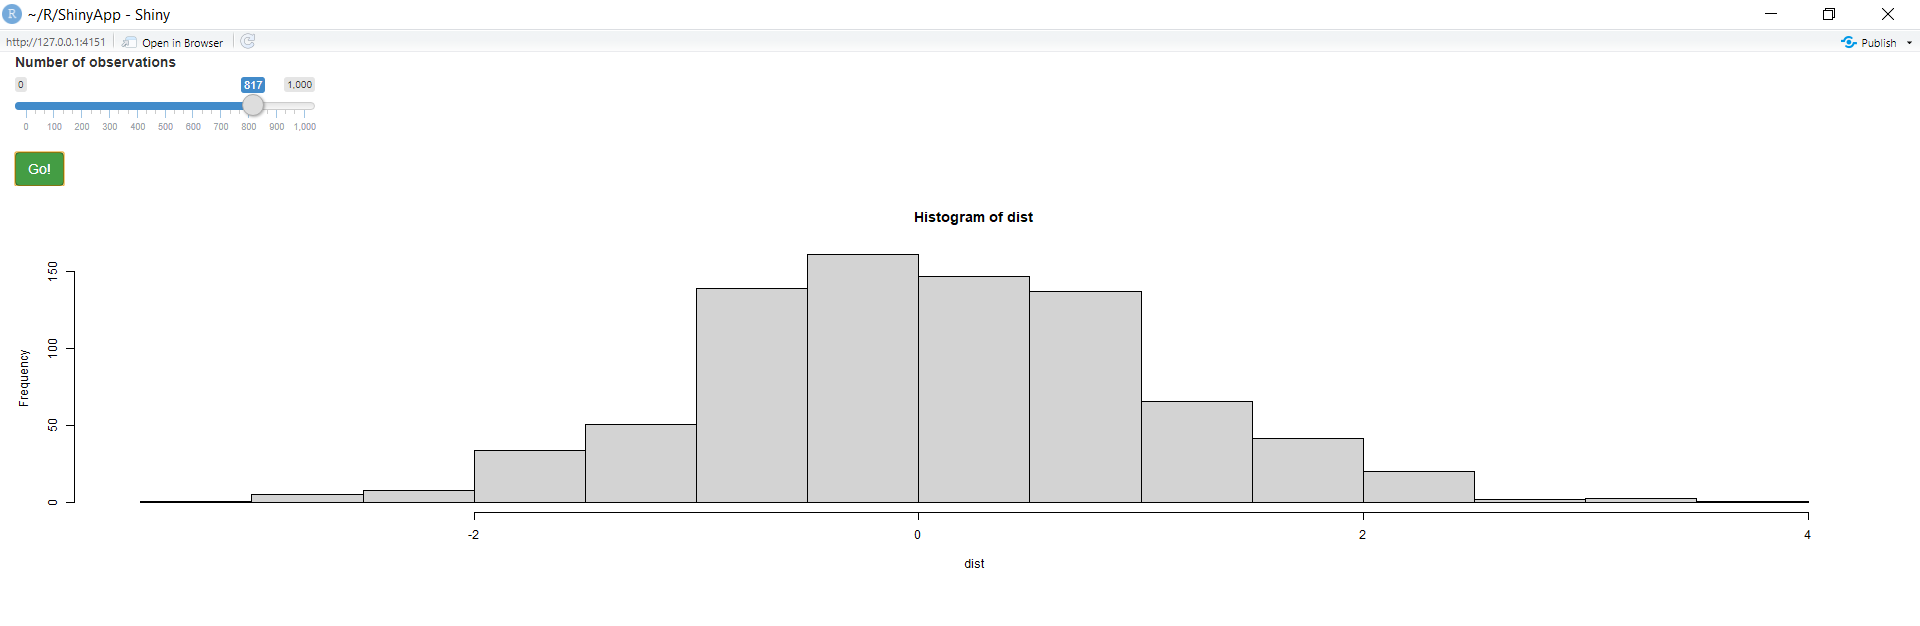
ui <- fluidPage( sliderInput("obs", "Number of observations", 0, 1000, 500), actionButton("goButton", "Go!", class = "btn-success"), plotOutput("distPlot") )
server <- function(input, output) { output$distPlot <- renderPlot({ input$goButton dist <- isolate(rnorm(input$obs)) hist(dist) }) }
create shiny app object
using shinyApp
shinyApp(ui, server)
`
**Output:
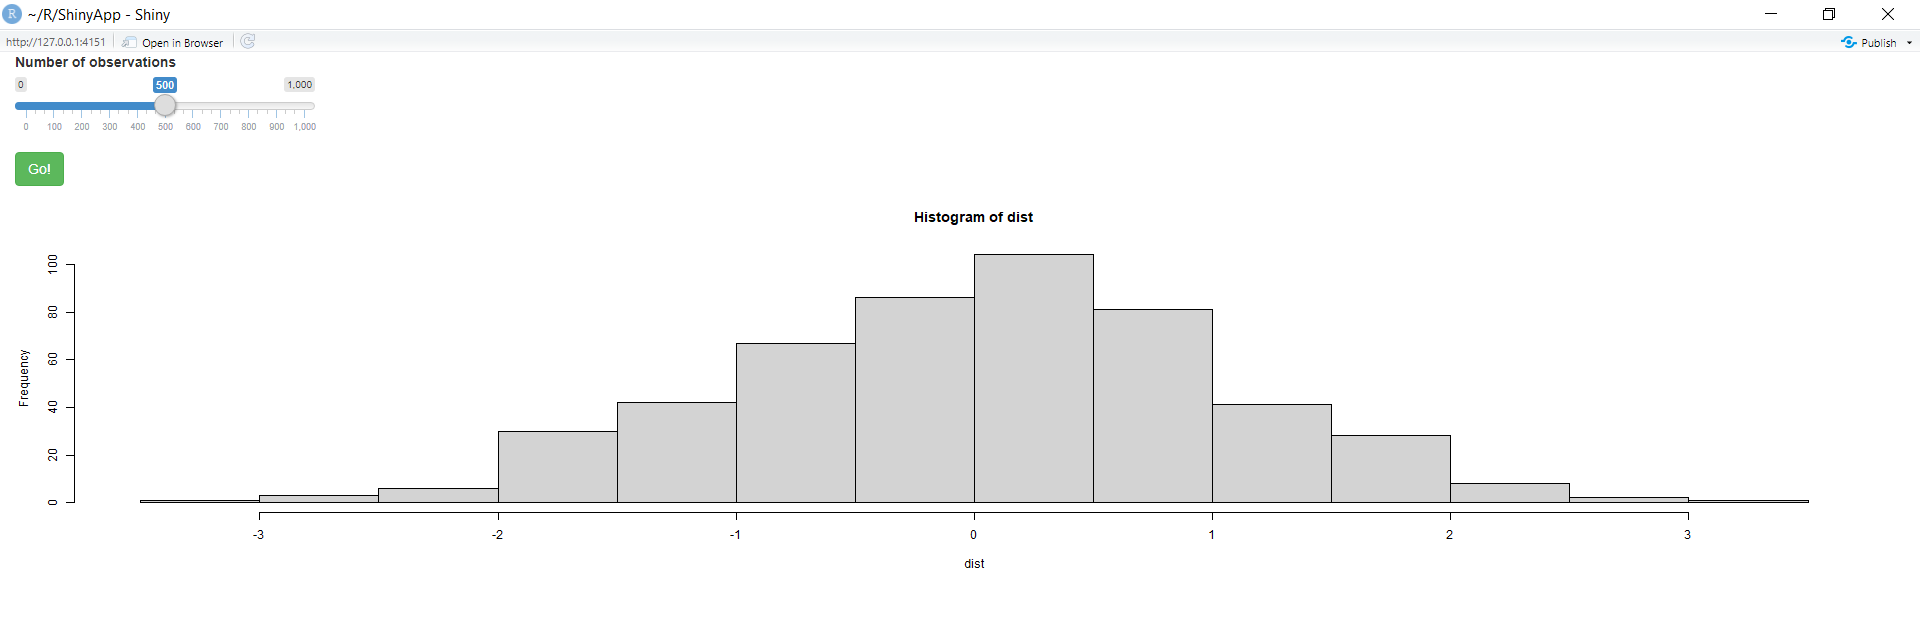
The output gets updated as soon as the **actionButton(Go!) is clicked.
**checkboxGroupInput(): It creates a group of checkboxes that can be used to toggle multiple choices independently. The server will receive the input as a character vector of the selected values.
**Syntax:
checkboxGroupInput(inputId, label, choices = NULL, selected = NULL, inline = FALSE, width = NULL, choiceNames = NULL, choiceValues = NULL)
| **Parameter | **Description |
|---|---|
| inputId | The input slot that will be used to access the value. |
| label | The contents of the button or link. |
| choices | List of values to show checkboxes for. If elements of the list are named then that name rather than the value is displayed to the user. |
| selected | The initial selection. |
| inline | If TRUE, render the choices horizontally. |
| width | The width of the input(ex-'200px',or'100%'). |
| choiceValues, choiceNames | List of names and values. |
R `
import shiny package
library(shiny)
define fluid page layout
ui <- fluidPage( checkboxGroupInput("icons", "Choose icons:", choiceNames = list(icon("dog"), icon("cat"), icon("fish"), icon("bug")), choiceValues = list("dog", "cat", "fish", "bug")), textOutput("txt") )
server <- function(input, output, session) { output$txt <- renderText({ icons <- paste(input$icons, collapse = ", ") paste("You chose", icons) }) }
create shiny app object
using shinyApp
shinyApp(ui = ui, server = server)
`
**Output:

**textInput(): It creates a text input label.
**Syntax:
textInput(inputId, label, value = "", width = NULL, placeholder = NULL)
| **Parameter | **Description |
|---|---|
| inputId | The input slot that will be used to access the value. |
| label | The contents of the button or link. |
| value | The initial value. |
| width | The width of the input(ex-'200px',or'100%'). |
| placeholder | A character string giving the user a hint as to what can be entered into the control. |
R `
import shiny package
library(shiny)
define fluid page layout
ui <- fluidPage( textInput("txt", "Enter your text here", "Empty"), verbatimTextOutput("value") )
server <- function(input, output) { output$value <- renderText({ input$text }) }
create shiny app object
using shinyApp
shinyApp(ui, server)
`
**Output:

**textOutput(): It creates a text output element. Render a reactive output variable as text within an application page.
**Syntax:
textOutput(outputId, container = if (inline) span else div, inline = FALSE)
| **Parameter | **Description |
|---|---|
| outputId | The output variable to read the value from. |
| container | A function to generate an HTML element to contain the text. |
| inline | Use an inline (span()) or block container (div()) for the output. |
R `
import shiny package
library(shiny)
define fluid page layout
ui <- fluidPage( textInput(inputId = "Name", label = "Enter your name"), textOutput("txt") )
server <- function(input, output, session) { output$txt <- renderText({ Name <- paste(input$Name, collapse = ", ") paste("Welcome! to geeksforgeeks ", Name) }) }
create shiny app object
using shinyApp
shinyApp(ui = ui, server = server)
`
**Output:

**wellPanel(): Creates a panel with a slightly inset border and gray background.
**Syntax: wellPanel(...)
| **Parameter | **Description |
|---|---|
| ... | UI elements to include inside the panel. |
R `
import shiny package
library(shiny)
define fluid page layout
ui <- fluidPage( sliderInput(inputId = "num", label = "Choose a number", value = 25, min = 1, max = 100),
define plot inside
a wellPanel
wellPanel(plotOutput("hist")) )
server <- function(input, output) { output$hist <- renderPlot({ hist(rnorm(input$num), main = input$title) }) }
create shiny app object
using shinyApp
shinyApp(ui = ui, server = server)
`
**Output:
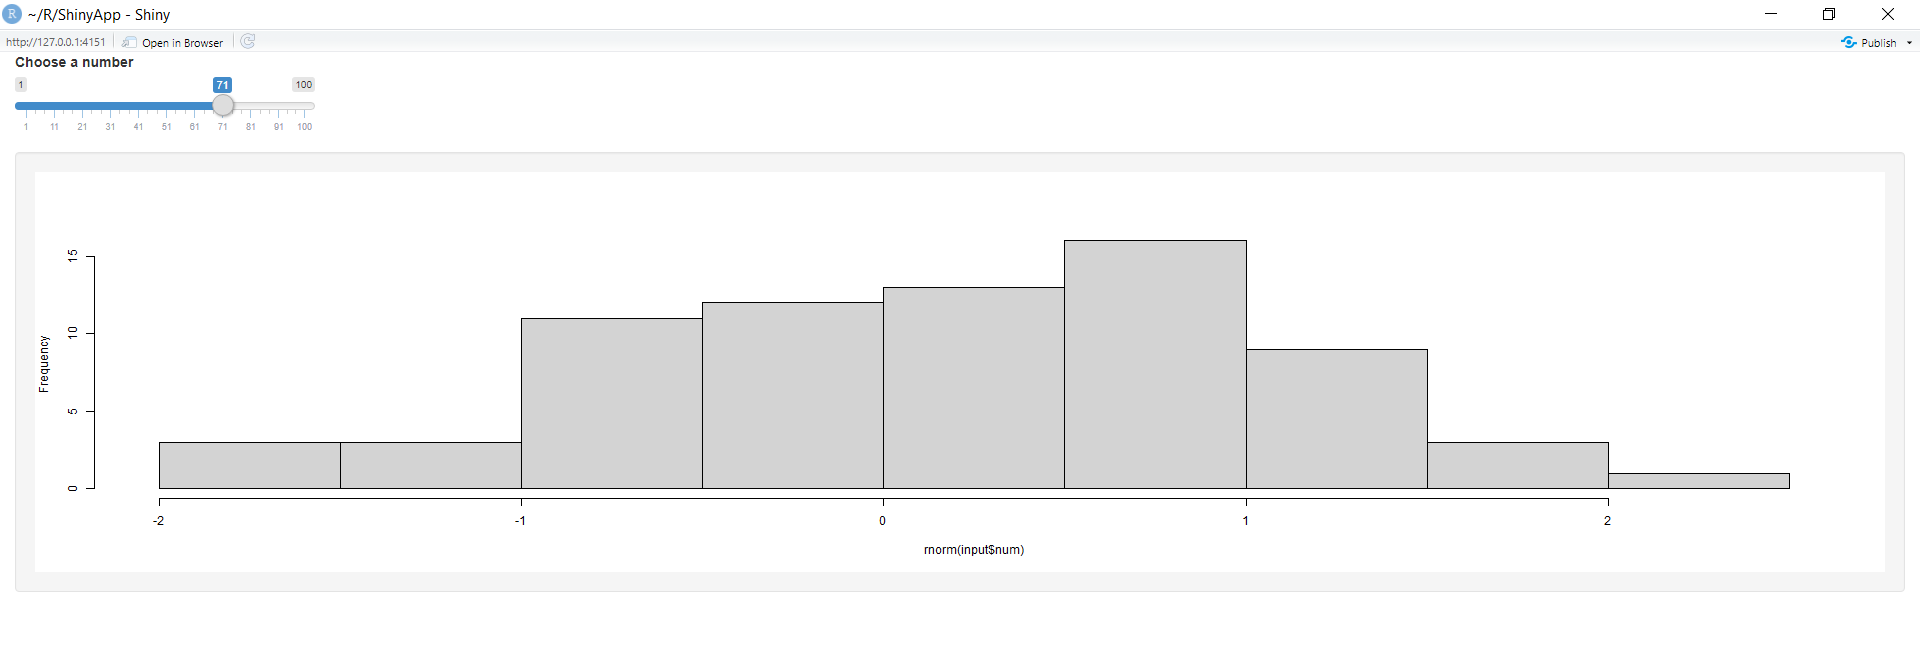
Observe that the histogram lies inside a gray-colored box(wellPanel).
This all function we can apply on different types of plots also now we apply this on scatter plot.
R `
Import shiny package
library(shiny)
Define fluid page layout with enhanced styling
ui <- fluidPage( titlePanel("Interactive Scatter Plot"),
Input: Numeric input for the number of points
sidebarLayout( sidebarPanel( numericInput(inputId = "num_points", label = "Number of Points", value = 50, min = 1, max = 100), br(), actionButton(inputId = "update_plot", label = "Update Plot") ),
# Output: Enhanced scatter plot
mainPanel(
  plotOutput(outputId = "scatter_plot", height = "400px")
)
) )
Server logic
server <- function(input, output) {
Generate random data based on user input
generate_data <- reactive({ data.frame( x = rnorm(input$num_points), y = rnorm(input$num_points) ) })
Render enhanced scatter plot with interactivity
output$scatter_plot <- renderPlot({ # Plot the generated data with enhanced aesthetics plot(generate_data()$x, generate_data()$y, main = "Interactive Scatter Plot", xlab = "X-axis", ylab = "Y-axis", pch = 19, col = "skyblue", xlim = c(-3, 3), ylim = c(-3, 3), cex = 1.5) })
Add interactivity: Update plot when the "Update Plot" button is pressed
observeEvent(input$update_plot, { invalidateLater(500, session) # Add a slight delay for a smoother update output$scatter_plot <- renderPlot({ plot(generate_data()$x, generate_data()$y, main = "Interactive Scatter Plot", xlab = "X-axis", ylab = "Y-axis", pch = 19, col = "skyblue", xlim = c(-3, 3), ylim = c(-3, 3), cex = 1.5) }) }) }
Create enhanced Shiny app object using shinyApp
shinyApp(ui, server)
`
**Output:
.jpg)
Shiny Package in R Programming
Shiny package helps to host standalone apps on a webpage embed them in R Markdown documents or build dashboards. One can also extend Shiny apps with CSS themes, HTML widgets, and JavaScript actions.