Basics of API Testing Using Postman (original) (raw)
Last Updated : 19 May, 2026
Postman is a widely used API testing tool that helps developers and testers send requests, validate responses, and automate API workflows efficiently.
- Simplifies API testing with an easy-to-use interface.
- Supports CRUD operations such as GET, POST, PUT, and DELETE.
- Allows automation of API tests using JavaScript scripts.
CRUD Operations with Postman
In web development, CRUD operations represent the four basic actions that can be performed on data:
- **Create: Adds new data (POST).
- **Read: Retrieves existing data (GET).
- **Update: Modifies existing data (PUT).
- **Delete: Removes data (DELETE).
Setting Up Postman
To get started with API testing in Postman:
- **Download and install Postman: We can install Postman from Postman's official site.
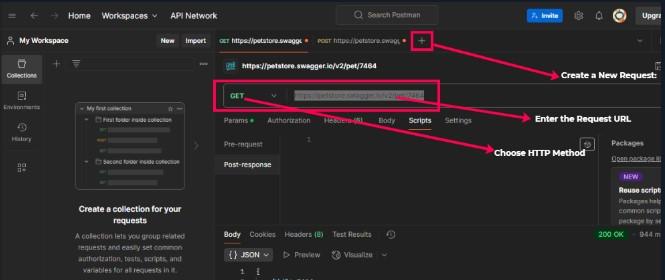
- **Create a New Request: Open Postman and click the ****+** button to create a new request.
- **Choose HTTP Method: Select the HTTP method (GET, POST, PUT, DELETE) from the dropdown next to the URL bar.
- **Enter the Request URL: Enter the API endpoint URL you want to test.
Setting Up Postman
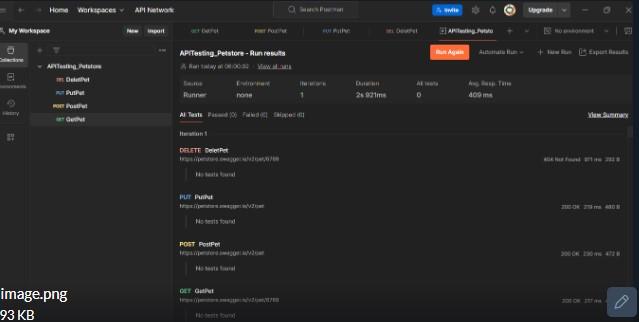
Example: Testing CRUD Operations with the Pet Store API
We will use a publicly available Pet Store API to demonstrate CRUD operations. The Pet Store API allows you to manage pet data, including adding, retrieving, updating, and deleting pets.
1. GET Request: Retrieving Data
A **GET request retrieves data from the server.
**Endpoint:
GET /pet/{petId}
To fetch details of a pet, replace {petId} with the actual pet ID (e.g., /pet/1).
**Steps in Postman:
- Set the method to GET.
- Enter the URL https://petstore.swagger.io/v2/pet/{petId} and replace {petId} with the pet’s ID (e.g., /pet/1).
- Click Send.
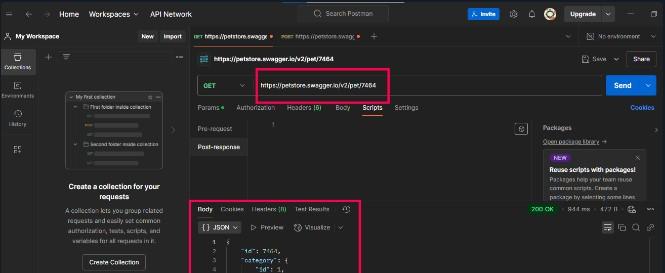
Set the method to GET.
If the pet exists, the server responds with a **200 OK status and the pet's details. If the pet is not found, you will receive a **404 Not Found status.
2. POST Request: Adding New Data
A POST request adds new data to the server.
**Endpoint:
POST /pet
To add a new pet, use the following JSON in the request body:
{
"id": 12345,
"name": "Doggy",
"status": "available"
}
**Steps in Postman:
- Set the method to POST.
- Enter the URL https://petstore.swagger.io/v2/pet.
- Go to the Body tab, select raw and choose JSON format.
- Paste the JSON data into the request body.
- Click Send.
A successful creation will return a 200 OK or 201 Created status.
3. PUT Request: Updating Data
A PUT request updates existing data on the server.
**Endpoint:
PUT /pet
To update details of the existing pet, use the following updated JSON data:
{
"id": 12345,
"name": "Doggy Updated",
"status": "sold"
}
**Steps in Postman:
- Set the method to PUT.
- Enter the URL:
https://petstore.swagger.io/v2/pet - Navigate to the Body tab, select raw, and choose JSON format.
- Paste the updated JSON data into the request body.
- Click Send to update the pet details.
A successful update will return a 200 OK status.
4. DELETE Request: Removing Data
A **DELETE request removes data from the server.
**Endpoint:
DELETE /pet/{petId}
To delete a pet, replace {petId} with the actual pet ID.
**Steps in Postman:
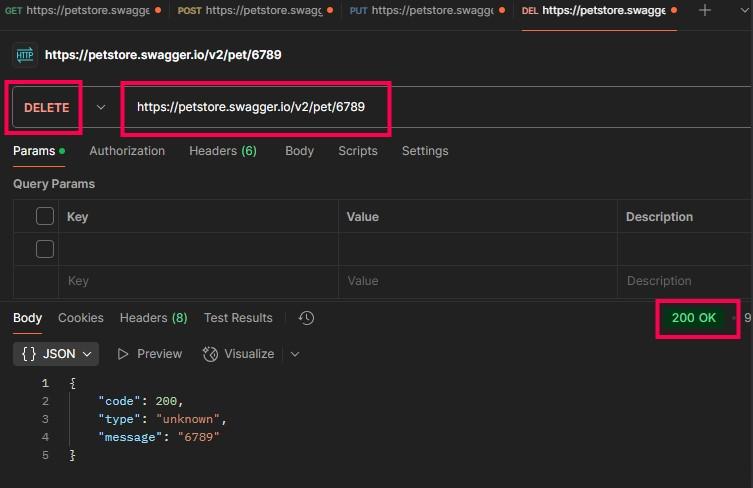
- Set the method to **DELETE.
- Enter the URL
https://petstore.swagger.io/v2/pet/{petId}. - Click **Send.
DELETE Request: Removing Data
The server will respond with a 200 OK or 204 No Content status on successful deletion.
Key Postman Features for API Testing
1. Collections
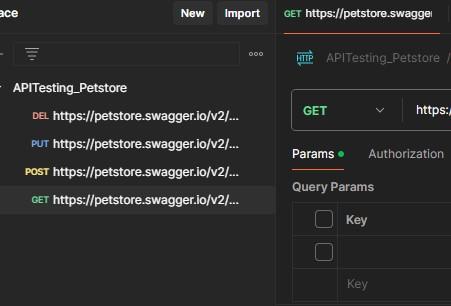
Collections allow you to organize related API requests and make your tests reusable and shareable.
**Steps to create a collection:
- After creating a request, click Save.
- Assign the request to a new or existing collection.
- Use the collection to organize and execute multiple API requests.
saved Collections
2. Automated Testing with JavaScript
Postman supports writing automated tests using JavaScript, which can be executed after a request is sent. This helps to validate API responses in an automated manner.
**Example Test:
pm.test("Status code is 200", function () {
pm.response.to.have.status(200);
});
This test checks if the response status code is 200.
3. Variables
Postman allows you to define variables to make your requests dynamic, such as for base URLs or authentication tokens.
**Defining variables:
- We can define variables in the Environment or Collection settings.
- Use variables in the request URL like {{baseUrl}}/pet/1.
Best Practices for API Testing
1. Understand the API
Before testing, review the API documentation to understand the available endpoints, parameters, and response formats. This helps you craft effective tests and ensures you test all required functionality.
2. Verify Status Codes
Always check the status code to ensure that the request was processed correctly:
- **2xx: Success (e.g., 200 OK, 201 Created).
- **4xx: Client errors (e.g., 400 Bad Request).
- **5xx: Server errors (e.g., 500 Internal Server Error).
3. Validate Responses
Ensure that the response body, headers, and response time are correct. Postman provides an easy way to validate these aspects using assertions in the test scripts.
4. Use Collections for Organization
Organize related API requests into collections for easier access and testing. Collections also support running tests in a sequence, making your testing process more streamlined.
Use Collections for Organization
5. Monitor Response Times
Ensure that the API responds within acceptable time limits. Postman allows you to monitor response times to ensure performance is not degraded.