Sending Your First Request via Postman (original) (raw)
Last Updated : 30 May, 2026
Postman is an API testing tool used to send requests to a server and view the responses. It helps developers understand how APIs behave and simplifies API testing and management.
- Used to send and test HTTP requests (GET, POST, PUT, DELETE)
- Helps in analyzing API responses and debugging issues
- Supports organizing and sharing APIs using collections with teams
Install Postman
Download Postman from the official website at postman.com/downloads. It is available for macOS, Windows, and Linux. You can also use the web version directly in your browser without installing anything.
Step 1. Open Postman
Launch the Postman application on your system (desktop or web version). Once open, you will see the main workspace with a sidebar for collections, a tab bar for requests, and a central panel where you build and send requests.
Step 2. Create a new request
Click the ****+** button in the tab bar (or press Ctrl+T / ⌘T) to open a new request tab. A blank request will appear with the following elements:
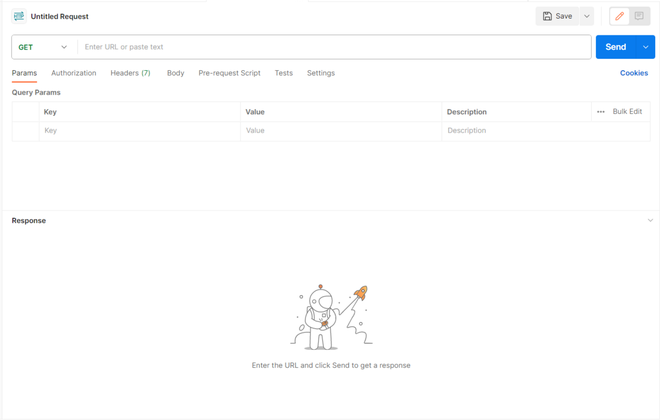
Empty Request
- **Request name: Shown as "Untitled Request" at the top; click it to rename. A new tab with the empty request will be open which is shown in the image shown below:
- **Method dropdown: Set to GET by default; change it to POST, PUT, PATCH, or DELETE as needed.
- **URL bar: Where you type or paste the API endpoint.
- **Send button: Fires the request to the server.
- **Tabs below the URL bar: Params, Authorization, Headers, Body, Pre-request Script, Tests, and Settings. Each controls a different part of the request.
Step 3. Try a real public API
Let's make a real request using JSONPlaceholder — a free, fake REST API built for testing:
Paste that URL into the URL bar, confirm the method is set to GET, and click Send. You should see a JSON response in the Body panel below:
Response · 200 OK
{
"userId": 1,
"id": 1,
"title": "sunt aut facere repellat...",
"body": "quia at suscipit..."
}
The green 200 OK status in the response panel confirms the request succeeded. Now let's look at exactly what Postman is showing you.
Step 4. Reading the response
After hitting Send, the response panel fills with everything the server returned. Here is what each part means:
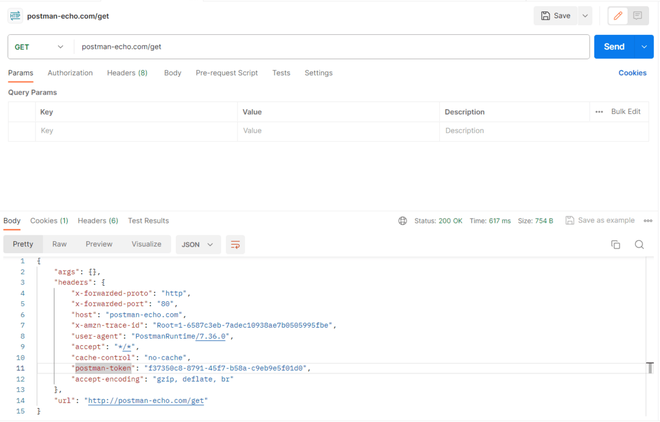
First Request
The Postman response panel after calling postman-echo.com/get, showing Status 200 OK, Time 617ms, Size 754B, and the JSON body open in Pretty view.
- **Status code: A three-digit number at the top right of the response panel. It tells you immediately whether the request worked.
Common ones:
**200 OK : Request succeeded
**201 Created : Resource was created (common with POST)
**400 Bad Request: Your request had an error
**401 Unauthorized: Missing or invalid authentication
**404 Not Found: Resource doesn't exist
**500 Server Error: Problem on the server's side
- **Time: The round-trip duration in milliseconds. Under 300 ms is fast; over 1,000 ms is worth investigating.
- **Size: The total byte weight of the response. Large sizes can slow down your application and may indicate the API needs pagination or field filtering.
- The four tabs in the response panel each show a different layer of the response:
- **Body: The actual data the server returned, whether a JSON object, an error message, or HTML. Four view modes are available: Pretty formats JSON with indentation for easy reading, Raw shows the unprocessed string, Preview renders HTML responses, and Visualize lets you build charts directly from the data.
- **Cookies: Any HTTP cookies the server set alongside the response. These appear most often after login or authentication endpoints. Postman stores and re-sends them automatically on subsequent requests, just as a real browser would.
- **Headers: Metadata attached to the response, such as Content-Type: application/json confirming the format, cache-control rules, and rate limit counters. These are not the data itself but provide important context for debugging.
- **Test Results: Pass or fail outcomes of any automated checks you wrote in the request's Tests tab. If you asserted that the status code must be 200 or that a specific field must exist in the body, results appear here in green or red after every send.
Step 5. Sending data with POST
Many APIs require you to send data alongside the request — creating a new user, submitting a form, and so on. That uses the POST method with a request body. Here is how:
- Click the method dropdown and select POST.
- Click the Body tab below the URL bar, select raw, then choose JSON from the format dropdown on the right. Postman automatically sets the Content-Type: application/json header for you.
- Type your JSON payload in the text area:
{
"title": "My First Post",
"body": "This is the content of my post.",
"userId": 1
}
- Click Send. A successful POST typically returns a 201 Created status with the newly created object in the response body.
Step 6. Adding authentication
Real-world APIs often require authentication before they return data. Postman supports all common methods. The cleanest approach is the Authorization tab — select your auth type (Bearer Token, Basic Auth, OAuth 2.0, or API Key) and fill in the value. Postman handles formatting and injects the header automatically.
If you prefer to set it manually, go to the Headers tab and add:
Key: Authorization
Value: Bearer your_token_here
Save your request to a collection
Before closing, save your work. Click Save (or Ctrl+S) and add the request to a Collection. Collections act as folders — they group related requests for a project together and can be shared with teammates or exported for documentation.
What to explore next
After learning basics, explore:
- Writing Tests (automating validations)
- Environments (dev, staging, production setup)
- Collection Runner (run multiple requests automatically)