Spring Boot How to Access Database using Spring Data JPA (original) (raw)
Last Updated : 25 Mar, 2025
**Spring Data JPA is a robust framework that simplifies the implementation of **JPA (Java Persistence API) repositories, making it easy to add a data access layer to the applications. CRUD (Create, Retrieve, Update, Delete) operations are the fundamental actions we can perform on a database. In this article, we will see an example of how to access data from a database in a Spring Boot application using Spring Data JPA.
A database is a collection of interrelated data that helps in efficient retrieval, insertion, and deletion of data from a database and organizes the data in the form of tables, views, schemas, reports, etc. So, for any application, a database is one of the most important modules and there needs to be a way to communicate with it. Therefore, the following steps are followed in order to access the database using Spring Data JPA:
**To learn how to create a spring boot project, refer to **this article****.**
Step-by-Step Implementation
Step 1: Create a Spring Boot project
To start, go to the spring initializr and create a new project with the following dependencies:
- **Spring Web: For building REST APIs.
- **Spring Data JPA: For interacting with the database using JPA.
- **MySQL Driver: To connect to MySQL.
Download the generated starter project and import it into the preferred Integrated Development Environment (IDE).
Step 2: Define the Entity Class
Now, we will create a model class named Company and annotate it with ****@Entity**. This annotation indicates that the class is mapped to a table in the database. Add the data members of the class, ensuring their data types match the columns in the database table. Add the annotation ****@Id** to the data member which will behave as the primary key attribute in the table and ****@GeneratedValue(strategy = GenerationType.AUTO)** to auto increment the primary key attribute.
**Company.java:
Java `
package com.example.demo.model;
import jakarta.persistence.*;
@Entity public class Company {
@Id
@GeneratedValue(strategy = GenerationType.AUTO)
private int id;

private String name;
private int duration;
private String profile;
private int stipend;
private boolean workFromHome;

// Default constructor (required by JPA)
public Company() {}

// Parameterized constructor
public Company(String name, int duration, String profile, int stipend, boolean workFromHome) {
    this.name = name;
    this.duration = duration;
    this.profile = profile;
    this.stipend = stipend;
    this.workFromHome = workFromHome;
}

// Getters and Setters
public int getId() {
    return id;
}

public void setId(int id) {
    this.id = id;
}

public String getName() {
    return name;
}

public void setName(String name) {
    this.name = name;
}

public int getDuration() {
    return duration;
}

public void setDuration(int duration) {
    this.duration = duration;
}

public String getProfile() {
    return profile;
}

public void setProfile(String profile) {
    this.profile = profile;
}

public int getStipend() {
    return stipend;
}

public void setStipend(int stipend) {
    this.stipend = stipend;
}

public boolean isWorkFromHome() {
    return workFromHome;
}

public void setWorkFromHome(boolean workFromHome) {
    this.workFromHome = workFromHome;
}
}
`
**Key Points:
- The @Entity annotation marks this class as a JPA entity.
- The @Id annotation specifies the primary key.
- The @GeneratedValue(strategy = GenerationType.AUTO) annotation auto-generates the primary key value.
Step 3: Create the Repository Interface
Now, we will create a repository interface **CompanyRepository with the annotation @Repository that extends the **CrudRepository. This interface will provide CRUD operations for the Company entity.
**CompanyRepository.java:
Java `
package com.example.demo.repository;
import com.example.demo.model.Company; import org.springframework.data.repository.CrudRepository; import org.springframework.stereotype.Repository;
@Repository public interface CompanyRepository extends CrudRepository<Company, Long> { }
`
**Key Points:
- The @Repository annotation marks this interface as a Spring Data repository.
- CrudRepository<Company, Long> provides built-in methods like save(), findById(), findAll(), and **deleteById().
Step 4: Configure the Database Connection
Open the **application.properties file and add the following configuration to connect to the MySQL database
spring.datasource.url=jdbc:mysql://localhost:3306/database_name
spring.datasource.username=root
spring.datasource.password=your_password
spring.jpa.hibernate.ddl-auto=update
**Key Points:
- Replace **database_name with the name of your database.
- Replace **your_password with your MySQL password.
- The **spring.jpa.hibernate.ddl-auto=update property automatically creates or updates the database schema based on your entity classes.
Step 5: Create REST APIs
Now, we will create REST APIs to perform CRUD operations on the Company entity.
**CompanyController.java:
Java `
package com.example.demo.controller;
import com.example.demo.model.Company; import com.example.demo.repository.CompanyRepository; import org.springframework.beans.factory.annotation.Autowired; import org.springframework.http.HttpStatus; import org.springframework.web.bind.annotation.*;
import java.util.List;
@RestController @RequestMapping("/companies") public class CompanyController {
@Autowired
private CompanyRepository companyRepository;

// Home Page
@GetMapping("/")
public String welcome() {
    return "<html><body><h1>WELCOME</h1></body></html>";
}

// Get All Companies
@GetMapping
public List<Company> getAllCompanies() {
    return companyRepository.findAll();
}

// Get a Company by ID
@GetMapping("/{id}")
public Company getCompanyById(@PathVariable int id) {
    return companyRepository.findById(id)
            .orElseThrow(() -> new RuntimeException("Company not found"));
}

// Create a Company
@PostMapping
@ResponseStatus(HttpStatus.CREATED)
public Company createCompany(@RequestBody Company company) {
    return companyRepository.save(company);
}

// Update a Company
@PutMapping("/{id}")
public Company updateCompany(@PathVariable int id, @RequestBody Company companyDetails) {
    Company company = companyRepository.findById(id)
            .orElseThrow(() -> new RuntimeException("Company not found"));
    company.setName(companyDetails.getName());
    company.setDuration(companyDetails.getDuration());
    company.setProfile(companyDetails.getProfile());
    company.setStipend(companyDetails.getStipend());
    company.setWorkFromHome(companyDetails.isWorkFromHome());
    return companyRepository.save(company);
}

// Delete a Company
@DeleteMapping("/{id}")
public void deleteCompany(@PathVariable int id) {
    companyRepository.deleteById(id);
}
}
`
**Key Points:
- The @RestController annotation marks this class as a controller for handling REST requests.
- The @RequestMapping("/companies") annotation maps all endpoints in this class to the /companies path.
- The @Autowired annotation injects the CompanyRepository bean.
Step 6: Test the Application
Now, we can run the spring boot application. we can test the REST APIs using Postman to verify that the application is functioning as expected.
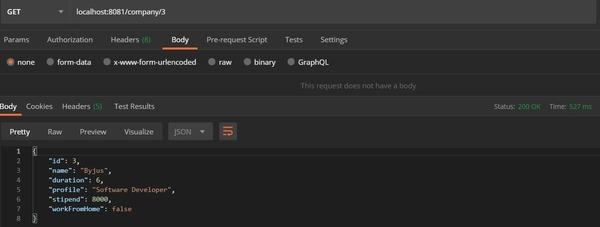
**Output:
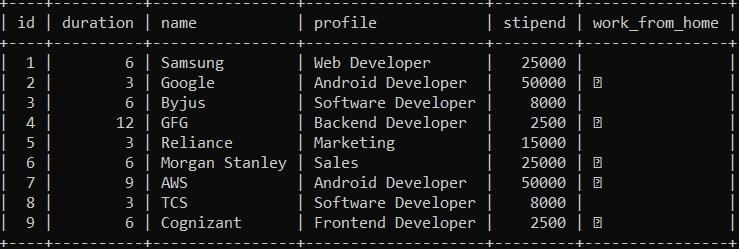
**The database:
Testing with the POSTMAN collection: