Spring Hibernate Configuration and Create a Table in Database (original) (raw)
Last Updated : 26 Mar, 2025
**Spring Boot and **Hibernate are a powerful combination for building scalable and efficient database-driven applications. Spring Boot simplifies application development by reducing boilerplate code, while Hibernate, a popular **ORM (Object-Relational Mapping) framework, enables easy database interactions. Together, they allow developers to manage relational databases, supporting **MySQL, PostgreSQL, and other **RDBMS.
In this article, we will walk you through configuring **Hibernate with Spring Boot, setting up a MySQL database, and performing CRUD operations using Spring Data JPA.
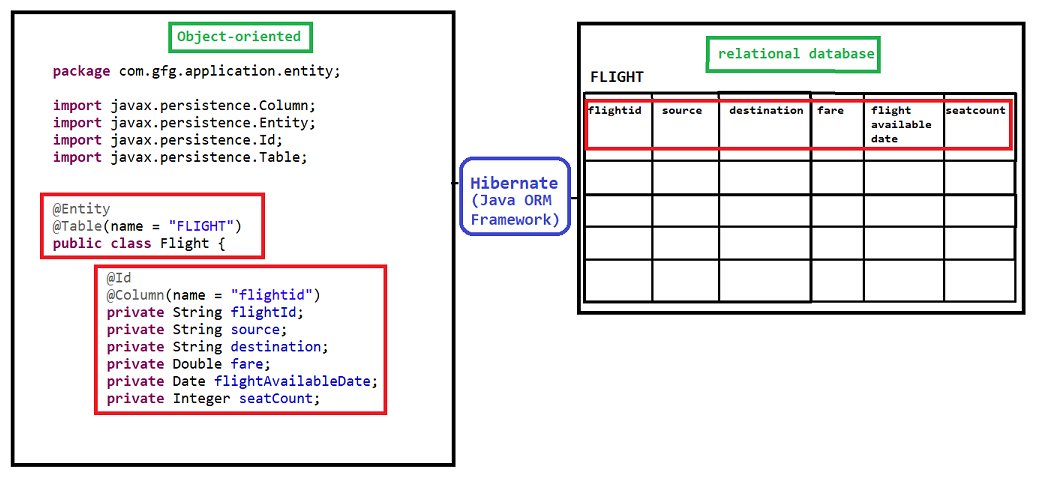
object-oriented to relational database
Advantages of Hibernate
- **Simplified CRUD Operations: Easily perform Create, Read, Update, and Delete operations on data from multiple tables.
- **Object-Relational Mapping: Map Java classes to database tables using annotations or XML files.
- **Database Independence: Hibernate supports multiple relational database management systems (RDBMS), including MySQL, Oracle, PostgreSQL, and more.
- **Automatic Schema Generation: Hibernate can automatically create and update database tables based on entity classes.
- **Caching: Hibernate provides first-level and second-level caching mechanisms to improve performance.
- **Lazy Loading: Optimize database access by loading related entities only when needed.
- **No Server Required: Hibernate can operate without requiring an application server.
Step-by-Step Implementation
Step 1: Create a Schema in MYSQL
Firstly, we need to create a schema (database) in MYSQL. we can use MYSQL workbench or the MYSQL command-line tool.
- Open MySQL Workbench or your preferred MySQL client.
- Connect to your MySQL server.
- Run the following SQL command to create a new schema:
CREATE SCHEMA `examportal`;
This will create a database named examportal where Hibernate will create the tables.

Step 2: Create a Spring Boot Project
Use Spring Initializr to create a new Spring Boot with the following dependencies:
- **Spring Web (for RESTful web services)
- **Spring Data JPA (for Hibernate integration)
- **MySQL Driver (for MySQL database connectivity)
- **Lombok (for reducing boilerplate code)
**Note: You can also add dependencies manually to the pom.xml file.
**pom.xml:
XML `
org.springframework.boot spring-boot-starter-web<!-- Spring Boot Starter Data JPA (includes Hibernate) -->
<dependency>
<groupId>org.springframework.boot</groupId>
<artifactId>spring-boot-starter-data-jpa</artifactId>
</dependency>
<!-- MySQL Driver -->
<dependency>
<groupId>mysql</groupId>
<artifactId>mysql-connector-java</artifactId>
<version>8.0.33</version> <!-- Use the latest version as of 2025 -->
<scope>runtime</scope>
</dependency>
<!-- Lombok (Optional, for reducing boilerplate code) -->
<dependency>
<groupId>org.projectlombok</groupId>
<artifactId>lombok</artifactId>
<version>1.18.30</version> <!-- Use the latest version as of 2025 -->
<scope>provided</scope>
</dependency>`
Step 3: Configure the Database
Add database configuration in the application.properties file under the src/main/resources folder.
# Database configurations
spring.datasource.url=jdbc:mysql://localhost:3306/examportal?useSSL=false&serverTimezone=UTC
spring.datasource.username=root
spring.datasource.password=root
spring.datasource.driver-class-name=com.mysql.cj.jdbc.Driver
# Hibernate and JPA configurations
spring.jpa.properties.hibernate.dialect=org.hibernate.dialect.MySQL8Dialect
spring.jpa.hibernate.ddl-auto=update
spring.jpa.show-sql=true
spring.jpa.properties.hibernate.format_sql=true
**Note:
- The spring.datasource.url includes the database name (examportal) and additional parameters (useSSL=false&serverTimezone=UTC) for secure connections and timezone settings.
- The spring.jpa.hibernate.ddl-auto=update setting ensures that the database schema is automatically updated based on the entity classes.
Step 4: Create an Entity Class
Create an entity class to map to a database table. Use annotations like @Entity, @Table, @Id, and @GeneratedValue to define the mapping.. The below example shows to create package and Java files accordingly.

**User.java:
Java `
package com.exam.Portal.entities;
import javax.persistence.Entity; import javax.persistence.GeneratedValue; import javax.persistence.GenerationType; import javax.persistence.Id; import javax.persistence.Table; import lombok.Data;
@Data @Entity @Table(name = "users") public class User {
@Id
@GeneratedValue(strategy = GenerationType.IDENTITY)
private int id;

private String username;
private String password;
private String firstname;
private String lastname;
private String email;
private String phone;
private boolean enable;
}
`
**Note:
- ****@Entity:** Marks the class as a JPA entity.
- ****@Table:** Specifies the table name in the database.
- ****@Id:** Marks the field as the primary key.
- ****@GeneratedValue:** Configures the primary key generation strategy.
Step 5: Create a Repository Interface
Extend the JpaRepository interface to create a repository for the User entity.
**UserRepository.java:
Java `
package com.exam.Portal.repositories;
import com.exam.Portal.entities.User; import org.springframework.data.jpa.repository.JpaRepository;
public interface UserRepository extends JpaRepository<User, Integer> { // Custom query methods can be added here }
`
Step 6: Create a Service Layer
Implement a service layer to handle business logic.
**UserService.java:
Java `
package com.exam.Portal.services;
import com.exam.Portal.entities.User; import com.exam.Portal.repositories.UserRepository; import org.springframework.beans.factory.annotation.Autowired; import org.springframework.stereotype.Service;
import java.util.List;
@Service public class UserService {
@Autowired
private UserRepository userRepository;

public List<User> getAllUsers() {
    return userRepository.findAll();
}

public User getUserById(int id) {
    return userRepository.findById(id).orElse(null);
}

public User createUser(User user) {
    return userRepository.save(user);
}

public void deleteUser(int id) {
    userRepository.deleteById(id);
}
}
`
Step 7: Create a REST Controller
Create a REST controller to expose endpoints for user management.
**UserController.java:
Java `
package com.exam.Portal.controllers;
import com.exam.Portal.entities.User; import com.exam.Portal.services.UserService; import org.springframework.beans.factory.annotation.Autowired; import org.springframework.web.bind.annotation.*;
import java.util.List;
@RestController @RequestMapping("/users") public class UserController {
@Autowired
private UserService userService;

@GetMapping
public List<User> getAllUsers() {
    return userService.getAllUsers();
}

@GetMapping("/{id}")
public User getUserById(@PathVariable int id) {
    return userService.getUserById(id);
}

@PostMapping
public User createUser(@RequestBody User user) {
    return userService.createUser(user);
}

@DeleteMapping("/{id}")
public void deleteUser(@PathVariable int id) {
    userService.deleteUser(id);
}
}
`
Step 8: Run the Application
Run the Spring Boot application. Hibernate will automatically create the users table in the examportal database based on the User entity.

We can also test the application using tools like Postman
- GET /users – Retrieve all users.
- GET /users/{id} – Retrieve a user by ID.
- POST /users – Create a new user.
- DELETE /users/{id} – Delete a user by ID.