Spring MVC Framework (original) (raw)
Last Updated : 10 Mar, 2025
The **Spring MVC Framework follows the Model-View-Controller architectural design pattern, which works around the **Front Controller, i.e., the **Dispatcher Servlet. The Dispatcher Servlet handles and dispatches all incoming HTTP requests to the appropriate controller. It uses @Controller and @RequestMapping as default request handlers. The ****@Controller** annotation defines that a particular class is a controller. The ****@RequestMapping** annotation maps web requests to Spring Controller methods. The terms model, view, and controller are defined as follows:
- **Model: The Model encapsulates the application data.
- **View: The View renders the model data and generates HTML output that the client’s browser can interpret.
- **Controller: The Controller processes the user requests and passes them to the view for rendering.
Dispatcher Servlet
The Dispatcher Servlet is the front controller that manages the entire HTTP request and response handling process. Now, the question is: **What is a Front Controller? It is quite simple, as the name suggests:
- When any web request is made, it first goes to the Front Controller, which is the Dispatcher Servlet.
- The Front Controller stands first, which is why it is named as such. After the request reaches it, the Dispatcher Servlet determines the appropriate controller to handle the request.
- Then, it dispatches the HTTP request to the specific controller.
Spring MVC Flow Diagram
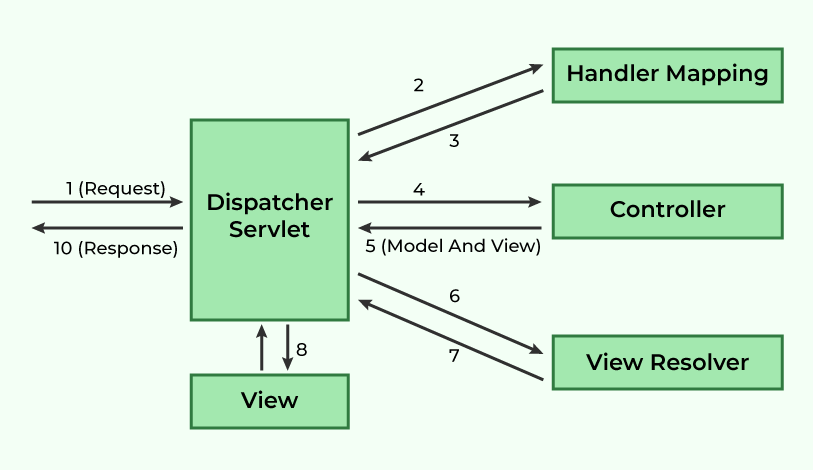
**Spring MVC Framework works as follows:
- All incoming requests are intercepted by the DispatcherServlet, which works as the front controller.
- The DispatcherServlet retrieves an entry of handler mapping from the configuration file and forwards the request to the controller.
- The controller processes the request and returns an object of ModelAndView.
- The DispatcherServlet checks the entry of the view resolver in the configuration file and invokes the appropriate view component.
Advantages of Spring MVC Framework
- Uses a lightweight servlet container for the development and deployment of applications.
- Enables rapid and parallel development.
- Facilitates fast application development.
- Allows multiple developers to work together efficiently.
- Makes updating the application easier.
- Enhances debugging due to multiple levels in the application.
Disadvantages of Spring MVC Framework
- It has high complexity when developing applications using this pattern.
- It is not suitable for small applications as it may affect performance and design.
Steps to Create a Spring MVC Application
Step 0: Set Up the Project
Set up your project with Maven, using the required archetype to create the necessary folder structure, and configure the server with your project.
Step 1: Add Dependencies in pom.xml
Load the Spring JAR files or add the dependencies if Maven is used. Add the following dependencies in pom.xml:
**pom.xml:
XML `
4.0.0
com.geeksforgeeks
SpringMVC
war
0.0.1-SNAPSHOT
SpringMVC Maven Webapp
http://maven.apache.org
<!-- Spring Web MVC -->
<dependency>
  <groupId>org.springframework</groupId>
  <artifactId>spring-webmvc</artifactId>
  <version>5.3.30</version>
</dependency>

<!-- Jakarta Servlet API (Provided Scope) -->
<dependency>
  <groupId>jakarta.servlet</groupId>
  <artifactId>jakarta.servlet-api</artifactId>
  <version>5.0.0</version>
  <scope>provided</scope>
</dependency> `
Step 2: Define the Controller
Create a controller class that maps a web request to a response.
**HelloGeek.java:
Java `
@Controller
public class HelloGeek {
@RequestMapping("/")
public String display()
{
return "hello";
}
}
`
Step 3: Configure web.xml
Specify the DispatcherServlet in the web.xml file:
**web.xml:
XML `
SpringMVC
spring
org.springframework.web.servlet.DispatcherServlet
1
spring
/
`
Step 4: Define the Bean Configuration
We have to define the bean in a separate XML file. We have specified the view components in this file. It is located in the WEB-INF directory.
spring-servlet.xml:
XML `
<context:component-scan base-package="com.geeksforgeeks.controller"/>
<mvc:annotation-driven/>

<bean class="org.springframework.web.servlet.view.InternalResourceViewResolver">
    <property name="prefix" value="/WEB-INF/views/"/>
    <property name="suffix" value=".jsp"/>
</bean>
`
In this configuration,
- We have added the necessary XML namespaces and schema locations.
- context:component-scan tells Spring where to look for annotated components.
- mvc:annotation-driven enables Spring MVC annotations.
- The InternalResourceViewResolver bean is defined to resolve view names. It looks for JSP files in the /WEB-INF/views/ directory and appends .jsp to the view name.
Step 5: Create a JSP File
We will now create a JSP file to display the message.
**index.jsp:
HTML `
<%@ page language="java" contentType="text/html; charset=UTF-8" pageEncoding="UTF-8"%>
Spring MVC Example${message}
`
This JSP file will display the message passed from the controller.
Step 6: Run the Application
Start the server and run the project. The output will be displayed as expected like below:
Spring MVC Tutorial!!