Spring REST XML Response (original) (raw)
REST APIs have become increasingly popular due to their simplicity and flexibility in architecting applications. A REST API, which stands for Representational State Transfer, is often referred to as RESTful web services. Unlike traditional MVC controllers that return views, **REST controllers return data directly. REST APIs support all HTTP methods (GET, POST, PUT, PATCH, DELETE, etc.), which correspond to CRUD (Create, Read, Update, Delete) operations. They can return data in various formats, with JSON being the most common. However, XML is also widely used, especially in scenarios where extensibility and security are critical.
Data Formats Supported by REST APIs
REST APIs can return data in multiple formats, including:
- JSON (JavaScript Object Notation)
- XML
- HTML
- XLT
- Python
- PHP
- Plain text
JSON is the most commonly used format due to its lightweight nature and ease of parsing. However, XML has its own advantages, especially in enterprise applications.
**Advantages of XML Over JSON
While JSON is the standard for data transfer, XML offers several advantages which are listed below:
- **Extensibility: XML uses tags for data definition, making it highly extensible.
- **Namespaces: XML supports namespaces, which helps avoid naming conflicts.
- **Comments: XML supports comments, which can be useful for documentation.
- **Encoding: XML supports various encoding schemes.
- **Security: XML is generally considered more secure than JSON because it has built-in support for validation and schema definitions. JSON, on the other hand, can be vulnerable to injection attacks if not properly validated.
**Note:
- JSON is less secure because of the absence of a JSON parser in the browser.
- JSONP is dangerous because it allows cross-origin exchanges of data.
Returning XML Responses in Spring Boot
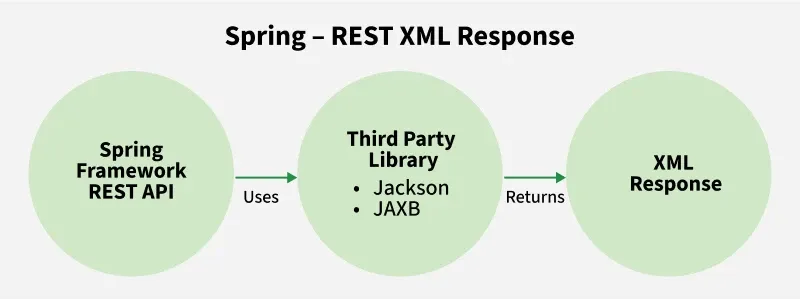
When we create a Spring Boot project with **Starter Web dependency, we only get support **for returning data in JSON format, with the help of the **Jackson library. To enable support for returning data in XML format we need third-party dependencies. Below, we’ll explore two ways to achieve this:
- Using Jackson XML Extension
- Using JAXB
**The below image demonstrates how Spring Framework REST API uses third-party libraries like Jackson or JAXB to return XML responses.
Setting Up the Project
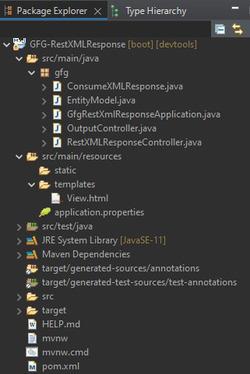
Project Structure
The project structure for the application is as follow:
Using Jackson XML Extension
Step 1: Adding Dependencies
The Jackson library is already present in the Spring framework's classpath for our application. We just need to add an extension to the Jackson library that can work with XML data responses. To add the extension, add the following dependency in the project build.
**Maven Dependency:
com.fasterxml.jackson.dataformat
jackson-dataformat-xml
After adding the above dependency and updating the project, the Jackson XML extension will get added in the classpath so the Spring MVC will automatically pick this up for XML responses.
**pom.xml:
XML `
4.0.0 org.springframework.boot spring-boot-starter-parent 2.6.3 sia GFG-RestXMLResponse 0.0.1-SNAPSHOT GFG-RestXMLResponse GeeksforGeeks <java.version>11</java.version> org.springframework.boot spring-boot-starter-thymeleaf org.springframework.boot spring-boot-starter-web
    <dependency>
        <groupId>com.fasterxml.jackson.dataformat</groupId>
        <artifactId>jackson-dataformat-xml</artifactId>
    </dependency>

    <dependency>
        <groupId>org.springframework.boot</groupId>
        <artifactId>spring-boot-devtools</artifactId>
        <scope>runtime</scope>
        <optional>true</optional>
    </dependency>
    <dependency>
        <groupId>org.projectlombok</groupId>
        <artifactId>lombok</artifactId>
        <optional>true</optional>
    </dependency>
    <dependency>
        <groupId>org.springframework.boot</groupId>
        <artifactId>spring-boot-starter-test</artifactId>
        <scope>test</scope>
    </dependency>
</dependencies>

<build>
    <plugins>
        <plugin>
            <groupId>org.springframework.boot</groupId>
            <artifactId>spring-boot-maven-plugin</artifactId>
            <configuration>
                <excludes>
                    <exclude>
                        <groupId>org.projectlombok</groupId>
                        <artifactId>lombok</artifactId>
                    </exclude>
                </excludes>
            </configuration>
        </plugin>
    </plugins>
</build>
`
Step 2: Bootstrapping the Application
Now, we can create a simple Spring Boot application to demonstrate how to return XML responses. Let's start with bootstrapping the application.
**GfgRestXmlResponseApplication.java:
This class initializes the Spring Boot application, which is the starting point for any Spring Boot application.
Java `
// Java Program to Illustrate Bootstrapping of Application
package gfg;
// Importing required classes import org.springframework.boot.SpringApplication; import org.springframework.boot.autoconfigure.SpringBootApplication;
// Annotation @SpringBootApplication
// Class public class GfgRestXmlResponseApplication {
// Main driver method
public static void main(String[] args)
{
    SpringApplication.run(
        GfgRestXmlResponseApplication.class, args);
}
}
`
Step 3: Creating the Entity Model
This class acts as a User object ( bean ) whose fields will be mapped to XML tags respectively. It also requires Getter/Setter methods which are automatically generated using '@Data' annotation of the 'Lombok' library. To embed the Lombok library in the project, add the following dependency in the project build.
**Maven Dependency:
org.projectlombok
lombok
true
Now define the EntityModel class:
**EntityModel.java:
This class will be used to map the user data that will be returned in the XML response.
Java `
// Java Program Illustrating Object to be return as XML // response
package gfg;
// Importing required classes import lombok.Data;
// Annotation @Data
// Class public class EntityModel {
// Class data members
String ID;
String NAME;
String DOB;
String PINCODE;
}
`
Step 4: Creating the REST Controller for XML Response
This REST API controller is configured to return data specifically in XML format, using produces attribute of @RequestMapping annotation.
**RestXMLResponseController.java:
Java `
// Java Program Illustrating REST API returning XML response
package gfg;
// Importing required classes import org.springframework.http.HttpHeaders; import org.springframework.http.HttpStatus; import org.springframework.http.ResponseEntity; import org.springframework.web.bind.annotation.GetMapping; import org.springframework.web.bind.annotation.PathVariable; import org.springframework.web.bind.annotation.RequestMapping; import org.springframework.web.bind.annotation.RestController;
// Annotations @RestController @RequestMapping(path = "/xml-output", produces = "application/xml")
// Class public class RestXMLResponseController {
@GetMapping("/get")
public ResponseEntity<EntityModel> get()
{

    EntityModel model = new EntityModel();
    model.setID("1");
    model.setNAME("Darshan.G.Pawar");
    model.setDOB("05-09-2001");
    model.setPINCODE("422 009");

    HttpHeaders headers = new HttpHeaders();
    ResponseEntity<EntityModel> entityModel
        = new ResponseEntity<>(model, headers,
                               HttpStatus.CREATED);

    return entityModel;
}

// Annotation
@GetMapping("/get/{id}")

// Class
public ResponseEntity<EntityModel>
getById(@PathVariable("id") String id)
{

    EntityModel model = new EntityModel();
    model.setID(id);
    model.setNAME("Darshan.G.Pawar");
    model.setDOB("05-09-2001");
    model.setPINCODE("422 009");

    HttpHeaders headers = new HttpHeaders();
    ResponseEntity<EntityModel> entityModel
        = new ResponseEntity<>(model, headers,
                               HttpStatus.CREATED);

    return entityModel;
}
}
`
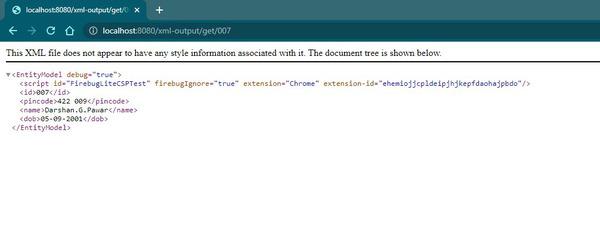
**Note: In the above example, the @GetMapping annotations **handle the GET requests. The produces attribute ensures that the responses are returned in XML format.
**Output 1:

**Output 2:
Step 5: Consuming XML Responses
- The data returned in XML format by REST API needs to be consumed and make to use.
- Spring Framework provides a convenient way to consume REST responses with the help of Spring's 'RestTemplate'.
- It benefits us by preventing the need to write boilerplate code.
- RestTemplate provides us with methods that are HTTP methods specific.
- Here for GET HTTP request, the 'getForEntity()' method is used that accepts URL to @GetMapping method, a class to which response will be mapped to and additional object parameters to URL.
- This method will return a ResponseEntity<> object.
**ConsumeXMLResponse.java:
Java `
// Java Program Illustrating Getting REST API Response
package gfg;
// Importing required classes import org.springframework.http.ResponseEntity; import org.springframework.web.client.RestTemplate;
// Class public class ConsumeXMLResponse {
RestTemplate rest = new RestTemplate();

public ResponseEntity<EntityModel> get(String id) {

    return rest.getForEntity("http://localhost:8080/xml-output/get/{id}",
              EntityModel.class, id);

}
}
`
**Note: This class sends a GET request to the REST API and retrieves the XML response, which is then mapped to the EntityModel class.
Step 6: Regular Controller to Display XML Response
This MVC Controller uses the above class to get the XML response returned by REST API. Also, after getting the data it returns us a modified view ( View.html)
**OutputController.java:
Java `
// Java Program to Illustrate Regular controller
package gfg;
// Importing required classes import org.springframework.http.HttpHeaders; import org.springframework.http.ResponseEntity; import org.springframework.stereotype.Controller; import org.springframework.ui.Model; import org.springframework.web.bind.annotation.GetMapping; import org.springframework.web.bind.annotation.PathVariable; import org.springframework.web.bind.annotation.RequestMapping;
// Annotation @Controller @RequestMapping("View")
// Class public class OutputController {
// Annotation
@GetMapping("/get/{id}")

public String
getXMLOutput(@PathVariable("id") String id, Model model)
{

    ConsumeXMLResponse response
        = new ConsumeXMLResponse();
    ResponseEntity<EntityModel> responseEntity
        = response.get(id);

    EntityModel entity = responseEntity.getBody();
    HttpHeaders headers = responseEntity.getHeaders();

    model.addAttribute("xml", entity);
    model.addAttribute("XMLheaders", headers);

    return "View";
}
}
`
**Note: The OutputController fetches the XML response and passes it to the view for rendering.
Step 7: Displaying the XML Response in HTML
Finally, we can display the XML response in an HTML page using Thymeleaf.
**View.html:
HTML `
GeeksforGeeksHello Geek : REST XML Response
Id :
Replaceable text
Name :
Replaceable text
Date Of Birth :
Replaceable text
Pincode :
Replaceable text
Headers :
`
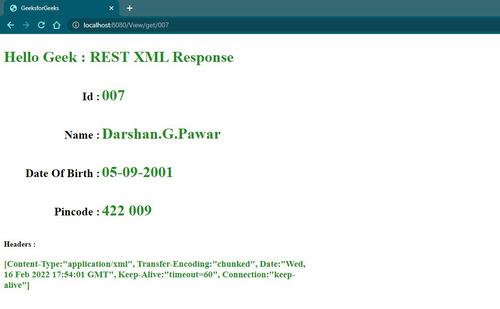
**Note: This HTML file uses Thymeleaf to render the data returned by the REST API in a formatted manner.
**Output:
Using **JAXB
**Step 1: Adding Dependencies
To use the JAXB library, add the following dependency in the project built.
**Maven Dependency:
org.codehaus.mojo
jaxb2-maven-plugin
2.5.0
**Note: In case you're using Java 9 or later, JAXB has been removed from the JDK, so you need to include the **jaxb-api dependency as well.
javax.xml.bind
jaxb-api
2.3.1
Step 2: Annotating the Entity Model for JAXB
To enable JAXB, you need to annotate your entity model class with @XmlRootElement, which marks the class as a valid root element for XML binding.
**EntityModel.java:
Java `
package gfg;
import javax.xml.bind.annotation.XmlRootElement;
import lombok.Data;
@XmlRootElement @Data public class EntityModel {
String ID;
String NAME;
String DOB;
String PINCODE;
}
`
**Note: You can also use Jersey dependency for developing RESTful APIs. The main advantage of using it is that it already has a JAX-RS library which eventually uses JAXB libraries.