Spring Hibernate Configuration and Create a Table in Database (original) (raw)
Last Updated : 20 Apr, 2026
Spring Hibernate configuration integrates the Spring Framework with Hibernate ORM to simplify database operations and object-relational mapping. It allows developers to manage database connectivity, transactions, and entity mapping efficiently using configuration files or annotations.
- Spring manages Hibernate settings (DataSource, SessionFactory) in one place, reducing boilerplate code.
- Supports transaction handling using annotations like @Transactional, improving code clarity.
- Hibernate can automatically create/update database tables using properties like hbm2ddl.auto.
Step-by-Step Implementation
Step 1: Create a Schema in MYSQL
Before setting up the project, create a schema (database) in MySQL where Hibernate will generate tables.
- Open MySQL Workbench or your preferred MySQL client.
- Connect to your MySQL server.
- Run the following SQL command to create a new schema:
CREATE SCHEMA `examportal`;
This command creates a database named examportal. Hibernate will use it to create the mapped tables automatically.

Step 2: Create a Spring Boot Project
Use Spring Initializr to create a new project with the following dependencies:
- Spring Web
- Spring Data JPA
- MySQL Driver
- Lombok (optional, reduces boilerplate code)
Alternatively, dependencies can be added manually to the pom.xml file.
**pom.xml:
XML `
org.springframework.boot spring-boot-starter-web<!-- Spring Boot Starter Data JPA (includes Hibernate) -->
<dependency>
<groupId>org.springframework.boot</groupId>
<artifactId>spring-boot-starter-data-jpa</artifactId>
</dependency>
<!-- MySQL Driver -->
<dependency>
<groupId>mysql</groupId>
<artifactId>mysql-connector-java</artifactId>
<version>8.0.33</version>
<scope>runtime</scope>
</dependency>
<!-- Lombok (optional) -->
<dependency>
<groupId>org.projectlombok</groupId>
<artifactId>lombok</artifactId>
<version>1.18.30</version>
<scope>provided</scope>
</dependency>`
Step 3: Configure the Database
Add database and Hibernate configurations in the application.properties file located in the src/main/resources folder.
# Database Configuration
spring.datasource.url=jdbc:mysql://localhost:3306/examportal?useSSL=false&serverTimezone=UTC
spring.datasource.username=root
spring.datasource.password=root
spring.datasource.driver-class-name=com.mysql.cj.jdbc.Driver# Hibernate & JPA Configuration
spring.jpa.properties.hibernate.dialect=org.hibernate.dialect.MySQL8Dialect
spring.jpa.hibernate.ddl-auto=update
spring.jpa.show-sql=true
spring.jpa.properties.hibernate.format_sql=true
- **spring.jpa.hibernate.ddl-auto=update: Automatically updates or creates tables based on entity definitions.
- **spring.jpa.show-sql=true: Prints executed SQL queries in the console for debugging.
- Replace root and password with your actual database credentials.
Step 4: Create an Entity Class
An entity class represents a database table. Use annotations to define the mapping between Java fields and database columns.
**User.java:
Java `
package com.exam.Portal.entities;
import javax.persistence.*; import lombok.Data;
@Data @Entity @Table(name = "users") public class User {
@Id
@GeneratedValue(strategy = GenerationType.IDENTITY)
private int id;

private String username;
private String password;
private String firstname;
private String lastname;
private String email;
private String phone;
private boolean enable;
}
`
**Annotations Used:
- ****@Entity:** Marks the class as a persistent entity.
- ****@Table:** Specifies the database table name.
- ****@Id:** Denotes the primary key field.
- ****@GeneratedValue:** Defines primary key generation strategy.
When the application runs, Hibernate automatically creates a table named users in the examportal database.
Step 5: Create a Repository Interface
The repository layer handles database operations. By extending JpaRepository, it provides built-in CRUD functionality.
**UserRepository.java:
Java `
package com.exam.Portal.repositories;
import com.exam.Portal.entities.User; import org.springframework.data.jpa.repository.JpaRepository;
public interface UserRepository extends JpaRepository<User, Integer> { // Custom query methods can be defined here }
`
Step 6: Create a Service Layer
The service layer contains business logic and interacts with the repository.
**UserService.java:
Java `
package com.exam.Portal.services;
import com.exam.Portal.entities.User; import com.exam.Portal.repositories.UserRepository; import org.springframework.beans.factory.annotation.Autowired; import org.springframework.stereotype.Service; import java.util.List;
@Service public class UserService {
@Autowired
private UserRepository userRepository;

public List<User> getAllUsers() {
    return userRepository.findAll();
}

public User getUserById(int id) {
    return userRepository.findById(id).orElse(null);
}

public User createUser(User user) {
    return userRepository.save(user);
}

public void deleteUser(int id) {
    userRepository.deleteById(id);
}
}
`
Step 7: Create a REST Controller
The controller layer exposes endpoints for performing CRUD operations.
**UserController.java:
Java `
package com.exam.Portal.controllers;
import com.exam.Portal.entities.User; import com.exam.Portal.services.UserService; import org.springframework.beans.factory.annotation.Autowired; import org.springframework.web.bind.annotation.*; import java.util.List;
@RestController @RequestMapping("/users") public class UserController {
@Autowired
private UserService userService;

@GetMapping
public List<User> getAllUsers() {
    return userService.getAllUsers();
}

@GetMapping("/{id}")
public User getUserById(@PathVariable int id) {
    return userService.getUserById(id);
}

@PostMapping
public User createUser(@RequestBody User user) {
    return userService.createUser(user);
}

@DeleteMapping("/{id}")
public void deleteUser(@PathVariable int id) {
    userService.deleteUser(id);
}
}
`
Step 8: Run the Application
Run the application using your IDE or by executing the following command:
mvn spring-boot:run
Once started, Hibernate will automatically create the users table in the examportal schema based on the entity class.
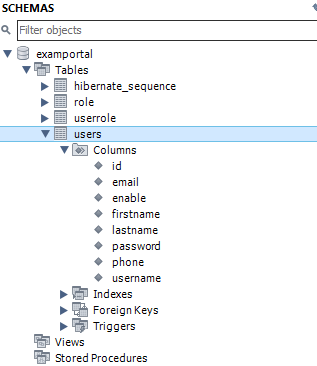
Tables
Testing the Application
Use Postman or any API testing tool to interact with the REST endpoints
| HTTP Method | Endpoint | Description |
|---|---|---|
| GET | /users | Retrieve all users |
| GET | /users/{id} | Retrieve a user by ID |
| POST | /users | Create a new user |
| DELETE | /users/{id} | Delete a user by ID |