How to Record the Screen on Your Windows PC (original) (raw)
Last Updated : 20 Feb, 2026
Screen recording on Windows is useful for creating tutorials, reporting issues, or saving important on-screen activity. Windows provides built-in recording tools along with powerful options from Microsoft. This guide explains how to record your screen using Game Bar, Snipping Tool, PowerPoint, and other alternatives with simple steps.
**Record Screen on Windows PC Using Windows Game Bar
The Xbox Game Bar is built into Windows and works well for recording most apps and gameplay.
**Note: Game Bar cannot record the desktop, File Explorer, or some built-in Windows apps.
**Step 1: Enable Game Bar
- Open Settings (Win + I).
- Go to Gaming > Xbox Game Bar.

- Turn on "Enable Xbox Game Bar".
Step 2: Start the Game Bar App
- Open the app or window you want to record.
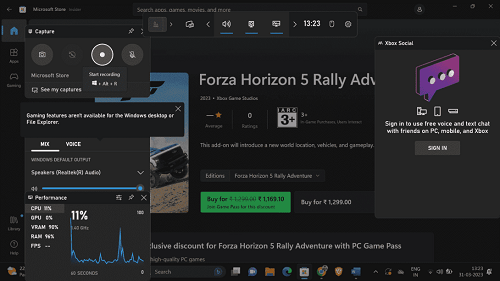
- Press Win + G to launch Game Bar.
- Click the Record button or press Win + Alt + R.
- Continue your activity. A small floating bar will appear with recording status.

**Step 3: Stop Recording & View File
- Press Win + Alt + R again to stop.
- You’ll see a notification click it to open the recording.
- Or manually navigate to:
C:\Users[username]\Videos\Captures

**Step 4: Customize Game Bar Settings (Optional)
Go to Settings > Gaming > Captures to adjust:
- Save location
- Background recording
- Audio/video quality
- Frame rate (30 or 60 FPS)
Windows 11’s Snipping Tool now includes a screen recording feature.
**Requirement: Windows 11 build 22621.1344 or higher.
Update via Settings > Windows Update if needed.
**Step 1: Update Snipping Tool
- Open Microsoft Store.
- Go to Library → Update the Snipping Tool.
**Step 2: Final Recording Screen
- Launch Snipping Tool (Start Menu or Win + Shift + S).
- Click the video camera icon on the toolbar.
- Click New.
- Select the recording area.
- Click Start to begin recording.
- Use Pause and Play if needed.
- Click Stop to finish.
**Step 3: Save the Recorded Video
- After recording:
- Click Save to download as an MP4.
- Click Share to send via apps/services.
Record the Screen on Your Windows PC using PowerPoint
PowerPoint includes a built-in screen recorder ideal for presentations.
**Step 1: Open Screen Recording Tool
- Open PowerPoint.
- Go to the Insert tab.
- Click Screen Recording (under Media).
**Step 2: Select Area & Start Recording
- Click Select Area and drag your cursor to choose the region.
- Enable audio/pointer if needed.
- Click Record (red circle). A short countdown begins.
**Step 3: Stop Recording
**Use:
- The control dock at the top, or
- Win + Shift + Q
The video is automatically inserted into your slide.
**Step 4: Edit & Export
- Resize or trim the video in PowerPoint.
- **To export as a video:
File > Export > Create a Video
**Alternative Way to How to Record Screen
If built-in tools don’t meet your needs, try these:
**1. OBS Studio
- Free and professional grade
- Perfect for high quality screen recording & streaming
- Highly customizable
**2. Wonder share Filmora
- Includes an easy screen recorder
- Great for editing long recordings
**3. Chrome Extensions
- Loom or Screencastify offer quick browser-based recording
**4. Online Screen Recorders
- Tools like Apowersoft Free Online Screen Recorder let you record without installations.