Fill Tool in Figma (original) (raw)
Last Updated : 13 May, 2024
In Figma, the Fill tool is like a paintbrush for your designs. You can use it to add colors or cool color blends to shapes, text, or anything else you're working on. It's super handy because you can choose colors from a palette or make fancy gradients. With this tool, you can make your designs look just the way you want them to.
and, with the Figma Fill tool, you can easily color in text, shapes, and even pictures with gradients. You can get creative by layering different colors or effects on top of each other to make your designs pop.
Table of Content
- What is Fill Tool?
- Why use Fill Tool?
- How to Use Fill Tool in Figma?
- Fill Tool Components
- Blend Mode Options
- Conclusion
The Fill tool in Figma is incredibly useful for adding color or gradients to various elements within your design.
**Here's why we use it:
- **Customization: It allows you to personalize the appearance of shapes, text, frames, and other objects by filling them with colors or gradients of your choice.
- **Visual Consistency: By using the Fill tool, you can maintain a consistent color scheme throughout your design, helping to create a cohesive and polished look.
- **Ease of Editing: The Fill tool makes it easy to experiment with different colors and gradients. You can quickly change the appearance of elements without having to redraw or recreate them from scratch.
- **Enhanced Creativity: With the ability to layer multiple fills on a single object, you can create complex effects, blend colors, or overlay gradients to achieve unique and visually appealing designs.
- **Efficiency: Applying fills with the Fill tool is a fast and efficient way to add color or gradients to your design elements, saving you time and effort in the design process.
Step 1: First Choose Frame
.png)
Step 1: Choose Frame
Step 2: Select the object(s) you want to fill with color or gradient in a frame
I will insert Circle in Frame and Select it For Coloring.

Step 2: Select an object
Step 3: There is fill option in Right Panel of Figma Click it and a color box will appear
.png)
Step 3: Click on the fill option
**Step 4: There are Two types of Color
- **Solid Color: In This Type we only use single color at a time.

Solid Color
- **Gradient Color: In This we can use multiple colors at a time according to our design.
.png)
Gradient Color
Step 5: We can also use color picker in the box for picking color

Color Picker: Marked inside a black circle.
**1. Color Picker
The color picker is a pivotal component embedded within Figma's Fill Tool, providing designers with the means to select and apply colors seamlessly within their designs.
To expedite color selection, Figma's color picker incorporates an eyedropper tool, enabling users to sample colors directly from existing elements within their designs. This tool promotes efficiency and precision, particularly when matching colors or adhering to established color schemes.

Color picker: we can pick any color from design
**2. Solid Color
The Solid Color fill type is a straightforward and commonly used option for applying a single, uniform color to shapes, text layers, or any other design elements. Fill shapes or objects with a single solid color.
**3. Gradient Color
Gradients are a versatile tool in a designer's arsenal, offering dynamic color transitions that add depth and visual interest to designs. Within Figma's Fill Tool, the gradient component empowers designers to create and apply gradients seamlessly.
**There are 4 types of Gradients:
Figma supports various gradient types, including linear gradients, radial gradients, and angular gradients. Each type offers unique possibilities for creating captivating visual effects:
- **Linear Gradients: Transition colors along a straight line, allowing for smooth color blending from one point to another.

Click on The Dropdown under the rectangle and select linear option.
- **Radial Gradients: Radiate colors outward from a central point, creating circular or elliptical color transitions.

Click on dropdown under the box and select radian.
- **Angular Gradients: Rotate colors around a central point, producing concentric rings of color with customizable angles.

Click on dropdown under the box and select Angular.
- **Diamond Gradients: Diamond gradient typically refers to a gradient style where the colors radiate from the center of the object outward, forming a diamond-shaped pattern.

Click on dropdown under the box and select Diamond.
**4. Image
Image fill is a versatile feature within the Fill Tool of design software that allows designers to fill shapes, text layers, or other design elements with custom images. Fill shapes or objects with an image from your computer or from a URL.

click on the image icon in box.
**5. Opacity Slider
**The opacity slider in Figma is a fundamental tool that allows designers to adjust the transparency of selected objects or layers within their designs.
- **Transparency Control: The opacity slider provides a straightforward means of controlling the transparency of selected objects or layers. By adjusting the slider, designers can make objects more transparent (lower opacity) or more opaque (higher opacity) to achieve the desired visual effect.
- **Granular Adjustment: The opacity slider offers granular control over transparency levels, allowing designers to fine-tune the opacity of objects with precision. This level of control enables subtle adjustments to be made to the visibility of elements within the design.
- **Layer Independence: The opacity slider operates on a per-layer basis, meaning that designers can adjust the transparency of individual layers independently of one another. This flexibility enables designers to create layered compositions with varying levels of transparency, adding depth and dimension to their designs.
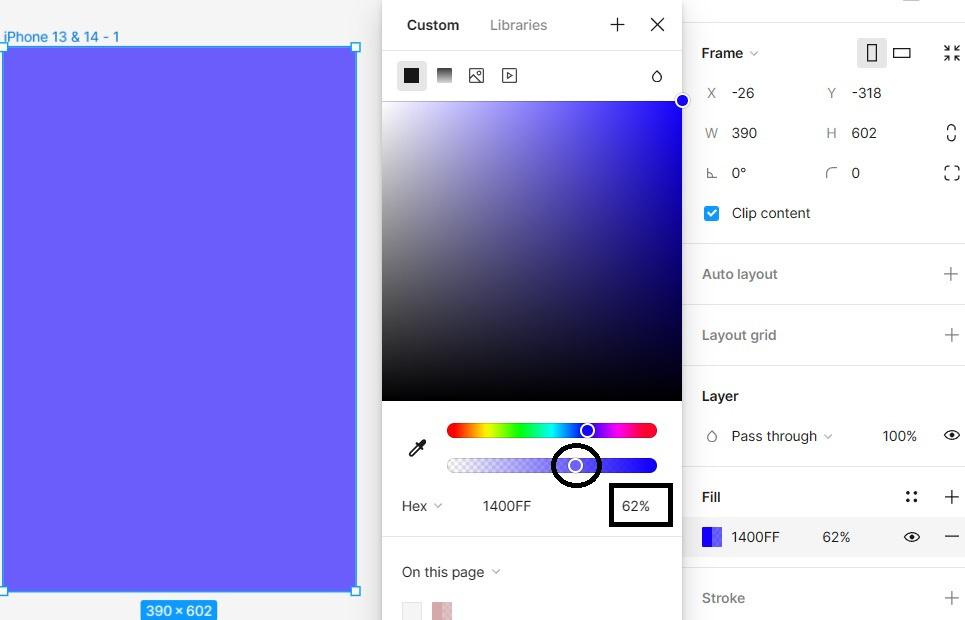
Click on the slider in circle and move it according to requirements of opacityand in square it is the percentage of opacity
**6. Blend Modes
Blend modes in Figma are a powerful feature that allows designers to control how layers interact with each other, enabling the creation of various visual effects. Here's a concise explanation of its functionality:
**Layer Interaction: Blend modes determine how pixels in one layer blend with pixels in the layers beneath it. Each blend mode applies a specific mathematical formula to determine the resulting color and opacity of pixels, resulting in different visual effects.

click on droplet icon and dropdown of blend modes will appear.
**Blend Mode Options
Figma offers a range of blend modes, each suited to different design scenarios. Common blend modes include:
- **Normal: The default blend mode, which displays the layer without any blending with the layers beneath it.
- **Multiply: Darkens the colors of the layer and blends them with the colors of the layers beneath, resulting in a darker overall appearance.
- **Screen: Lightens the colors of the layer and blends them with the colors of the layers beneath, resulting in a lighter overall appearance.
- **Overlay: Combines the Multiply and Screen blend modes to enhance contrast and saturation in the image.
- **Soft Light: Similar to Overlay, but with a softer effect, resulting in more subtle changes.
- **Hard Light: Similar to Overlay, but with a more intense effect, resulting in more pronounced changes.
- **Difference: Subtracts the color of the layer from the color of the layers beneath, resulting in inverted colors.
- **Exclusion: Similar to Difference, but with less intense color inversion.

This is the blend mode options list in black.
Conclusion
In conclusion, the Fill tool in Figma emerges as an invaluable asset for designers across various skill levels and project scopes. it's clear that the Fill tool in Figma is a must-have for designers, whether you're just starting out or you've been at it for a while. What makes it so great is how easy it is to use. You can add colors, gradients, or textures to your designs without any hassle, which saves you a lot of time and helps you come up with new ideas. Plus, if you're working with other people, the Fill tool makes it super simple to share your work and get feedback in real-time. This means you can collaborate smoothly and keep everything looking consistent across all your projects.