Spring Apache Kafka Tutorial (original) (raw)
In this Spring Apache Kafka lesson, we will learn how we can get started with Apache Kafka in a Spring Boot project and start producing and consuming messages on the topic of our choice. Apart from a simple project, we will deep dive into Kafka terminologies and how the concept of partitioning works in Kafka. Let’s get started.
1. Introduction
With the uprise of Microservices, the necessity of asynchronous communication between the involved services became a mainstream requirement. Actually, that is how Apache Kafka came into existence at LinkedIn. The main requirements of the new asynchronous communication system they needed were message persistence and high throughput. Once LinkedIn was able to make a project in the face of Kafka, they donated the project to Apache Software foundation where it came to be known as Apache Kafka.
2. What is Apache Kafka?
Kafka was developed at LinkedIn in the year 2010 and it was donated to Apache Software Foundation where it became one of the top projects by 2012. Apache Kafka has three main components in its ecosystem:
- Publisher-Subscriber: This component of Kafka is responsible to send and consume data across Kafka Nodes (more on Nodes in coming sections) and the consumer apps which can scale with very high throughput
- Kafka Streams: With Kafka streaming API, it is possible to process incoming data into kafka at near real-time
- Connect API: With the Connect API, it is possible to integrate many external data sources and data sinks with Kafka
For a high-level definition, we can provide a simple definition for Apache Kafka:
Apache Kafka is a distributed, fault-tolerant, horizontally-scalable, commit log.
Let us elaborate what we just said:
- Distributed: Kafka is a distributed system where all the messages are replicated across various nodes so that each server is capable of responding to the client for the messages it contains. Also, even if one node fails, other nodes can quickly take over without any downtime
- Fault-tolerant: As Kafka does not have a Single Point of Failure, even if one of the node goes down, the end-user will hardly notice this as the other parts take responsibility of the messages which are lost due to the failed node
- Horizontally-scalable: Kafka allows us to add more machines to the cluster with zero downtime. This means that if we start to face lag in messages due to a low number of servers in the cluster, we can quickly add more servers and maintain the performance of the system
- Commit Log: A commit log refers to a structure similar to a Linked List. The order of insertion of messages is maintained and data cannot be removed from this log until a threshold time is reached
A lot more concepts about Apache Kafka will become clear in the coming sections where we talk about basic terminologies used in Apache Kafka lesson.
3. Apache Kafka Terminologies
Before we can move ahead with Kafka concepts and sample project, we must understand basic terms related to Apache Kafka. Some of these are:
- Producer: This component publish messages to the Kafka cluster
- Consumer: This component consume messages from the Kafka cluster
- Message: This is the data which is sent by the producer to the cluster
- Connection: The producer needs to establesh a TCP connection to publish message. Same is needed in consumer app to consume data from the Kafka cluster
- Topic: A Topic is a logical grouping of similar messages. The producer app can publish message to a particular Topic and can consume from a specific Topic
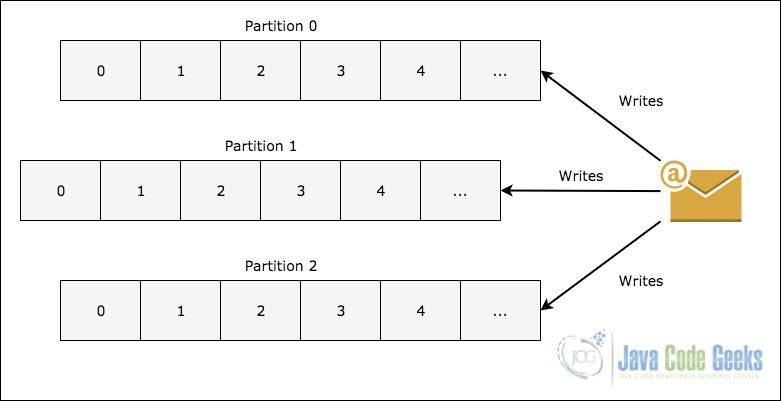
- Topic Partition: To scale a topic memory as it can contain a lot of messages, a single Topic is divided into partitions and each partition can live on any node in the cluster, following image shows how message is written into multiple partitions:
Topic partitioning in Kafka - Replicas: As we saw in above image about topic partitioning, each message is replicated across various nodes to maintain the order and to prevent data loss when one of the node dies
- Consumer Groups: Multiple consumers who are interested in a single topic can be kept in a group which s referred to as Consumer Groups
- Offset: Kafka stores no information about which consumer is going to read what data. Each consumer keeps an offset value with themselves about what was the last message they read. This means that different consumers can read different messages at the same time
- Node: A Node is just a single server in the cluster. We can add virtually any number of nodes in a cluster as we choose
- Cluster: A group of nodes is termed as a cluster.

4. Installing Kafka and Making a Topic
To download and install Kafka, we can refer to the Official Kafka guide provided here. When the Kafka server is up and running, we can create a new topic, named as javacodegeeks with the following command:
Creating a topic
bin/kafka-topics --create
--zookeeper localhost:2181
--replication-factor 1 --partitions 1
--topic javacodegeeks
We will see the following output once this command executes:

Kafka create topic
5. Making the Spring Boot Project with Maven
We will be using one of the many Maven archetypes to create a sample project for our example. To create the project execute the following command in a directory that you will use as workspace:
Creating a Project
mvn archetype:generate -DgroupId=com.javacodegeeks.example -DartifactId=JCG-BootKafka-Example -DarchetypeArtifactId=maven-archetype-quickstart -DinteractiveMode=false
If you are running maven for the first time, it will take a few seconds to accomplish the generate command because maven has to download all the required plugins and artifacts in order to make the generation task. Once we run this project, we will see following output and the project will be created:

Creating Kafka project
6. Adding Maven dependencies
Once you have created the project, feel free to open it in your favourite IDE. Next step is to add appropriate Maven Dependencies to the project. We will work with following dependencies in our project:
spring-boot-starter-web: This dependency marks this project as a Web project and it adds dependencies in order to create controllers and make Web-related classes.spring-kafka: This is the dependency which brings all the Kafka related dependencies into the project classpathspring-boot-starter-test: This dependency collects all test related JARs into the project like JUnit and Mockito.
Here is the pom.xml file with the appropriate dependencies added:
pom.xml
com.javacodegeeks.example JCG-BootKafka-Example jar 1.0-SNAPSHOT JCG-BootKafka-Example
org.springframework.boot spring-boot-starter-parent 1.5.10.RELEASE UTF-8 UTF-8 1.8<dependency>
<groupId>org.springframework.boot</groupId>
<artifactId>spring-boot-starter-web</artifactId>
</dependency>
<dependency>
<groupId>org.springframework.kafka</groupId>
<artifactId>spring-kafka</artifactId>
<version>1.1.3.RELEASE</version>
</dependency>
<dependency>
<groupId>org.springframework.boot</groupId>
<artifactId>spring-boot-starter-test</artifactId>
<scope>test</scope>
</dependency>Find the latest Maven dependencies on Maven Central.
Finally, to understand all the JARs which are added to the project when we added this dependency, we can run a simple Maven command which allows us to see a complete Dependency Tree for a project when we add some dependencies to it. Here is a command which we can use:
Check Dependency Tree
mvn dependency:tree
When we run this command, it will show us the following Dependency Tree:

Checking Dependency
Noticed something? So many dependencies were added by just adding four dependencies to the project. Spring Boot collects all related dependencies itself and leave nothing for us in that matter. The biggest advantage is that all these dependencies are guranteed to be copatible with each other.
7. Project Structure
Before we move on and start working on the code for the project, let’s present here the project structure we will have once we’re finished adding all the code to the project:

Project Structure
We have divided the project into multiple packages so that the principle of separation of concern is followed and code remains modular.
8. Adding configuration
Before we can start writing code for our project, we need to provide some properties in the application.properties file of our Spring Boot project:
application.properties
#Kafka Topic message.topic.name=javacodegeeks
spring.kafka.bootstrap-servers=localhost:9092
#Unique String which identifies which consumer group this consumer belongs to spring.kafka.consumer.group-id=jcg-group
These are some properties which we will be using in our project as the topic and group ID for the message we will publish and consume. Also, 9092 is the default port for Apache Kafka. Note that we could have defined multiple topics here as well with different name for the keys.
9. Defining the Producer configuration
We will start by defining the configuration for a Producer. The only property we need to define mandatorily for a Kafka Producer is the address for Kafka server with its port.
KafkaProducerConfig.java
package com.javacodegeeks.example.config;
import org.apache.kafka.clients.producer.ProducerConfig; import org.apache.kafka.common.serialization.StringSerializer; import org.springframework.beans.factory.annotation.Value; import org.springframework.context.annotation.Bean; import org.springframework.context.annotation.Configuration; import org.springframework.kafka.core.DefaultKafkaProducerFactory; import org.springframework.kafka.core.KafkaTemplate; import org.springframework.kafka.core.ProducerFactory;
import java.util.HashMap; import java.util.Map;
@Configuration public class KafkaProducerConfig {
@Value("${spring.kafka.bootstrap-servers}")
private String bootstrapAddress;

@Bean
public ProducerFactory<String, String> producerFactory() {
    Map<String, Object> configProps = new HashMap<>();
    configProps.put(
        ProducerConfig.BOOTSTRAP_SERVERS_CONFIG, bootstrapAddress);
    configProps.put(
        ProducerConfig.KEY_SERIALIZER_CLASS_CONFIG, StringSerializer.class);
    configProps.put(
        ProducerConfig.VALUE_SERIALIZER_CLASS_CONFIG, StringSerializer.class);
    return new DefaultKafkaProducerFactory<>(configProps);
}

@Bean
public KafkaTemplate<String, String> kafkaTemplate() {
    return new KafkaTemplate<>(producerFactory());
}
}
Although above class definition is pretty simple, we still have some points which we need to understand:
@Configuration: This class is defined as a configuration class which means that this class will be picked up by Spring Boot automatically and all beans defined inside this class will be managed by Spring container automatically.- We defined a bean for
ProducerFactorywhich takes input as various properties like the Kafka server address and other serialization properties which hels to code and decode the message sent through the Kafka producer bean. - Finally, we defined a bean for
KafkaTemplatewhich is the actual API object which will be used to publish the message on a Kafka topic.
10. Defining the Consumer configuration
As we are making Kafka producer and consumer in the same app for demonstration purposes, we will also define a consumer config class which will just contain basic properties for a Kafka consumer. This class can be put inside any project which isn’t a producer and only a Kafka consumer as well without any changes. Let’s look at the configuration definition:
KafkaConsumerConfig.java
package com.javacodegeeks.example.config;
import org.apache.kafka.clients.consumer.ConsumerConfig; import org.apache.kafka.common.serialization.StringDeserializer; import org.springframework.beans.factory.annotation.Value; import org.springframework.context.annotation.Bean; import org.springframework.context.annotation.Configuration; import org.springframework.kafka.annotation.EnableKafka; import org.springframework.kafka.config.ConcurrentKafkaListenerContainerFactory; import org.springframework.kafka.core.ConsumerFactory; import org.springframework.kafka.core.DefaultKafkaConsumerFactory;
import java.util.HashMap; import java.util.Map;
@EnableKafka @Configuration public class KafkaConsumerConfig {
@Value("${spring.kafka.bootstrap-servers}")
private String bootstrapAddress;

@Value("${spring.kafka.consumer.group-id}")
private String groupId;

@Bean
public ConsumerFactory<String, String> consumerFactory() {
    Map<String, Object> props = new HashMap<>();
    props.put(
            ConsumerConfig.BOOTSTRAP_SERVERS_CONFIG, bootstrapAddress);
    props.put(
            ConsumerConfig.GROUP_ID_CONFIG, groupId);
    props.put(
            ConsumerConfig.KEY_DESERIALIZER_CLASS_CONFIG, StringDeserializer.class);
    props.put(
            ConsumerConfig.VALUE_DESERIALIZER_CLASS_CONFIG, StringDeserializer.class);
    return new DefaultKafkaConsumerFactory<>(props);
}

@Bean
public ConcurrentKafkaListenerContainerFactory<String, String> kafkaListenerContainerFactory() {
    ConcurrentKafkaListenerContainerFactory<String, String> factory
            = new ConcurrentKafkaListenerContainerFactory<>();
    factory.setConsumerFactory(consumerFactory());
    return factory;
}
}
The configuration we provided is very similar to the producer configuration. The only difference to note here is:
- We defined a
ConsumerFactoryclass object bean which considers the Kafka server address and the consumer group ID as well which this Kafka consumer app belongs to. We have provided a unique String to the consumer as only a unique string is acceptable - Finally, we defined a
ConcurrentKafkaListenerContainerFactorywhich makes sure that this consumer application can consume Kafka messages at a concurrent pace and can give a consistent throughput even when published messages are high in number.
11. Defining the Spring Boot class
At the final stage, we will make the Spring Boot class with which we can publish a message, consume the message on the same topic. Here is the class definition for the main class:
KafkaApp.java
package com.javacodegeeks.example;
import org.slf4j.Logger; import org.slf4j.LoggerFactory; import org.springframework.beans.factory.annotation.Autowired; import org.springframework.beans.factory.annotation.Value; import org.springframework.boot.CommandLineRunner; import org.springframework.boot.SpringApplication; import org.springframework.boot.autoconfigure.SpringBootApplication; import org.springframework.kafka.annotation.KafkaListener; import org.springframework.kafka.core.KafkaTemplate;
@SpringBootApplication public class KafkaApp implements CommandLineRunner {
private static final Logger LOG = LoggerFactory.getLogger("KafkaApp");

@Value("${message.topic.name}")
private String topicName;

private final KafkaTemplate<String, String> kafkaTemplate;

@Autowired
public KafkaApp(KafkaTemplate<String, String> kafkaTemplate) {
    this.kafkaTemplate = kafkaTemplate;
}

public static void main(String[] args) {
    SpringApplication.run(KafkaApp.class, args);
}

@Override
public void run(String... strings) {
    kafkaTemplate.send(topicName, "Hello Geek!");
    LOG.info("Published message to topic: {}.", topicName);
}

@KafkaListener(topics = "javacodegeeks", group = "jcg-group")
public void listen(String message) {
    LOG.info("Received message in JCG group: {}", message);
}
}
We have used an interface CommandLineRunner to make this class run code with which we can test the producer and config class code we wrote. In this class, we publish a message to the specified topic and listen for it in the listener method we defined in the same class.
In the next section, we will run our project with a simple Maven command.
12. Running the project
Now that the main class definition is done, we can run our project. Running the application is easy with maven, just use the following command:
Running the Project
mvn spring-boot:run
Once we execute the above command, we will see that a message has been published on the specified topic and same app consumed the message as well:

Running Spring Boot Kafka project
13. Kafka Partitioning
As a final concept, we will touch upon how Topic partitioning is done in Apache Kafka. We will start with a very simple illustrative image which shows how leaders exist in a Topic partition:

Topic Partitioning
When a write happens for a topic at a position for which Partition 0 in the Broker 0 is the leader, this data is replicated across the nodes so that the message remains safe. This means that message will be replicated across Partition 0 for all three brokers shown in the image above.
The replication process in Kafka is done in parallel by multiple threads being opened by the node. As the threads are opened to exploit parallelism as much as possible, a very high throughput system is achieved in Kafka. After a message is replicated a certain number of times, a write is called to be accepted but the replication of message continues until the replication factor is achieved for the data.
14. Conclusion
In this lesson, we looked at how easy and quick it is to construct a Spring Boot app with Apache Kafka integrated into it. Apache Kafka has grown from a simple Apache project to a production-grade project which can manage millions of request each second when deployed with the correct number of nodes in its cluster, assigned proper memory and managed correctly through Zookeeper. Apache Kafka is one of the most promising skill to have in a software engineer jobs and can cover many use cases like website-tracking, real-time messaging application and much more.
The scale at which Apache Kafka can manage messages on its topics and partitions is really humungous and the architecture route it takes to become so much scalable is inspiring to many other projects. The scailability and real-time processing speed it promises it offers makes sure that it solves many of your problems in projects which needs to scale very much.
15. Download the Source Code
This was an example of Apache Kafka integration with Spring Framework.
Download
You can download the full source code of this example here: JCG-BootKafka-Example