How To Install Ruby On Ubuntu - Linux Start (original) (raw)
Ruby is a high-level programming language primarily used to build web apps. There are several ways to install it on Ubuntu, and each has its own benefits.
Using Ubuntu’s package managers (apt or snap) will be the easiest. However, if you plan to develop Ruby applications and need multiple Ruby versions, the rbenv or RVM scripts will be better suited for the task.
Install Ruby with Apt
Before installing Ruby from the Ubuntu repo, you should update your apt package index. This’ll ensure you get the latest version currently available in the repo.
sudo apt updateAfter that, it’s simply a matter of installing the Ruby package.
sudo apt install ruby-fullYou can verify the installation afterward by checking the Ruby version.
ruby --versionInstall the Ruby Snap
If you want to install Ruby with a package manager but the apt package isn’t the version you want, you can go for the Ruby snap. By default, the installed snap will be the latest Ruby version.
sudo snap install ruby --classicIt’s also possible to install an older Ruby version with snap. First, check the Ruby versions available through snap.
snap info rubyThen, specify the channel for the exact version you want to install. For instance, to switch to Ruby version 2.7, you could use
sudo snap switch ruby --channel=2.7/stablesudo snap refreshOnce again, you can check the Ruby version to confirm that it is installed properly.
ruby -vUse rbenv to Install Ruby
rbenv is a version manager for Ruby that lets you manage multiple Ruby versions at once. While rbenv can’t install Ruby on its own, we’ll install it with the ruby-build plugin, which in turn will allow us to install Ruby.
Install Prerequisites
Update your package index and install the required dependencies to start. Some of these libraries might already be present, in which case, they’ll simply be ignored, so you needn’t worry about duplicate installations.
sudo apt update && sudo apt install git curl autoconf bison build-essential libssl-dev libyaml-dev libreadline6-dev zlib1g-dev libncurses5-dev libffi-dev libgdbm6 libgdbm-dev libdb-devInstall Rbenv
Download and run the Rbenv installer script through git.
curl -fsSL https://github.com/rbenv/rbenv-installer/raw/HEAD/bin/rbenv-installer | bashNow, add $HOME/.rbenv/bin to your PATH environment variable with the following commands.
echo 'export PATH="$HOME/.rbenv/bin:$PATH"' >> ~/.bashrcecho 'eval "$(rbenv init -)"' >> ~/.bashrcsource ~/.bashrcThe installation is complete at this point. You can verify this by checking the Rbenv version.
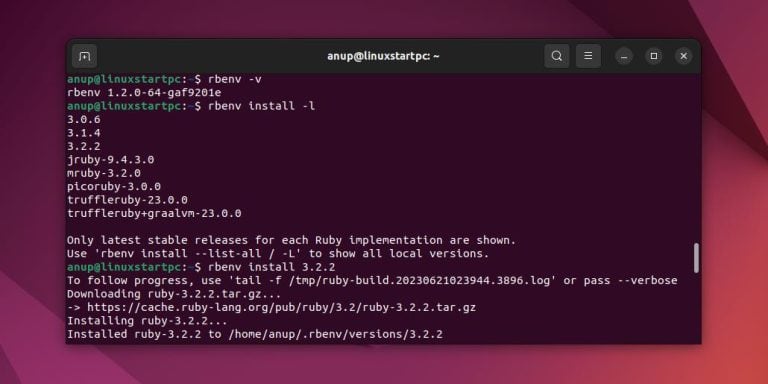
rbenv -vInstall Ruby
Before you install Ruby, list the available versions and decide on the one that you want to install.
rbenv install -lThen, simply specify the version number like so
rbenv install 3.2.2As installing Ruby with rbenv will take a little while, you can optionally use the verbose flag to track progress.
rbenv install --verbose 3.2.2Set this Ruby version as the new default using the global option.
rbenv global 3.2.2Finally, verify the Ruby installation this time by checking the version.
ruby --versionInstall Ruby using RVM
Ruby Environment Manager (RVM) allows you to manage multiple Ruby installations as well as gemsets. You’ll have access to more Ruby versions through RVM compared to rbenv.
Install Dependencies
The installation process is very similar to rbenv. Start by updating the package index and installing the required dependencies first.
sudo apt update && sudo apt install curl g++ gcc autoconf automake bison libc6-dev libffi-dev libgdbm-dev libncurses5-dev libsqlite3-dev libtool libyaml-dev make pkg-config sqlite3 zlib1g-dev libgmp-dev libreadline-dev libssl-devInstall RVM
Add the GPG key so that you’ll be able to verify the RVM install script.
gpg --keyserver hkp://pgp.mit.edu --recv-keys 409B6B1796C275462A1703113804BB82D39DC0E3 7D2BAF1CF37B13E2069D6956105BD0E739499BDBThen, download and run the install script like so
curl -sSL https://get.rvm.io | bash -s stablesource ~/.rvm/scripts/rvmInstall Ruby
You can install the latest stable Ruby version with
rvm install rubyThen, set it as the default Ruby version like so
rvm --default use rubyIf you want to install a specific version instead, list the available Ruby versions.
rvm list knownThen, specify the version you want to install and set it as the new default like so
rvm install ruby-2.7.2rvm --default use ruby-2.7.2Finally, check the current Ruby version to verify the installation.
ruby --version