PyQt QGroupBox (original) (raw)
Summary: in this tutorial, you’ll learn how to use the PyQt QGroupBox class to create a group box frame with a title.
A group box allows you to group related widgets together in a frame with a title on top. To create a group box widget, you use the QWidget class:
group_box = QGroupBox(title)Code language: Python (python)
Because a group box doesn’t automatically lay out the child widgets, to add widgets to the group box, you need to create a layout object first:
layout = QVBoxLayout()Code language: Python (python)
set the layout for the group box:
group_box.setLayout(layout)Code language: Python (python)
and use the layout object to add the child widgets:
layout.addWidget(widget1) layout.addWidget(widget2) layout.addWidget(widget3)Code language: Python (python)
Here are the complete steps for creating a group box and adding child widgets to it:
`# Create a group box group_box - QGroupBox(title)
create a layout and set it for the group box
layout = QVBoxLayout() group_box.setLayout(layout)
add widgets to the layout
layout.addWidget(widget1) layout.addWidget(widget2) layout.addWidget(widget3)`Code language: Python (python)
The following example uses the QGroupBox class to create group box widgets:
`import sys from PyQt6.QtWidgets import QApplication, QWidget, QFormLayout, QPushButton, QGroupBox, QLineEdit, QDateEdit from PyQt6.QtCore import Qt
class MainWindow(QWidget): def init(self, *args, **kwargs): super().init(*args, **kwargs)
    self.setWindowTitle('PyQt QGroupBox')

    layout = QFormLayout(self)
    self.setLayout(layout)

    person_groupbox = QGroupBox('Personal Information')
    form_layout = QFormLayout()
    person_groupbox.setLayout(form_layout)

    form_layout.addRow('First Name:', QLineEdit(person_groupbox))
    form_layout.addRow('Last Name:', QLineEdit(person_groupbox))
    form_layout.addRow('DOB:', QDateEdit(person_groupbox))

    contact_groupbox = QGroupBox('Contact Information')
    form_layout = QFormLayout()
    contact_groupbox.setLayout(form_layout)
    form_layout.addRow('Phone Number:', QLineEdit(contact_groupbox))
    form_layout.addRow('Email Address:', QLineEdit(contact_groupbox))

    layout.addWidget(person_groupbox)
    layout.addWidget(contact_groupbox)
    layout.addWidget(QPushButton('Save'))

    # show the window
    self.show()
if name == 'main': app = QApplication(sys.argv) window = MainWindow() sys.exit(app.exec())`Code language: Python (python)
Output:
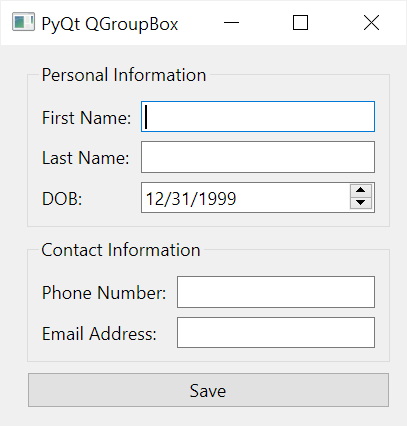
How it works.
First, create a group box with a title 'Personal Information':
person_groupbox = QGroupBox('Personal Information')Code language: Python (python)
Next, create a form layout and set it as the layout of the group box:
form_layout = QFormLayout() person_groupbox.setLayout(form_layout)Code language: Python (python)
Then, add widgets to the form layout of the group box:
form_layout.addRow('First Name:', QLineEdit(person_groupbox)) form_layout.addRow('Last Name:', QLineEdit(person_groupbox)) form_layout.addRow('DOB:', QDateEdit(person_groupbox))Code language: Python (python)
After that, create the second group box:
contact_groupbox = QGroupBox('Contact Information') form_layout = QFormLayout() contact_groupbox.setLayout(form_layout) form_layout.addRow('Phone Number:', QLineEdit(contact_groupbox)) form_layout.addRow('Email Address:', QLineEdit(contact_groupbox))Code language: Python (python)
Finally, place the group boxes in the main window:
layout.addWidget(person_groupbox) layout.addWidget(contact_groupbox)Code language: Python (python)
Summary #
- Use PyQt
QGroupBoxclass to create a group box widget.
Was this tutorial helpful ?