Nginx installation on Linux (original) (raw)
This article is part of our Academy Course titled Introduction to Nginx.
This course will introduce you to the magic of nginx. You will learn to install and configure nginx for a variety of software platforms and how to integrate it with Apache. Additionally, you will get involved with more advanced concepts like Load Balancing, SSL configuration and Websockets proxying. Check it out here!
1. Introduction
Nginx (pronunced “_engine x_”) is – in few words- a small, powerful, and scalable web/proxy server. According to a recent survh2ey performed by Netcraft, Nginx powers more than 15% of the web, equating to 111,680,078 sites [1], including giants like Netflix and WordPress.com.
Nginx is available under the Simplified BSD License, an open source license, and can be installed either from online repositories or from sources. In this article we will cover the installation of Nginx in Debian, Ubuntu, and CentOS using both methods. It is important to note that the repositories are often somewhat out-of-date. If we want the latest features and bugfixes, it’s recommended to build from source or use packages directly from nginx.org.
2. Installation of Nginx in Debian Wheezy 7.2 using online repositories
Using aptitude, the high-level interface to the Debian GNU/Linux package manager, we can check the list of packages related to Nginx (see Fig. 1). However, it is advisable to run the command aptitude update first in order to see an updated list of available packages.

Figure 1
(By the way, the letter “p” in the first column indicates that no trace of the package currently exists on the system).
If we can’t decide which package to install, aptitude search -followed by a package name such as aptitude search nginx– is our friend and will help us to make up our minds as to which one is right for us. Based on the description of each package listed above, we will proceed with the installation of nginx-full (see Fig. 2). It is important to note that the description of each package lists the additional modules that are available by default through the installation using repositories, but we’ll cross that bridge when we get there – later in this tutorial.

Figure 2: Installation of nginx-full in Debian Wheezy 7.2 using repositories
At this point, Nginx has been installed but it is not running yet. We will set things in motion with service nginx start and then we will be able to see its start page in a web browser (see Fig. 3).

Figure 3: Nginx start page
Then the following command will show us the version of Nginx that we have just installed (see Fig. 4):

Figure 4: Nginx v1.2.1 installed from repositories
However, as of today the latest version of Nginx is 1.5.6, while version 1.2.1 is dated June 05, 2012 [2]. That goes to show that we need to install the program from sources if we want to use the latest, up-to-date version.
3. Installation of Nginx in Debian Wheezy 7.2 from sources
Please note that the following instructions represent the default way of building a package from scratch in Linux, so be advised that the regular installation procedure using ./configure, make, and make install makes it harder for you to uninstall the package later if you don’t want to use it anymore because there is no way for the system to keep track of all the files that were added / modified during the process.
In summary, you should have a valid reason (a very good one, actually!) for compiling a package using the method mentioned above. There are a couple of valid reasons why you may want to do so, though. The most common reason is to install a more recent version of a certain package in your system; another reason is to compile in order to add support for a particular feature.
If you build and install a .deb or a .rpm file, then the corresponding package manager (aptitude / apt-get or yum, respectively) will be aware of the presence of the package and it will make sure that you do not overwrite the files of a previously installed package. On the other hand, the make install command will overwrite anything that gets in its way. We will discuss later the other options that we have when we DO have a valid reason to compile and install a package from source.
Now that we have decided that we will not settle for less than the latest version of Nginx, we need to follow these steps to download the compressed tarball from http://nginx.org/download/ and uncompress it before proceeding with the build per se.
- Download the tarball:
wgethttp://nginx.org/download/nginx-1.5.6.tar.gz - Uncompress it:
tar xvzf nginx-1.5.6.tar.gz - Go to the directory that was automatically created during the last step:
cd nginx-1.5.6
And then:
./configure(add the--helpoption if you want to list all the configuration options). The output of./configureshows the directory where Nginx will be installed (/usr/local/nginx, see Fig. 5)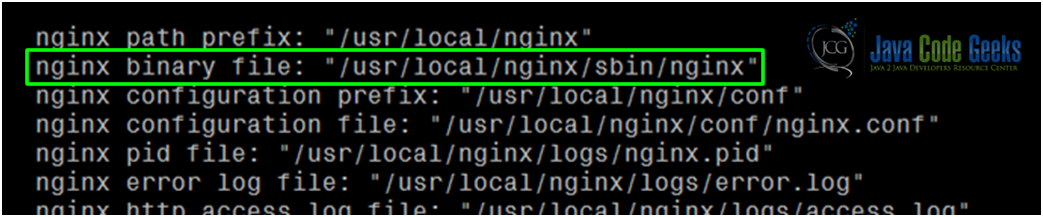
Figure 5: Nginx installation pathmakemake install

Even when the installation is complete, the directory where Nginx is located has not yet been added to the PATH environment variable (see Fig. 6)

Figure 6: The PATH variable (before)
Now let’s add the /usr/local/nginx/sbin directory to the PATH variable and let’s check the version of Nginx that we have just installed from sources (see Fig. 7).

Figure 7: The PATH variable (after) and Nginx v1.5.6 installed from sources
NOTE: During the configure process, it is possible that the system will complain about missing libraries (see Fig. 8). In that case we can either installed the packages that provide such libraries (in our case, libpcre3-dev and zlib1g-dev) or ignore them during configure.

Figure 8: Missing libraries
4. Installation of Nginx on Ubuntu 12.04 LTS
Even though the latest version of Ubuntu is 13.10 (codename Saucy Salamander, released on October 17th, 2013) we have chosen to perform the installation on Ubuntu 12.04 LTS (codename Precise Pangolin) due to the extended support provided by Canonical until April 2017.
We will proceed to update sources with sudo aptitude update and then install nginx-full from the distribution’s online repositories. The “sudo” keyword must be added as in Ubuntu the root account is disabled by default (see Fig. 9). Other than that, the installation will not differ significantly than the same procedure that we just performed in Debian. The same applies to the installation from source code.

Figure 9: Installing package nginx-full in Ubuntu from repositories
However, we can see that the available version is even more outdated in this case (see Fig. 10).

Figure 10: Nginx version installed in Ubuntu from repos
As before, we will remove (uninstall) all packages related to nginx before proceeding with the installation from source code (see Fig. 11).

Figure 11
As before, after installing Nginx from source code, we have the latest and up-to-date version of the package (see Fig. 12):

Figure 12
However, when it comes to starting Nginx –and just as what would have happened had we tried to do so in Debian- we will most likely get a nginx: unrecognized service error message (see Fig. 13).

Figure 13
This is due to the fact that we have installed the package from sources and therefore the startup script has not yet been put in place. In this case, we can either start the nginx daemon by running the main executable from the command line using its full path (/usr/local/nginx/sbin/nginx) or by writing a script that will take care of the job for us – of course this last option represents the best choice as we want to be able to use all of the usual arguments (start, stop, restart, reload, and so on). Also, we can just use one of the startup scripts provided along with this tutorial (which we can also modify to better suit our needs).
Once we have added the script in the /etc/init.d directory (and named it nginx), we need to change the DAEMON variable to point to /usr/local/nginx/sbin/nginx and include the installation directory (/usr/local/nginx/sbin) in the PATH variable (see Figs. 14a and 14b):

Figure 14a: Nginx startup script (before)

Figure 14b: Nginx startup script (after)
Then we can run the script as follows (see Fig. 15a):

Figure 15a: Nginx listening on port 80 with PID 1931
Also, we need to make sure that the nginx.conf file “knows” where to find the PID of Nginx. Uncomment the following line in nginx.conf (see Fig. 15c, most likely it will be found in /usr/local/nginx/conf) and change the path to the one that the startup script indicates (see Fig. 15b):

Figure 15b: The file /var/run/$NAME.pid (where $NAME=nginx) contains the current PID of Nginx

Figure 15c
5. Use of the checkinstall package to keep track of all the files created or modified by an installation script
The checkinstall package (see Fig. 16) keeps track of all the files created or modified during the installation process. It also creates and installs a package (.deb or .rpm) that is compatible with your package manager (see Figs. 16 and 17), which can be used later to completely remove the package if you don’t need it anymore. Check the attached man page for details on its use.

Figure 16a: Installation of the checkinstall package

Figure 16b: Creating a .deb file with checkinstall and make install (I)

Figure 16c: Creating a .deb file with checkinstall and make install (II)
When we run aptitude search nginx, the package that we just installed will appear with the comments that we added as description (see Fig. 17):

Figure 17
6. Installing Nginx in CentOS 6.4
6.1. From repositories
- Download and install nginx yum configuration file from http://nginx.org/packages/centos/6\. Make sure you select the appropriate architecture; “noarch” is a safe choice:
- Download:
wget http://nginx.org/packages/centos/6/noarch/RPMS/nginx-release-centos-6-0.el6.ngx.noarch.rpm - Install:
rpm -ivh nginx-release-centos-6-0.el6.ngx.noarch.rpm
- Download:
- Install nginx:
yum install nginx - Start nginx:
service nginx start
6.2. From sources
Follow the same procedure as for Debian and Ubuntu.
6.3. Enabling modules
According to its wiki [3], Nginx modules must be selected during compile as run-time selection of modules is not currently supported. A full summary of the compile-time options, including optional modules, can be found in the provided configure script by running ./configure --help. Unfortunately, if we have installed Nginx installed and want to add a certain module, we will have to uninstall it and the recompile it with support for the desired module.
For a list of the standard HTTP modules, refer to Table 1 [4]:
| Name | Description | Version | configure argument to disable |
|---|---|---|---|
| HTTP Core | Control ports, locations, error pages, aliases, and other essentials. | –without-http | |
| Access | Allow/deny based on IP address. | –without-http_access_module | |
| Auth Basic | Basic HTTP authentication. | –without-http_auth_basic_module | |
| Auto Index | Generates automatic directory listings. | –without-http_autoindex_module | |
| Browser | Interpret “User-Agent” string. | 0.4.3 | –without-http_browser_module |
| Charset | Recode web pages. | –without-http_charset_module | |
| Empty GIF | Serve a 1×1 image from memory. | 0.3.10 | –without-http_empty_gif_module |
| FastCGI | FastCGI Support. | –without-http_fastcgi_module | |
| Geo | Set config variables using key/value pairs of IP addresses. | 0.1.17 | –without-http_geo_module |
| Gzip | Gzip responses. | –without-http_gzip_module | |
| Headers | Set arbitrary HTTP response headers. | ||
| Index | Controls which files are to be used as index. | ||
| Limit Requests | Limit frequency of connections from a client. | 0.7.20 | –without-http_limit_req_module |
| Limit Conn | Limit concurrent connections based on a variable. | –without-http_limit_conn_module | |
| Log | Customize access logs. | ||
| Map | Set config variables using arbitrary key/value pairs. | 0.3.16 | –without-http_map_module |
| Memcached | Memcached support. | –without-http_memcached_module | |
| Proxy | Proxy to upstream servers. | –without-http_proxy_module | |
| Referer | Filter requests based on Referer header. | –without-http_referer_module | |
| Rewrite | Request rewriting using regular expressions. | –without-http_rewrite_module | |
| SCGI | SCGI protocol support. | 0.8.42 | –without-http_scgi_module |
| Split Clients | Splits clients based on some conditions | 0.8.37 | –without-http_split_clients_module |
| SSI | Server-side includes. | –without-http_ssi_module | |
| Upstream | For load-balancing. | –without-http_upstream_ip_hash_module (ip_hash directive only) | |
| User ID | Issue identifying cookies. | –without-http_userid_module | |
| uWSGI | uWSGI protocol support. | 0.8.40 | –without-http_uwsgi_module |
| X-Accel | X-Sendfile-like module. |
Table 1: Standard HTTP modules
For a list of option HTTP modules, refer to Table 2 [5]:
| Name | Description | Version | configure argument to enable |
|---|---|---|---|
| Addition | Append text to pages. | –with-http_addition_module | |
| Auth Request | Implements client authorization based on the result of a subrequest. | 1.5.4 | –with-http_auth_request_module |
| Degradation | Allow to return 204 or 444 code for some locations on low memory condition. | 0.8.25 | –with-http_degradation_module |
| Embedded Perl | Use Perl in Nginx config files. | 0.3.21 | –with-http_perl_module |
| FLV | Flash Streaming Video | 0.4.7 | –with-http_flv_module |
| GeoIP | Creates variables with information from the MaxMind GeoIP binary files. | 0.8.6, 0.7.63 | –with-http_geoip_module |
| Google Perftools | Google Performance Tools support. | 0.6.29 | –with-google_perftools_module |
| Gzip Precompression | Serves precompressed versions of static files. | 0.6.23 | –with-http_gzip_static_module |
| Gunzip | On-the-fly decompressing of gzipped responses. | 1.3.6 | –with-http_gunzip_module |
| Image Filter | Transform images with Libgd | 0.7.54 | –with-http_image_filter_module |
| MP4 | Enables mp4 streaming with seeking ability. | 1.1.3, 1.0.7 | –with-http_mp4_module |
| Random Index | Randomize directory indexes. | 0.7.15 | –with-http_random_index_module |
| Real IP | For using nginx as backend | 0.3.8 | –with-http_realip_module |
| Secure Link | Protect pages with a secret key. | 0.7.18 | –with-http_secure_link_module |
| SSL | HTTPS/SSL support. | –with-http_ssl_module | |
| Stub Status | View server statistics. | 0.1.18 | –with-http_stub_status_module |
| Substitution | Replace text in pages | –with-http_sub_module | |
| WebDAV | WebDAV pass-through support. | 0.3.38 | –with-http_dav_module |
| XSLT | Post-process pages with XSLT. | 0.7.8 | –with-http_xslt_module |
Table 2: Optional HTTP modules
For a list of mail modules, refer to Table 3 [6]:
| Name | Description | configure argument |
|---|---|---|
| Mail Core | Core parameters for mail module. | –with-mail |
| POP3 | POP3 settings. | –without-mail_pop3_module |
| IMAP | IMAP settings. | –without-mail_imap_module |
| SMTP | SMTP settings. | –without-mail_smtp_module |
| Auth HTTP | Use Nginx to authenticate mail services. | |
| Proxy | Nginx can proxy IMAP, POP3, and SMTP protocols. | |
| SSL | This module ensures SSL/TLS support for POP3/IMAP/SMTP. | –with-mail_ssl_module |
Table 3: Mail modules
As an example, we will recompile Nginx to include the Addition module (see Fig. 18):

Figure 18: Recompiling Nginx with the Addition module
7. Adding Nginx as a system service
- Debian / Ubuntu:
update-rc.d –f nginx defaults(usesudoon Ubuntu)
Note: If any files /etc/rcrunlevel.d/[SK]??name already exist then update-rc.d does nothing. The program was written this way so that it will never change an existing configuration, which may have been customized by the system administrator. The program will only install links if none are present, i.e., if it appears that the service has never been installed before [7].
- CentOS: chkconfig nginx on

Gabriel Canepa is a Linux Foundation Certified System Administrator (LFCS-1500-0576-0100) and web developer from Villa Mercedes, San Luis, Argentina. He works for a worldwide leading consumer product company and takes great pleasure in using FOSS tools to increase productivity in all areas of his daily work. When he's not typing commands or writing code or articles, he enjoys telling bedtime stories with his wife to his two little daughters and playing with them, the great pleasure of his life.