restore point (original) (raw)
What is restore point?
A system restore point is a backup copy of important Windows operating system (OS) files and settings that can be used to recover the system to an earlier point of time in the event of system failure or instability. It is a part of Windows XP, Vista, 7, 8, 10, 11 and Windows Server. They are created automatically or manually. System restore points only affect OS and application files, but not user data.
How do system restore points work?
The Windows system restore utility is responsible for making and using restore points. In old versions, Windows XP and Server 2003, the restore points were saved by the utility. Since Windows Vista, system restore points are made using the Microsoft Volume Shadow Copy Service (Microsoft VSS).
System restore points are designed to help the user recover the OS in the event an update, driver or application damages the OS. This way, copies of the files needed for operation are available and can be used to restore from. A system restore point can be called the last known good configuration.
The amount of hard drive space used by system restore points varies from 1% to 15%, depending on the size of the drive. If the reserved space for system restore points fills up, it will delete old copies to make space for new ones. System restore points also only store changed files -- also known as the difference -- and therefore use less storage than a full copy.
System restore is different than Windows Reset this PC or go back to the previous version of Windows.

What a restore point saves and recovers
A system restore point is primarily used for OS files and settings. It saves Windows system files and drivers. This will help in the event of a bad Windows update or system corruption. It also saves executable application data. This can be used in the event a program affects system performance or stability. The system registry and configurations are also saved.
The Windows Security Account Manager (SAM) and passwords are not backed up in restore points. Saved passwords may not be available after a system restore. This also means that a corporate domain-joined computer may lose its association to the domain after a restore and will need to be rejoined to the domain.
A system restore point is not a full backup. It does not affect user data or files. This means that a system restore point can be safely used by a user. A system restore will not delete personal files such as documents, pictures, music or videos. Be careful, though; because these files are not affected by a system restore, it cannot be used to recover these types of files if they are accidentally deleted. The Volume Shadow Copy may have copies of user files separate from system restore points though.
A system restore point is also only a local copy of the data. If the computer hardware is damaged a system restore cannot be used. It also cannot be used to transfer data from an old computer to a new one. A Windows system image may be used to create a full backup.

When system restore points are made and how to make a manual restore point
Windows will automatically make a restore point before doing most changes. This allows the system to easily rollback the change if something goes wrong. An automatic restore point is made before a Windows update is installed, an unsigned driver is installed, or a program is installed from an MSI. A restore point is also made every seven days if no other automatic restore point has been otherwise made.
Creating a manual system restore point is easy. In Windows 10 and Windows 11:
- Open the Settings app and go to the System
- From the system page open the About tab, then go to the right side under Related Settings.
- Click Advanced System Settings. This opens the System Properties window.
- From there, go to the System Protection This has all the system restore settings.
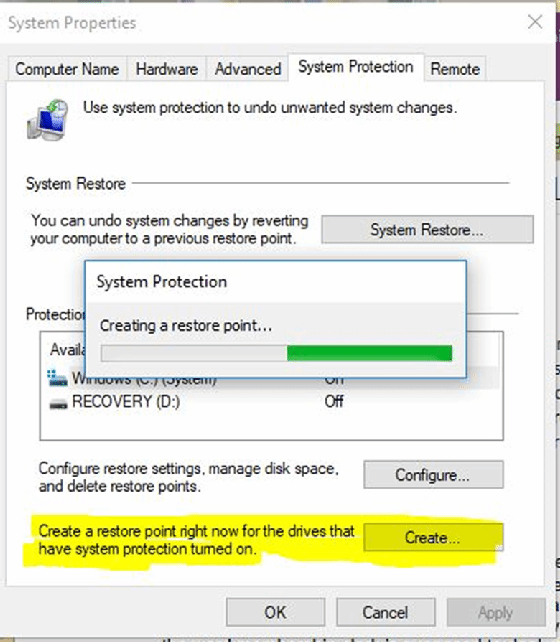
- To create a manual system restore point click the button labeled Create… and then give it a name that will help identify what the point is for.
- Then click Create.

Choose a restore point in the System Protection tab in System Properties.
How to recover with a system restore point
To manually go back to a previous system restore point is simple.
In Windows 10:
- Open the Settings app and go to the System
- From the system page open the About tab and then go to the right side under Related Settings.
- Click Advanced System Settings. This opens the System Properties window.
- From there, go to the System Protection
- Click the button labeled System Restore… A window will open with the option to use the most recent automatic restore point or to select a different point.
- Click Next and then Finish to start the restore.

Advanced troubleshooting -- accessible manually on restart by holding down the shift key -- includes a Reset this PC button. This enables users to click a System Restore button to launch the System Properties window/System Protection tab to revert a system to previous restore point (see above image).
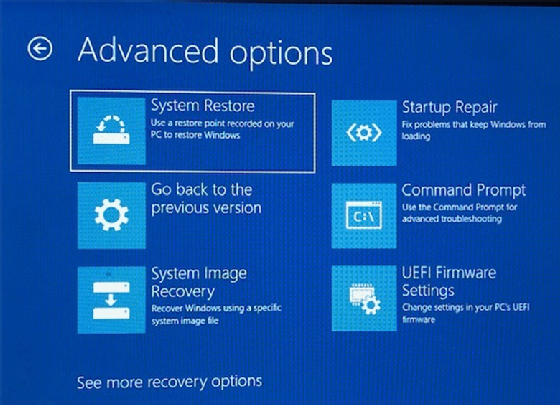
If something is wrong with Windows, so that it cannot start properly, it will boot into a system recovery program. This has several options that can help to recover the PC, one of which is system restore:
- Go to the Troubleshoot menu and select Advanced
- Select System Restore and the restore window will open.
- From there follow the prompts to select a restore point and rollback to a previous configuration.
Learn how PowerShell handles Windows 10 restore points and how and when to perform a Windows Registry cleanup.
This was last updated in November 2021
Continue Reading About restore point
- How to repair Windows Server using Windows SFC and DISM
- How to access Windows 10 troubleshooting tools step by step
- How to solve four common Windows 10 problems
- Windows 10 vs. Windows 11 requirements force PC upgrades
- Windows 11 vs. Windows 10: What are the differences?
 How do you back up the Windows 11 registry before editing it?
  By: Brien Posey
  How to configure shadow copies on file servers
  By: Damon Garn
  data restore
  By: Kinza Yasar
  System Restore (Windows)
  By: Rahul Awati