Introduction to Tensors (original) (raw)
TensorFlow basics
Keras
Build with Core
TensorFlow in depth
Customization
Data input pipelines
Import and export
Accelerators
Performance
Model Garden
Estimators
Appendix
Introduction to Tensors
Stay organized with collections Save and categorize content based on your preferences.
import tensorflow as tf
import numpy as np
2024-08-15 03:05:18.327501: E external/local_xla/xla/stream_executor/cuda/cuda_fft.cc:485] Unable to register cuFFT factory: Attempting to register factory for plugin cuFFT when one has already been registered 2024-08-15 03:05:18.348450: E external/local_xla/xla/stream_executor/cuda/cuda_dnn.cc:8454] Unable to register cuDNN factory: Attempting to register factory for plugin cuDNN when one has already been registered 2024-08-15 03:05:18.354825: E external/local_xla/xla/stream_executor/cuda/cuda_blas.cc:1452] Unable to register cuBLAS factory: Attempting to register factory for plugin cuBLAS when one has already been registered
Tensors are multi-dimensional arrays with a uniform type (called a dtype). You can see all supported dtypes at tf.dtypes.
If you're familiar with NumPy, tensors are (kind of) like np.arrays.
All tensors are immutable like Python numbers and strings: you can never update the contents of a tensor, only create a new one.
Basics
First, create some basic tensors.
Here is a "scalar" or "rank-0" tensor . A scalar contains a single value, and no "axes".
# This will be an int32 tensor by default; see "dtypes" below.
rank_0_tensor = tf.constant(4)
print(rank_0_tensor)
tf.Tensor(4, shape=(), dtype=int32) WARNING: All log messages before absl::InitializeLog() is called are written to STDERR I0000 00:00:1723691120.932442 176945 cuda_executor.cc:1015] successful NUMA node read from SysFS had negative value (-1), but there must be at least one NUMA node, so returning NUMA node zero. See more at https://github.com/torvalds/linux/blob/v6.0/Documentation/ABI/testing/sysfs-bus-pci#L344-L355 I0000 00:00:1723691120.936343 176945 cuda_executor.cc:1015] successful NUMA node read from SysFS had negative value (-1), but there must be at least one NUMA node, so returning NUMA node zero. See more at https://github.com/torvalds/linux/blob/v6.0/Documentation/ABI/testing/sysfs-bus-pci#L344-L355 I0000 00:00:1723691120.940040 176945 cuda_executor.cc:1015] successful NUMA node read from SysFS had negative value (-1), but there must be at least one NUMA node, so returning NUMA node zero. See more at https://github.com/torvalds/linux/blob/v6.0/Documentation/ABI/testing/sysfs-bus-pci#L344-L355 I0000 00:00:1723691120.943264 176945 cuda_executor.cc:1015] successful NUMA node read from SysFS had negative value (-1), but there must be at least one NUMA node, so returning NUMA node zero. See more at https://github.com/torvalds/linux/blob/v6.0/Documentation/ABI/testing/sysfs-bus-pci#L344-L355 I0000 00:00:1723691120.954872 176945 cuda_executor.cc:1015] successful NUMA node read from SysFS had negative value (-1), but there must be at least one NUMA node, so returning NUMA node zero. See more at https://github.com/torvalds/linux/blob/v6.0/Documentation/ABI/testing/sysfs-bus-pci#L344-L355 I0000 00:00:1723691120.958376 176945 cuda_executor.cc:1015] successful NUMA node read from SysFS had negative value (-1), but there must be at least one NUMA node, so returning NUMA node zero. See more at https://github.com/torvalds/linux/blob/v6.0/Documentation/ABI/testing/sysfs-bus-pci#L344-L355 I0000 00:00:1723691120.961894 176945 cuda_executor.cc:1015] successful NUMA node read from SysFS had negative value (-1), but there must be at least one NUMA node, so returning NUMA node zero. See more at https://github.com/torvalds/linux/blob/v6.0/Documentation/ABI/testing/sysfs-bus-pci#L344-L355 I0000 00:00:1723691120.964843 176945 cuda_executor.cc:1015] successful NUMA node read from SysFS had negative value (-1), but there must be at least one NUMA node, so returning NUMA node zero. See more at https://github.com/torvalds/linux/blob/v6.0/Documentation/ABI/testing/sysfs-bus-pci#L344-L355 I0000 00:00:1723691120.967730 176945 cuda_executor.cc:1015] successful NUMA node read from SysFS had negative value (-1), but there must be at least one NUMA node, so returning NUMA node zero. See more at https://github.com/torvalds/linux/blob/v6.0/Documentation/ABI/testing/sysfs-bus-pci#L344-L355 I0000 00:00:1723691120.971300 176945 cuda_executor.cc:1015] successful NUMA node read from SysFS had negative value (-1), but there must be at least one NUMA node, so returning NUMA node zero. See more at https://github.com/torvalds/linux/blob/v6.0/Documentation/ABI/testing/sysfs-bus-pci#L344-L355 I0000 00:00:1723691120.974711 176945 cuda_executor.cc:1015] successful NUMA node read from SysFS had negative value (-1), but there must be at least one NUMA node, so returning NUMA node zero. See more at https://github.com/torvalds/linux/blob/v6.0/Documentation/ABI/testing/sysfs-bus-pci#L344-L355 I0000 00:00:1723691120.977717 176945 cuda_executor.cc:1015] successful NUMA node read from SysFS had negative value (-1), but there must be at least one NUMA node, so returning NUMA node zero. See more at https://github.com/torvalds/linux/blob/v6.0/Documentation/ABI/testing/sysfs-bus-pci#L344-L355 I0000 00:00:1723691122.208679 176945 cuda_executor.cc:1015] successful NUMA node read from SysFS had negative value (-1), but there must be at least one NUMA node, so returning NUMA node zero. See more at https://github.com/torvalds/linux/blob/v6.0/Documentation/ABI/testing/sysfs-bus-pci#L344-L355 I0000 00:00:1723691122.210786 176945 cuda_executor.cc:1015] successful NUMA node read from SysFS had negative value (-1), but there must be at least one NUMA node, so returning NUMA node zero. See more at https://github.com/torvalds/linux/blob/v6.0/Documentation/ABI/testing/sysfs-bus-pci#L344-L355 I0000 00:00:1723691122.212791 176945 cuda_executor.cc:1015] successful NUMA node read from SysFS had negative value (-1), but there must be at least one NUMA node, so returning NUMA node zero. See more at https://github.com/torvalds/linux/blob/v6.0/Documentation/ABI/testing/sysfs-bus-pci#L344-L355 I0000 00:00:1723691122.214776 176945 cuda_executor.cc:1015] successful NUMA node read from SysFS had negative value (-1), but there must be at least one NUMA node, so returning NUMA node zero. See more at https://github.com/torvalds/linux/blob/v6.0/Documentation/ABI/testing/sysfs-bus-pci#L344-L355 I0000 00:00:1723691122.216798 176945 cuda_executor.cc:1015] successful NUMA node read from SysFS had negative value (-1), but there must be at least one NUMA node, so returning NUMA node zero. See more at https://github.com/torvalds/linux/blob/v6.0/Documentation/ABI/testing/sysfs-bus-pci#L344-L355 I0000 00:00:1723691122.218734 176945 cuda_executor.cc:1015] successful NUMA node read from SysFS had negative value (-1), but there must be at least one NUMA node, so returning NUMA node zero. See more at https://github.com/torvalds/linux/blob/v6.0/Documentation/ABI/testing/sysfs-bus-pci#L344-L355 I0000 00:00:1723691122.220650 176945 cuda_executor.cc:1015] successful NUMA node read from SysFS had negative value (-1), but there must be at least one NUMA node, so returning NUMA node zero. See more at https://github.com/torvalds/linux/blob/v6.0/Documentation/ABI/testing/sysfs-bus-pci#L344-L355 I0000 00:00:1723691122.222554 176945 cuda_executor.cc:1015] successful NUMA node read from SysFS had negative value (-1), but there must be at least one NUMA node, so returning NUMA node zero. See more at https://github.com/torvalds/linux/blob/v6.0/Documentation/ABI/testing/sysfs-bus-pci#L344-L355 I0000 00:00:1723691122.224486 176945 cuda_executor.cc:1015] successful NUMA node read from SysFS had negative value (-1), but there must be at least one NUMA node, so returning NUMA node zero. See more at https://github.com/torvalds/linux/blob/v6.0/Documentation/ABI/testing/sysfs-bus-pci#L344-L355 I0000 00:00:1723691122.226429 176945 cuda_executor.cc:1015] successful NUMA node read from SysFS had negative value (-1), but there must be at least one NUMA node, so returning NUMA node zero. See more at https://github.com/torvalds/linux/blob/v6.0/Documentation/ABI/testing/sysfs-bus-pci#L344-L355 I0000 00:00:1723691122.228329 176945 cuda_executor.cc:1015] successful NUMA node read from SysFS had negative value (-1), but there must be at least one NUMA node, so returning NUMA node zero. See more at https://github.com/torvalds/linux/blob/v6.0/Documentation/ABI/testing/sysfs-bus-pci#L344-L355 I0000 00:00:1723691122.230251 176945 cuda_executor.cc:1015] successful NUMA node read from SysFS had negative value (-1), but there must be at least one NUMA node, so returning NUMA node zero. See more at https://github.com/torvalds/linux/blob/v6.0/Documentation/ABI/testing/sysfs-bus-pci#L344-L355 I0000 00:00:1723691122.269036 176945 cuda_executor.cc:1015] successful NUMA node read from SysFS had negative value (-1), but there must be at least one NUMA node, so returning NUMA node zero. See more at https://github.com/torvalds/linux/blob/v6.0/Documentation/ABI/testing/sysfs-bus-pci#L344-L355 I0000 00:00:1723691122.271069 176945 cuda_executor.cc:1015] successful NUMA node read from SysFS had negative value (-1), but there must be at least one NUMA node, so returning NUMA node zero. See more at https://github.com/torvalds/linux/blob/v6.0/Documentation/ABI/testing/sysfs-bus-pci#L344-L355 I0000 00:00:1723691122.273006 176945 cuda_executor.cc:1015] successful NUMA node read from SysFS had negative value (-1), but there must be at least one NUMA node, so returning NUMA node zero. See more at https://github.com/torvalds/linux/blob/v6.0/Documentation/ABI/testing/sysfs-bus-pci#L344-L355 I0000 00:00:1723691122.274956 176945 cuda_executor.cc:1015] successful NUMA node read from SysFS had negative value (-1), but there must be at least one NUMA node, so returning NUMA node zero. See more at https://github.com/torvalds/linux/blob/v6.0/Documentation/ABI/testing/sysfs-bus-pci#L344-L355 I0000 00:00:1723691122.276917 176945 cuda_executor.cc:1015] successful NUMA node read from SysFS had negative value (-1), but there must be at least one NUMA node, so returning NUMA node zero. See more at https://github.com/torvalds/linux/blob/v6.0/Documentation/ABI/testing/sysfs-bus-pci#L344-L355 I0000 00:00:1723691122.278854 176945 cuda_executor.cc:1015] successful NUMA node read from SysFS had negative value (-1), but there must be at least one NUMA node, so returning NUMA node zero. See more at https://github.com/torvalds/linux/blob/v6.0/Documentation/ABI/testing/sysfs-bus-pci#L344-L355 I0000 00:00:1723691122.280754 176945 cuda_executor.cc:1015] successful NUMA node read from SysFS had negative value (-1), but there must be at least one NUMA node, so returning NUMA node zero. See more at https://github.com/torvalds/linux/blob/v6.0/Documentation/ABI/testing/sysfs-bus-pci#L344-L355 I0000 00:00:1723691122.282664 176945 cuda_executor.cc:1015] successful NUMA node read from SysFS had negative value (-1), but there must be at least one NUMA node, so returning NUMA node zero. See more at https://github.com/torvalds/linux/blob/v6.0/Documentation/ABI/testing/sysfs-bus-pci#L344-L355 I0000 00:00:1723691122.284613 176945 cuda_executor.cc:1015] successful NUMA node read from SysFS had negative value (-1), but there must be at least one NUMA node, so returning NUMA node zero. See more at https://github.com/torvalds/linux/blob/v6.0/Documentation/ABI/testing/sysfs-bus-pci#L344-L355 I0000 00:00:1723691122.287058 176945 cuda_executor.cc:1015] successful NUMA node read from SysFS had negative value (-1), but there must be at least one NUMA node, so returning NUMA node zero. See more at https://github.com/torvalds/linux/blob/v6.0/Documentation/ABI/testing/sysfs-bus-pci#L344-L355 I0000 00:00:1723691122.289508 176945 cuda_executor.cc:1015] successful NUMA node read from SysFS had negative value (-1), but there must be at least one NUMA node, so returning NUMA node zero. See more at https://github.com/torvalds/linux/blob/v6.0/Documentation/ABI/testing/sysfs-bus-pci#L344-L355 I0000 00:00:1723691122.291891 176945 cuda_executor.cc:1015] successful NUMA node read from SysFS had negative value (-1), but there must be at least one NUMA node, so returning NUMA node zero. See more at https://github.com/torvalds/linux/blob/v6.0/Documentation/ABI/testing/sysfs-bus-pci#L344-L355
A "vector" or "rank-1" tensor is like a list of values. A vector has one axis:
# Let's make this a float tensor.
rank_1_tensor = tf.constant([2.0, 3.0, 4.0])
print(rank_1_tensor)
tf.Tensor([2. 3. 4.], shape=(3,), dtype=float32)
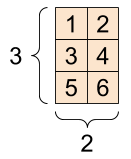
A "matrix" or "rank-2" tensor has two axes:
# If you want to be specific, you can set the dtype (see below) at creation time
rank_2_tensor = tf.constant([[1, 2],
                             [3, 4],
                             [5, 6]], dtype=tf.float16)
print(rank_2_tensor)
tf.Tensor( [[1. 2.] [3. 4.] [5. 6.]], shape=(3, 2), dtype=float16)
| A scalar, shape: [] | A vector, shape: [3] | A matrix, shape: [3, 2] |
|---|---|---|
 |
 |
 |
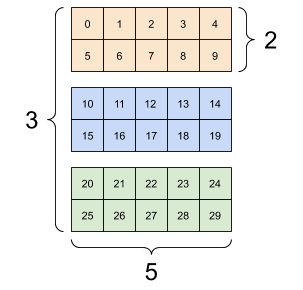
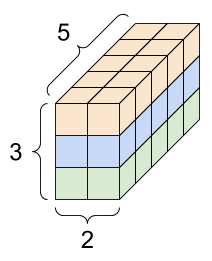
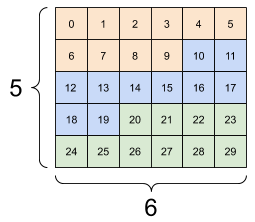
Tensors may have more axes; here is a tensor with three axes:
# There can be an arbitrary number of
# axes (sometimes called "dimensions")
rank_3_tensor = tf.constant([
  [[0, 1, 2, 3, 4],
   [5, 6, 7, 8, 9]],
  [[10, 11, 12, 13, 14],
   [15, 16, 17, 18, 19]],
  [[20, 21, 22, 23, 24],
   [25, 26, 27, 28, 29]],])

print(rank_3_tensor)
tf.Tensor( [[[ 0 1 2 3 4] [ 5 6 7 8 9]]
[[10 11 12 13 14] [15 16 17 18 19]]
[[20 21 22 23 24] [25 26 27 28 29]]], shape=(3, 2, 5), dtype=int32)
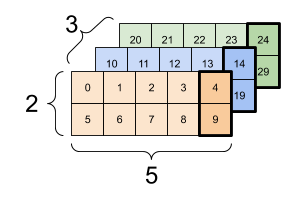
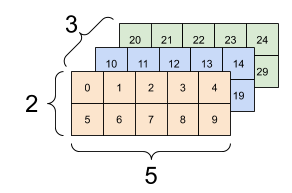
There are many ways you might visualize a tensor with more than two axes.
| A 3-axis tensor, shape: [3, 2, 5] | ||
|---|---|---|
 |
 |
 |
You can convert a tensor to a NumPy array either using np.array or the tensor.numpy method:
np.array(rank_2_tensor)
array([[1., 2.], [3., 4.], [5., 6.]], dtype=float16)
rank_2_tensor.numpy()
array([[1., 2.], [3., 4.], [5., 6.]], dtype=float16)
Tensors often contain floats and ints, but have many other types, including:
- complex numbers
- strings
The base tf.Tensor class requires tensors to be "rectangular"---that is, along each axis, every element is the same size. However, there are specialized types of tensors that can handle different shapes:
- Ragged tensors (see RaggedTensor below)
- Sparse tensors (see SparseTensor below)
You can do basic math on tensors, including addition, element-wise multiplication, and matrix multiplication.
a = tf.constant([[1, 2],
                 [3, 4]])
b = tf.constant([[1, 1],
                 [1, 1]]) # Could have also said `tf.ones([2,2], dtype=tf.int32)`

print(tf.add(a, b), "\n")
print(tf.multiply(a, b), "\n")
print(tf.matmul(a, b), "\n")
tf.Tensor( [[2 3] [4 5]], shape=(2, 2), dtype=int32)
tf.Tensor( [[1 2] [3 4]], shape=(2, 2), dtype=int32)
tf.Tensor( [[3 3] [7 7]], shape=(2, 2), dtype=int32)
print(a + b, "\n") # element-wise addition
print(a * b, "\n") # element-wise multiplication
print(a @ b, "\n") # matrix multiplication
tf.Tensor( [[2 3] [4 5]], shape=(2, 2), dtype=int32)
tf.Tensor( [[1 2] [3 4]], shape=(2, 2), dtype=int32)
tf.Tensor( [[3 3] [7 7]], shape=(2, 2), dtype=int32)
Tensors are used in all kinds of operations (or "Ops").
c = tf.constant([[4.0, 5.0], [10.0, 1.0]])

# Find the largest value
print(tf.reduce_max(c))
# Find the index of the largest value
print(tf.math.argmax(c))
# Compute the softmax
print(tf.nn.softmax(c))
tf.Tensor(10.0, shape=(), dtype=float32) tf.Tensor([1 0], shape=(2,), dtype=int64) tf.Tensor( [[2.6894143e-01 7.3105854e-01] [9.9987662e-01 1.2339458e-04]], shape=(2, 2), dtype=float32)
tf.convert_to_tensor([1,2,3])
<tf.Tensor: shape=(3,), dtype=int32, numpy=array([1, 2, 3], dtype=int32)>
tf.reduce_max([1,2,3])
<tf.Tensor: shape=(), dtype=int32, numpy=3>
tf.reduce_max(np.array([1,2,3]))
<tf.Tensor: shape=(), dtype=int64, numpy=3>
About shapes
Tensors have shapes. Some vocabulary:
- Shape: The length (number of elements) of each of the axes of a tensor.
- Rank: Number of tensor axes. A scalar has rank 0, a vector has rank 1, a matrix is rank 2.
- Axis or Dimension: A particular dimension of a tensor.
- Size: The total number of items in the tensor, the product of the shape vector's elements.
Tensors and tf.TensorShape objects have convenient properties for accessing these:
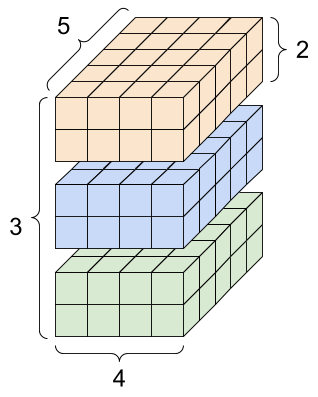
rank_4_tensor = tf.zeros([3, 2, 4, 5])
| A rank-4 tensor, shape: [3, 2, 4, 5] | |
|---|---|
 |
 |
print("Type of every element:", rank_4_tensor.dtype)
print("Number of axes:", rank_4_tensor.ndim)
print("Shape of tensor:", rank_4_tensor.shape)
print("Elements along axis 0 of tensor:", rank_4_tensor.shape[0])
print("Elements along the last axis of tensor:", rank_4_tensor.shape[-1])
print("Total number of elements (3*2*4*5): ", tf.size(rank_4_tensor).numpy())
Type of every element: <dtype: 'float32'> Number of axes: 4 Shape of tensor: (3, 2, 4, 5) Elements along axis 0 of tensor: 3 Elements along the last axis of tensor: 5 Total number of elements (324*5): 120
But note that the Tensor.ndim and Tensor.shape attributes don't return Tensor objects. If you need a Tensor use the tf.rank or tf.shape function. This difference is subtle, but it can be important when building graphs (later).
tf.rank(rank_4_tensor)
<tf.Tensor: shape=(), dtype=int32, numpy=4>
tf.shape(rank_4_tensor)
<tf.Tensor: shape=(4,), dtype=int32, numpy=array([3, 2, 4, 5], dtype=int32)>
While axes are often referred to by their indices, you should always keep track of the meaning of each. Often axes are ordered from global to local: The batch axis first, followed by spatial dimensions, and features for each location last. This way feature vectors are contiguous regions of memory.
| Typical axis order |
|---|
 |
Indexing
Single-axis indexing
TensorFlow follows standard Python indexing rules, similar to indexing a list or a string in Python, and the basic rules for NumPy indexing.
- indexes start at
0 - negative indices count backwards from the end
- colons,
:, are used for slices:start:stop:step
rank_1_tensor = tf.constant([0, 1, 1, 2, 3, 5, 8, 13, 21, 34])
print(rank_1_tensor.numpy())
[ 0 1 1 2 3 5 8 13 21 34]
Indexing with a scalar removes the axis:
print("First:", rank_1_tensor[0].numpy())
print("Second:", rank_1_tensor[1].numpy())
print("Last:", rank_1_tensor[-1].numpy())
First: 0 Second: 1 Last: 34
Indexing with a : slice keeps the axis:
print("Everything:", rank_1_tensor[:].numpy())
print("Before 4:", rank_1_tensor[:4].numpy())
print("From 4 to the end:", rank_1_tensor[4:].numpy())
print("From 2, before 7:", rank_1_tensor[2:7].numpy())
print("Every other item:", rank_1_tensor[::2].numpy())
print("Reversed:", rank_1_tensor[::-1].numpy())
Everything: [ 0 1 1 2 3 5 8 13 21 34] Before 4: [0 1 1 2] From 4 to the end: [ 3 5 8 13 21 34] From 2, before 7: [1 2 3 5 8] Every other item: [ 0 1 3 8 21] Reversed: [34 21 13 8 5 3 2 1 1 0]
Multi-axis indexing
Higher rank tensors are indexed by passing multiple indices.
The exact same rules as in the single-axis case apply to each axis independently.
print(rank_2_tensor.numpy())
[[1. 2.] [3. 4.] [5. 6.]]
Passing an integer for each index, the result is a scalar.
# Pull out a single value from a 2-rank tensor
print(rank_2_tensor[1, 1].numpy())
4.0
You can index using any combination of integers and slices:
# Get row and column tensors
print("Second row:", rank_2_tensor[1, :].numpy())
print("Second column:", rank_2_tensor[:, 1].numpy())
print("Last row:", rank_2_tensor[-1, :].numpy())
print("First item in last column:", rank_2_tensor[0, -1].numpy())
print("Skip the first row:")
print(rank_2_tensor[1:, :].numpy(), "\n")
Second row: [3. 4.] Second column: [2. 4. 6.] Last row: [5. 6.] First item in last column: 2.0 Skip the first row: [[3. 4.] [5. 6.]]
Here is an example with a 3-axis tensor:
print(rank_3_tensor[:, :, 4])
tf.Tensor( [[ 4 9] [14 19] [24 29]], shape=(3, 2), dtype=int32)
| Selecting the last feature across all locations in each example in the batch | |
|---|---|
 |
 |
Read the tensor slicing guide to learn how you can apply indexing to manipulate individual elements in your tensors.
Manipulating Shapes
Reshaping a tensor is of great utility.
# Shape returns a `TensorShape` object that shows the size along each axis
x = tf.constant([[1], [2], [3]])
print(x.shape)
(3, 1)
# You can convert this object into a Python list, too
print(x.shape.as_list())
[3, 1]
You can reshape a tensor into a new shape. The tf.reshape operation is fast and cheap as the underlying data does not need to be duplicated.
# You can reshape a tensor to a new shape.
# Note that you're passing in a list
reshaped = tf.reshape(x, [1, 3])
print(x.shape)
print(reshaped.shape)
(3, 1) (1, 3)
The data maintains its layout in memory and a new tensor is created, with the requested shape, pointing to the same data. TensorFlow uses C-style "row-major" memory ordering, where incrementing the rightmost index corresponds to a single step in memory.
print(rank_3_tensor)
tf.Tensor( [[[ 0 1 2 3 4] [ 5 6 7 8 9]]
[[10 11 12 13 14] [15 16 17 18 19]]
[[20 21 22 23 24] [25 26 27 28 29]]], shape=(3, 2, 5), dtype=int32)
If you flatten a tensor you can see what order it is laid out in memory.
# A `-1` passed in the `shape` argument says "Whatever fits".
print(tf.reshape(rank_3_tensor, [-1]))
tf.Tensor( [ 0 1 2 3 4 5 6 7 8 9 10 11 12 13 14 15 16 17 18 19 20 21 22 23 24 25 26 27 28 29], shape=(30,), dtype=int32)
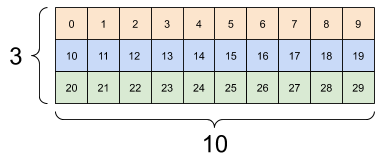
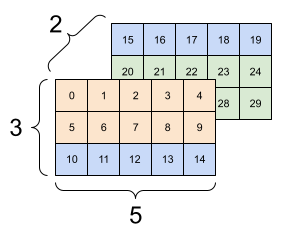
Typically the only reasonable use of tf.reshape is to combine or split adjacent axes (or add/remove 1s).
For this 3x2x5 tensor, reshaping to (3x2)x5 or 3x(2x5) are both reasonable things to do, as the slices do not mix:
print(tf.reshape(rank_3_tensor, [3*2, 5]), "\n")
print(tf.reshape(rank_3_tensor, [3, -1]))
tf.Tensor( [[ 0 1 2 3 4] [ 5 6 7 8 9] [10 11 12 13 14] [15 16 17 18 19] [20 21 22 23 24] [25 26 27 28 29]], shape=(6, 5), dtype=int32)
tf.Tensor( [[ 0 1 2 3 4 5 6 7 8 9] [10 11 12 13 14 15 16 17 18 19] [20 21 22 23 24 25 26 27 28 29]], shape=(3, 10), dtype=int32)
| Some good reshapes. | ||
|---|---|---|
 |
 |
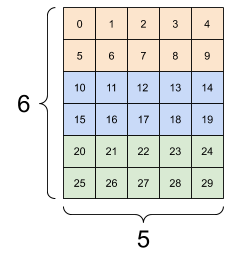 |
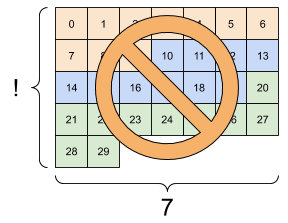
Reshaping will "work" for any new shape with the same total number of elements, but it will not do anything useful if you do not respect the order of the axes.
Swapping axes in tf.reshape does not work; you need tf.transpose for that.
# Bad examples: don't do this

# You can't reorder axes with reshape.
print(tf.reshape(rank_3_tensor, [2, 3, 5]), "\n")

# This is a mess
print(tf.reshape(rank_3_tensor, [5, 6]), "\n")

# This doesn't work at all
try:
  tf.reshape(rank_3_tensor, [7, -1])
except Exception as e:
  print(f"{type(e).__name__}: {e}")
tf.Tensor( [[[ 0 1 2 3 4] [ 5 6 7 8 9] [10 11 12 13 14]]
[[15 16 17 18 19] [20 21 22 23 24] [25 26 27 28 29]]], shape=(2, 3, 5), dtype=int32)
tf.Tensor( [[ 0 1 2 3 4 5] [ 6 7 8 9 10 11] [12 13 14 15 16 17] [18 19 20 21 22 23] [24 25 26 27 28 29]], shape=(5, 6), dtype=int32)
InvalidArgumentError: { {function_node _wrapped__Reshape_device/job:localhost/replica:0/task:0/device:GPU:0} } Input to reshape is a tensor with 30 values, but the requested shape requires a multiple of 7 [Op:Reshape]
| Some bad reshapes. | ||
|---|---|---|
 |
 |
 |
You may run across not-fully-specified shapes. Either the shape contains a None (an axis-length is unknown) or the whole shape is None (the rank of the tensor is unknown).
Except for tf.RaggedTensor, such shapes will only occur in the context of TensorFlow's symbolic, graph-building APIs:
More on DTypes
To inspect a tf.Tensor's data type use the Tensor.dtype property.
When creating a tf.Tensor from a Python object you may optionally specify the datatype.
If you don't, TensorFlow chooses a datatype that can represent your data. TensorFlow converts Python integers to tf.int32 and Python floating point numbers to tf.float32. Otherwise TensorFlow uses the same rules NumPy uses when converting to arrays.
You can cast from type to type.
the_f64_tensor = tf.constant([2.2, 3.3, 4.4], dtype=tf.float64)
the_f16_tensor = tf.cast(the_f64_tensor, dtype=tf.float16)
# Now, cast to an uint8 and lose the decimal precision
the_u8_tensor = tf.cast(the_f16_tensor, dtype=tf.uint8)
print(the_u8_tensor)
tf.Tensor([2 3 4], shape=(3,), dtype=uint8)
Broadcasting
Broadcasting is a concept borrowed from the equivalent feature in NumPy. In short, under certain conditions, smaller tensors are "stretched" automatically to fit larger tensors when running combined operations on them.
The simplest and most common case is when you attempt to multiply or add a tensor to a scalar. In that case, the scalar is broadcast to be the same shape as the other argument.
x = tf.constant([1, 2, 3])

y = tf.constant(2)
z = tf.constant([2, 2, 2])
# All of these are the same computation
print(tf.multiply(x, 2))
print(x * y)
print(x * z)
tf.Tensor([2 4 6], shape=(3,), dtype=int32) tf.Tensor([2 4 6], shape=(3,), dtype=int32) tf.Tensor([2 4 6], shape=(3,), dtype=int32)
Likewise, axes with length 1 can be stretched out to match the other arguments. Both arguments can be stretched in the same computation.
In this case a 3x1 matrix is element-wise multiplied by a 1x4 matrix to produce a 3x4 matrix. Note how the leading 1 is optional: The shape of y is [4].
# These are the same computations
x = tf.reshape(x,[3,1])
y = tf.range(1, 5)
print(x, "\n")
print(y, "\n")
print(tf.multiply(x, y))
tf.Tensor( [[1] [2] [3]], shape=(3, 1), dtype=int32)
tf.Tensor([1 2 3 4], shape=(4,), dtype=int32)
tf.Tensor( [[ 1 2 3 4] [ 2 4 6 8] [ 3 6 9 12]], shape=(3, 4), dtype=int32)
| A broadcasted add: a [3, 1] times a [1, 4] gives a [3,4] |
|---|
 |
Here is the same operation without broadcasting:
x_stretch = tf.constant([[1, 1, 1, 1],
                         [2, 2, 2, 2],
                         [3, 3, 3, 3]])

y_stretch = tf.constant([[1, 2, 3, 4],
                         [1, 2, 3, 4],
                         [1, 2, 3, 4]])

print(x_stretch * y_stretch)  # Again, operator overloading
tf.Tensor( [[ 1 2 3 4] [ 2 4 6 8] [ 3 6 9 12]], shape=(3, 4), dtype=int32)
Most of the time, broadcasting is both time and space efficient, as the broadcast operation never materializes the expanded tensors in memory.
You see what broadcasting looks like using tf.broadcast_to.
print(tf.broadcast_to(tf.constant([1, 2, 3]), [3, 3]))
tf.Tensor( [[1 2 3] [1 2 3] [1 2 3]], shape=(3, 3), dtype=int32)
Unlike a mathematical op, for example, broadcast_to does nothing special to save memory. Here, you are materializing the tensor.
It can get even more complicated. This section of Jake VanderPlas's book Python Data Science Handbook shows more broadcasting tricks (again in NumPy).
tf.convert_to_tensor
Most ops, like tf.matmul and tf.reshape take arguments of class tf.Tensor. However, you'll notice in the above case, Python objects shaped like tensors are accepted.
Most, but not all, ops call convert_to_tensor on non-tensor arguments. There is a registry of conversions, and most object classes like NumPy's ndarray, TensorShape, Python lists, and tf.Variable will all convert automatically.
See tf.register_tensor_conversion_function for more details, and if you have your own type you'd like to automatically convert to a tensor.
Ragged Tensors
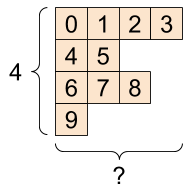
A tensor with variable numbers of elements along some axis is called "ragged". Use tf.ragged.RaggedTensor for ragged data.
For example, This cannot be represented as a regular tensor:
| A tf.RaggedTensor, shape: [4, None] |
|---|
 |
ragged_list = [
    [0, 1, 2, 3],
    [4, 5],
    [6, 7, 8],
    [9]]
try:
  tensor = tf.constant(ragged_list)
except Exception as e:
  print(f"{type(e).__name__}: {e}")
ValueError: Can't convert non-rectangular Python sequence to Tensor.
Instead create a tf.RaggedTensor using tf.ragged.constant:
ragged_tensor = tf.ragged.constant(ragged_list)
print(ragged_tensor)
<tf.RaggedTensor [[0, 1, 2, 3], [4, 5], [6, 7, 8], [9]]>
The shape of a tf.RaggedTensor will contain some axes with unknown lengths:
print(ragged_tensor.shape)
(4, None)
String tensors
tf.string is a dtype, which is to say you can represent data as strings (variable-length byte arrays) in tensors.
The strings are atomic and cannot be indexed the way Python strings are. The length of the string is not one of the axes of the tensor. See tf.strings for functions to manipulate them.
Here is a scalar string tensor:
# Tensors can be strings, too here is a scalar string.
scalar_string_tensor = tf.constant("Gray wolf")
print(scalar_string_tensor)
tf.Tensor(b'Gray wolf', shape=(), dtype=string)
And a vector of strings:
| A vector of strings, shape: [3,] |
|---|
 |
# If you have three string tensors of different lengths, this is OK.
tensor_of_strings = tf.constant(["Gray wolf",
                                 "Quick brown fox",
                                 "Lazy dog"])
# Note that the shape is (3,). The string length is not included.
print(tensor_of_strings)
tf.Tensor([b'Gray wolf' b'Quick brown fox' b'Lazy dog'], shape=(3,), dtype=string)
In the above printout the b prefix indicates that tf.string dtype is not a unicode string, but a byte-string. See the Unicode Tutorial for more about working with unicode text in TensorFlow.
If you pass unicode characters they are utf-8 encoded.
tf.constant("🥳👍")
<tf.Tensor: shape=(), dtype=string, numpy=b'\xf0\x9f\xa5\xb3\xf0\x9f\x91\x8d'>
Some basic functions with strings can be found in tf.strings, including tf.strings.split.
# You can use split to split a string into a set of tensors
print(tf.strings.split(scalar_string_tensor, sep=" "))
tf.Tensor([b'Gray' b'wolf'], shape=(2,), dtype=string)
# ...but it turns into a `RaggedTensor` if you split up a tensor of strings,
# as each string might be split into a different number of parts.
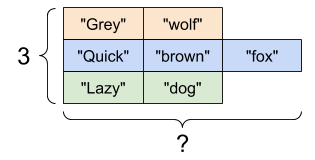
print(tf.strings.split(tensor_of_strings))
<tf.RaggedTensor [[b'Gray', b'wolf'], [b'Quick', b'brown', b'fox'], [b'Lazy', b'dog']]>
| Three strings split, shape: [3, None] |
|---|
 |
And tf.strings.to_number:
text = tf.constant("1 10 100")
print(tf.strings.to_number(tf.strings.split(text, " ")))
tf.Tensor([ 1. 10. 100.], shape=(3,), dtype=float32)
Although you can't use tf.cast to turn a string tensor into numbers, you can convert it into bytes, and then into numbers.
byte_strings = tf.strings.bytes_split(tf.constant("Duck"))
byte_ints = tf.io.decode_raw(tf.constant("Duck"), tf.uint8)
print("Byte strings:", byte_strings)
print("Bytes:", byte_ints)
Byte strings: tf.Tensor([b'D' b'u' b'c' b'k'], shape=(4,), dtype=string) Bytes: tf.Tensor([ 68 117 99 107], shape=(4,), dtype=uint8)
# Or split it up as unicode and then decode it
unicode_bytes = tf.constant("アヒル 🦆")
unicode_char_bytes = tf.strings.unicode_split(unicode_bytes, "UTF-8")
unicode_values = tf.strings.unicode_decode(unicode_bytes, "UTF-8")

print("\nUnicode bytes:", unicode_bytes)
print("\nUnicode chars:", unicode_char_bytes)
print("\nUnicode values:", unicode_values)
Unicode bytes: tf.Tensor(b'\xe3\x82\xa2\xe3\x83\x92\xe3\x83\xab \xf0\x9f\xa6\x86', shape=(), dtype=string)
Unicode chars: tf.Tensor([b'\xe3\x82\xa2' b'\xe3\x83\x92' b'\xe3\x83\xab' b' ' b'\xf0\x9f\xa6\x86'], shape=(5,), dtype=string)
Unicode values: tf.Tensor([ 12450 12498 12523 32 129414], shape=(5,), dtype=int32)
The tf.string dtype is used for all raw bytes data in TensorFlow. The tf.io module contains functions for converting data to and from bytes, including decoding images and parsing csv.
Sparse tensors
Sometimes, your data is sparse, like a very wide embedding space. TensorFlow supports tf.sparse.SparseTensor and related operations to store sparse data efficiently.
| A tf.SparseTensor, shape: [3, 4] |
|---|
 |
# Sparse tensors store values by index in a memory-efficient manner
sparse_tensor = tf.sparse.SparseTensor(indices=[[0, 0], [1, 2]],
                                       values=[1, 2],
                                       dense_shape=[3, 4])
print(sparse_tensor, "\n")

# You can convert sparse tensors to dense
print(tf.sparse.to_dense(sparse_tensor))
SparseTensor(indices=tf.Tensor( [[0 0] [1 2]], shape=(2, 2), dtype=int64), values=tf.Tensor([1 2], shape=(2,), dtype=int32), dense_shape=tf.Tensor([3 4], shape=(2,), dtype=int64))
tf.Tensor( [[1 0 0 0] [0 0 2 0] [0 0 0 0]], shape=(3, 4), dtype=int32)
Except as otherwise noted, the content of this page is licensed under the Creative Commons Attribution 4.0 License, and code samples are licensed under the Apache 2.0 License. For details, see the Google Developers Site Policies. Java is a registered trademark of Oracle and/or its affiliates.
Last updated 2024-08-15 UTC.